How to Add and Remove Widgets to iPhone 7 / 7 Plus with 3D Touch

Can you add and remove widgets with ease on your iPhone 7 or 7 Plus model? This task has become extra simple thanks to 3D Touch feature introduced by Apple on both new handsets. Since this is a quick and easy-to-repeat guide you’ll find it useful and must-have. Follow this iOS 10 widgets tutorial if you wish to improve your device.

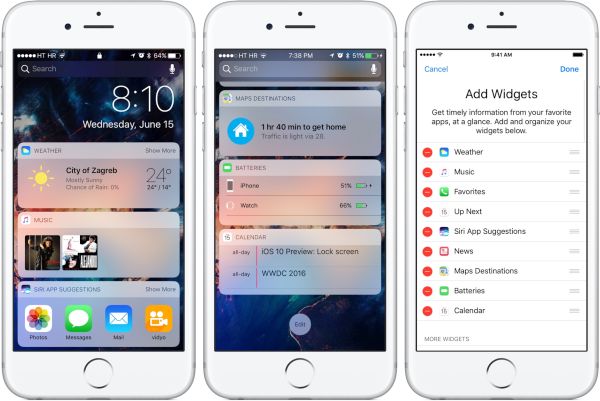
What are widgets for? They provide you a quick access to your favorite applications right from your iOS 10 Lockscreen. All you have to do is add the right widget and you’ll be able to launch it within moments directly from iPhone Lock screen. Does it sound cool to you? You can also learn how to share disappearing photos with your friends via WhatsApp tool.

Do you know that you can add widgets using 3D Touch? This is what we’ll teach you to do. You can easily add and also remove those apps you no longer need the fast access to.

How to Add and Remove Widgets on iPhone 7 iOS 10

iOS 10 Widgets Tutorial

There are a couple of things that you must check before you can enjoy the awesome features on iOS 10 phones. This particular guide will only work on several phones, including 7 and 7 Plus because these two models have the 3D Touch option required for smooth process.

You can also follow the instruction if you have iPhone 6s or 6s Plus that are updated to iOS 10. These two smartphone versions also include the 3D Touch technology.

Some applications don’t have widgets that can be added to your Lock screen. Please keep this in mind and double check if the program has a widget or not before you try to add it to your phone. Learn how to fix iOS 10 problem with messages not being sent on your ‘fruit’ devices.

How to add a widget using 3D Touch

How to Add Widgets to iPhone 7 Plus / 7

Step 1. Take your phone into your hands.

Step 2. Choose the program you need to add widgets for on your iOS 10 phone.

How to Add iOS 10 Widgets with 3D Touch

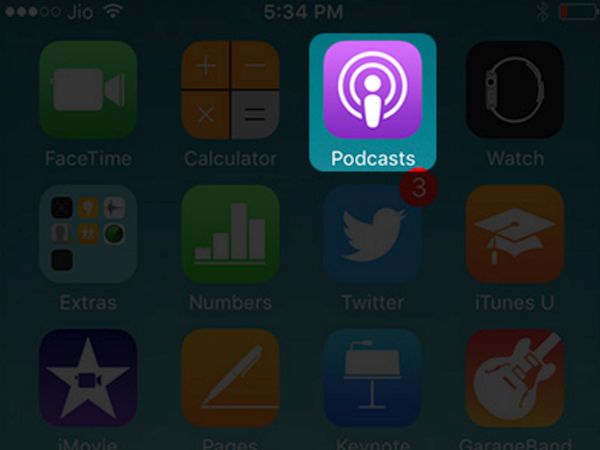
Step 3. Now you should 3D Touch on the app icon. Isn’t this simple?

Step 4. You’ll see the shortcut menu.

Add iOS 10 Widget with 3D Touch

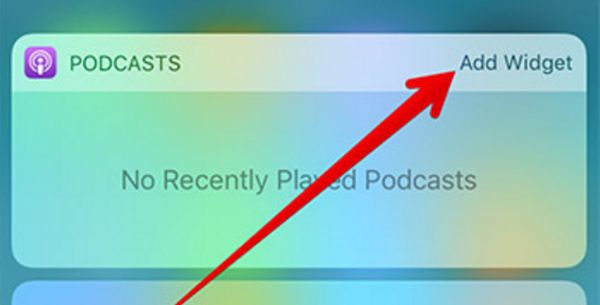
Step 5. Find Add Widget option in this menu. You’ll see it at the upper right part of the menu.

Step 6. Your widget has been successfully added. Just confirm your decision and you are done.

How to Delete iOS 10 Widgets

How to Remove Widgets on iPhone with iOS 10

Unfortunately the procedure of removing widgets is not as simple and fast. The 3D Touch feature doesn’t support it so you cannot remove them the same way they were added. You can still edit your widgets and delete them. Here is how it works.

Step 1. You need your handset with widgets on it.

Step 2. Swipe right and you’ll get to your Lock screen on iPhone 7 or 7 Plus.

Step 3. A bit of scrolling down is necessary. Get to the bottom of the screen and hit Edit option.

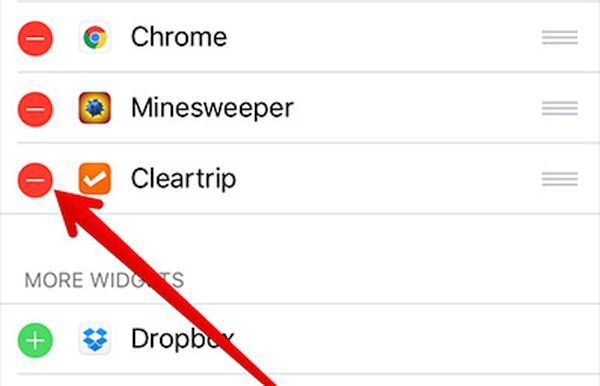
Step 4. You’ll see the list of applications with widgets. There will be red buttons on the left side of this list.

Step 5. Click on the red button to delete the widget.

How to Remove Widgets on iPhone

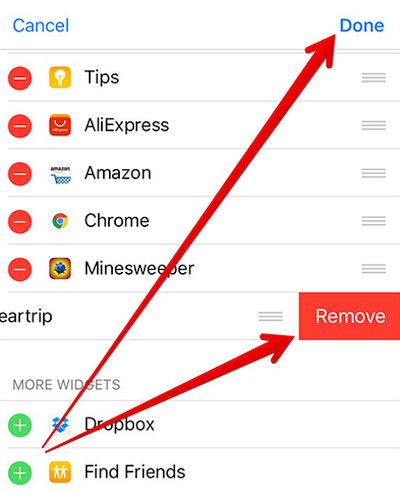
Step 6. Click on Remove option.

Step 7. Make sure you confirm your decision by clicking on Done feature at the top of the screen.

Step 8. The widget will be now removed for good.

Why would you need to use widgets? This is a simple access to your app updates and news. There is no need to launch every program when you only wish to read the most recent data. Widgets show the information you are looking for right on your Lock screen. Hit the widget and get into details.

This cool option was released back with iOS 8 platform and successfully updated for iOS 9 and iOS 10. The next firmware version [read the latest iPhone 8 rumors] will absolutely include this option as well. Still not all the applications support widgets. Maybe this will change sooner than later.

Best Way to Add Multiple Photos or Videos to Instagram on iOS 10 iPhone

Can you add more than one photo to your Instagram account? Absolutely! You can share multiple pictures at once using your iPhone and amazing iOS 10 tips. Just follow the guide below and you’ll love adding several videos or pictures all at the same time. This way you’ll save your time and share your joy with friends and other social network users. Isn’t it great?

How are you able to accomplish this task? Should you download any third-party apps for iOS 10 firmware or find a different way? We know some incredible Instagram iOS tips you should know about. Let’s discover them.

How to Add Several Pics to Instagram

Instagram Multiple Photos Feature

The iOS 10 secrets for Instagram are simple. This program itself supports the option for sharing multiple files at once. The feature you’ll be using is called Carousel. It works for both iPhone 7 and iPad as well as earlier Apple handset models.

It’s cool that you don’t have to download any extra programs to enjoy the feature. Use your iPhone or iPad that has Instagram installed on it and make sure you have updated to iOS 10 because earlier operating system versions might not support the great changes.

Share Multiple Videos and Pics on Instagram iOS 10 Tips

How to Share Multiple Pictures on Instagram

Before we share the guide below you should learn some iPhone Instagram tips. Firstly, you can really post more than one image or video at a time. Secondly, there is the maximum amount of files that can be shared simultaneously. The app currently supports sharing up to 10 files at once.

Anyways, it’s amazing that you are allowed to post 10 pics at once instead of adding them one by one as you were used to do. Sharing unforgettable moments of your life was never that easy before!

All the files you will add using carousel option will appear inline so your Instagram feed will show only the first photo of the post and users can view all other images by swiping over your main photograph.

Here is how you can share multiple photos on Instagram:

Step 1. Check your iPhone or iPad firmware version. Is it iOS 10? You are good to go. If you are still running previous iOS 9 you are advised to update now.

Step 2. Make sure you have the most recent version of Instagram on iDevice.

Step 3. Open Instagram app on your mobile gadget.

Add Several Videos or Photos to Instagram

Step 4. Do you see the ‘+’ (plus) option at the lower part of the screen? Click on it.

Step 5. Select Library section.

Step 6. Click on Select Multiple feature.

Step 7. Choose videos and / or pictures from your photo library. You can select 10 files at most. You can also adjust the images in the frame.

Step 8. Click on Next to proceed.

Step 9. If you want to apply filters to your files you can click on filter option at the bottom of your screen. Edit photos one by one.

Step 10. You can now click – drag images to adjust their order. To delete an image from your future post you’ll have to click and drag it to the trash button.

Step 11. Press on Next and add captions and location to your post. You can also tag each image or video file by clicking the Tag feature and choosing those people who you wish to tag.

Step 12. Click on the Share button and your post will appear in your feed.

Carousel Tips Instagram iOS 10

All your friends will see the first image of your post just as they regularly do. However since your post now features the Carousel icon at the upper right part it is possible to see all the images attached by swiping over it. Here is how you can download pics from Instagram on your handset.

How do you like the Carousel Instagram update for iPhone 7 and other Apple devices? Is it more comfortable to share your life moments with other from now on?

How to Turn Live Photo into Still Image on Your Mac

Do you like Mac live photos? Sometimes you might wish to turn off live photo feature and send a still image to your friends. We have already explained how you can send disappearing pics and videos through WhatsApp. Is it possible to change live pictures? Should you extract still picture from a short video? How does it happen? We’ll tell you what you need to do with your interactive images to make them look still.

Actually you’ll be surprised at how easy everything is. The guide clearly explains how to turn live photo into still photograph within seconds. The convertion procedure is a quick one. You won’t spend much time changing the status of your pics.

Live Photos on Mac

Mac Live Photos

Live images are impressive. They look wonderful on smaller iPhone screen and are extra beautiful on the big Mac displays. Point on such image and it will come alive. You’ll feel as if you are in a fairy tale. The true magic of live images is amazing. Still there are situations when you need to use Mac live photo edit option and create still shots. If you are using social networkds you can share photos that disappear through Instagram on iOS 10 handset.

Why would you need to change the pictures on your computer? It’s easier with iPhones since not all models support the ‘live’ status. Well, if you want to easier navigate through Mac photo library without seeing images going alive when you accidentally place pointer on one of them you can turn such photos into still images and solve the browsing problem.

Make Live and Still Images on Mac

How to Make Live Photos Still

So how exactly can you extract the still image from your live photo if you are using Mac machine? Follow the detailed guide below that shows step by step how you get still photos from live photographs by quickly turning off this feature. No more pics will suddenly come alive when you touch them.

Step 1. You should use only your computer. So take your Mac and open Photos application on it.

Step 2. To make live photos still you should choose those images one by one. So select one live pic for now. Just hover the mouse on it. You remember that if this is a live image it will come alive.

Step 3. Right press on the file you have just chosen.

Disable Live Photos Feature on Mac Computer

Step 4. You’ll see the menu for your photos. There will be the option called Turn off Live Photo which has nothing to do with animated GIFs. This is what you need to select.

You see how simple it is to disable Live Photo option. It’s also really easy to turn it back on in case you miss the fun of photographs that look alive.

How to Enable Live Photos on Your Mac

Step 1. Launch Photos program on the ‘fruit’ computer.

Step 2. Select the image that is ‘live’ but disabled by you.

Step 3. Right click on it.

How to enable live photo feature on Mac computer

Step 4. Select the feature called Turn On Live Photo.

Now your photograph is alive again and when you hover over it it will interact with you.

It’s not a secret that a lot of Mac users also own the iPhone that also supports the live images. How can you change the ‘live’ status of your smartphone images?

How to make live photo still on iPhone 7 iOS 10

How to Turn Live Photo into Still Image on iPhone 7

Step 1. Take your handset. You don’t need your Mac right now.

Step 2. Choose your Live Photo.

Step 3. Click on ‘share’ option.

Step 4. Press on Duplicate option.

Step 5. Click on Duplicate as Still Photo.

Now you have two similar images where one is a still pic and one is a live photograph. Isn’t it awesome?

The well-known Cupertino-based company keep improving its Photo programs for all devices. We believe that Apple will add even more interesting changes and possibilities into iOS 11 and the next iPhone 8 that will celebrate the iPhone’s 10th anniversary later in 2017.

Cool WhatsApp Photos and Video ‘Disappearing’ Tricks for iOS 10 iPhone 7

It seams that photos that disappear after being received by iPhone users is a new trend. Different applications support this feature. For example, you can share disappearing images via your Instagram account. It is also possible to use WhatsApp disappearing photos and videos option on your iOS 10 smartphone. Let’s learn more about this interesting opportunity.

If you want to use the disappearing photos in your WhatsApp you’ll have to make sure you have installed iOS 10 in the end of 2016 or early 2017. You need to also update the app version since older ones do not support the great feature that ‘deletes’ an image after it was sent and successfully received and viewed by your friend or other contact. We’ll explain some details about photos that disappear and share the detailed guide on how you can use it.

Those iPhone 7 users who also have the new earphones can control their AirPods with Siri-like commands.

Share Disappearing Photos using WhatsApp

Photo Tricks on iPhone 7

In case you don’t know this WhatsApp is owned by Facebook. We can’t say it’s the most popular and used message program still there are a lot of iDevice owners who prefer it to the default iMessage and similar applications.

WhatsApp video and photo upgrade could really popularize this app. A lot of users enjoy the idea of photographs, GIF images and video files that are automatically deleted once being viewed. This way you can save much space on your mobile device and share your private content with people you love. You won’t have to worry about third-party people watching your videos and photos after they were seen by their original recipient.

How does it work? You choose a file and send it via WhatsApp. Remember to use ‘Status’ for your message since this feature allows more privacy and makes sure that your files will disappear after 24 hours. Can’t send a message? Learn how to fix known message issues on iOS 10.

If you want to compare this option with similar features you should look at Instagram and Snapchat ‘Stories’ that have similar functionality. Right now WhatsApp supports the disappearing files only in Europe. It promises to offer the same thing in other countries in the future.

Status for WhatsApp iOS 10 Update

How to Share WhatsApp Disappearing Photos and Videos

Step 1. Remember that you need to have the most recent release of WhatsApp to enjoy the iOS 10 tricks with photographs and videos. Launch App Store on your iPhone and select Updates.

Step 2. Open your application.

Step 3. You’ll see the Status section at the lower part of the screen. It is responsible for your WhatsApp disappearing videos and photos.

Photos that disappear in 24 hours WhatsApp iOS 10 changes


Step 4. Open your in-app camera. Create a selfie, photo or a short video file.

Step 5. Draw on your file if needed. You can also add emojis, symbols and text message.

Step 6. Send your file that will expire after 1 full day to your family member or friend.

Hopefully these simple video tips for iPhone 7 will help you create amazing messages and share private files with your friends. Keep in mind that these files should be automatically removed by the app once 24 hours pass. By the way, have you heard latest rumors about iPhone 8 that should be launched later this year?

The Status option is an interesting one. It is shown to everyone when you create your Status update. Still it is possible to switch to My Contacts except or Only Share with instead. Besides, WhatsApp upgrade brings three sections for your status menu. You’ll see My Status that shows your current status and those who view it, Recent Updates with the messages created by your friends and Viewed Updates that includes the messages from those people who are muted by you.

Anyways, enjoy the opportunity to send pictures and videos that will disappear on their own since WhatsApp offers this wonderful option.

How to Type Special Symbols on iPhone 7 or iOS 10 iPhone 6

It’s hard to keep in mind all the iPhone keyboard symbols. Do you also search for how to type copyright symbol each time you need to use one in a text message? Personally I do. I also search for registered and trademark symbols while it’s so much easier to use iOS 10 symbols offered by your mobile keyboard. I have just learned this awesome trick and am about to share it with you.

Let’s get into details how to type symbols on iphone without performing any extra search. You’ll enjoy how quick and fun this task is once you know some amazing iOS 10 tips and tricks I am about to share with you.

iPhone Special symbols

iPhone Special Characters

I’ll explain the idea of typing iPhone keyboard symbols much quicker than you are used to. There is a great emoji keyboard which gives you an idea how to get emojis on your iPhone 7 or iPhone 7 Plus. Still the same keyboard can be used for creating the special symbols on-the-go and this includes copyright, trademark and registered signs.

Isn’t it incredible? Only one feature brings so many advantages that you’ll enjoy working with it every day. Now your special notes will always look neat and cute while you can save your nerves and time.

You can always type any symbol with your predictive keyboard option. This is one way to complete this task. We will talk about an alternative method on how to get symbols on iPhone emoji keyboard. You can choose either way since your goal is to type the registered symbols. Are you ready to explore the possibilities?

iPhone emoji keyboard

How to Add Symbols on iPhone Emoji Keyboard

Step 1. To get iOS 10 symbols with your emoji keyboard you need to first launch any application on your smartphone.

Step 2. You should now access your iOS QuickType keyboard. You might also use it for symbol suggestions however there are some special characters that are not displayed by this option. Thus you need to continue and explore iPhone emoji keyboard features.

How to Select Emoji Keyboard on iPhone

Step 3. Click on emoji image you’ll see at the lower part of your mobile keyboard. Sometimes you see no emoji icon, this means you have to click – hold the globe button in order to choose Emoji feature.

Step 4. Once you see the emoji keyboard selected you have to do the following thing. Swipe from right to left. You’ll have to repeat this action till you get to the Symbols section.

Select emoji symbols on iPhone emoji keyboard

Step 5. Look for the symbol you need. Choose it and it will appear in your message.

If you don’t want to use the emoji symbol trick you can try working with simple QuickType feature. Sometimes this option doesn’t work, so keep this in mind just in case nothing happens.

How to Type Symbols on iPhone with QuickType Option

Step 1. Open an application on your iOS 10 iPhone 7. It can be just any program that supports QuickType. For example, launch your Messages tool.

Step 2. Access your QuickType virtual keyboard.

Step 3. Launch any conversation.

Step 4. Click on your text field.

Step 5. If you need to use trademark symbol you should type “TM”.

Step 6. If you wish to type the registered symbol you’ll have to type (R).

Step 7. If you are looking for copyright symbol you need to type (c).

Step 8. Once you type the character it will automatically turn into the symbol or your keyboard will suggest the symbol for you. In this situation you need to click on the image and it will be added to your text message.

It’s great how many wonderful features are offered by iOS 10 update [learn how to activate iPhone after you unlock it]. You can use special characters and symbols without internet connection. In other words you don’t have to search for the symbol in order to add it to your message. Just use either QuickKeyboard with predictions or Emoji Keyboard feature and you’ll love the quick results.

How to Add Videos from Snapchat to Your iPhone Instagram Stories

There are a lot of Snapchat users among Instagram fans with iPhone 7 or other phone models that are running iOS 10. It is possible to make your stories so much better with videos and we’ll explain how you can upload videos to your Instagram account.

The guide is extremely simple. You’ll love to learn about new features and easily add short films and movies to make your Instagram story prettier and more interesting to your friends and other users who come across it.

How to share Snapchat videos with Instagram users

Share Videos from Snapchat

You know that Snapchat has a lot of videos. This platform make it easy to add videos and you can also share them through Instagram network. What should you do before you can continue with the guide?

Firstly, make sure you have installed one of iOS 10 firmware versions. There are several of them presented by Apple in 2016 – 2017. There is no need to update to the most recent release. Just make sure you are no longer using iOS 9 mobile operating system as the function might not work on it.

Secondly, you have to use Snapchat and Instagram and have both programs installed on your iPhone or iPad.

Thirdly, follow the step by step guide and explore awesome iPhone Instagram tips for sharing cute videos directly from Snapchat.

How to capture video using Snapchat on iPhone

How to Upload Snapchat Videos to Instagram

Step 1. Let’s get to creating interesting iPhone Instagram stories that include videos. How can you achieve this? Open Snapchat program on the phone and use this walkthrough.

Step 2. Make a new snap just as you normally do.

How to save video from Snapchat to iPhone 7

Step 3. Once you like the results of your work you should click on the option that says ‘download / save.’ This button can be found at the lower left part of the screen.

Step 4. Click on X to exit since you have already saved the new story. This button is located at the upper left part of the screen.

Snapchat Memories

Step 5. Look at your shutter button. Do you see the Memories option? You should press on it to continue.

Step 6. Choose your story and proceed.

Step 7. Swipe up on your video.

Step 8. Click on the share option you’ll see at the lower part of the screen.

Add video from Snapchat to your iPhone folder

Step 9. It’s time to click on Save Video option. This way your file will be saved right on your iPhone. P.S. You can convert your videos to slow motion and turn slowmo back to regular videos.

Step 10. We are almost ready to upload video to your Instagram. Launch this social network on your smartphone.

Step 11. Click on your camera button or just swipe from left to right.

Add video to Instagram story

Step 12. Now you should swipe up from the edge of your display and this way you’ll access your Camera Roll.

Step 13. Choose your Snapchat video.

Step 14. Add text or emojis if you wish.

Save Snapchat video to your Instagram story on iPhone 7 with iOS 10

Step 15. Now upload the file to your iPhone Instagram story and click on ‘Your Story’ at the bottom of the screen. Isn’t it great?

There should be no Instagram video upload fail if you upload files using this method. Snapchat videos are easy to create and simple to save as you can see from the guide above. Since the Snapchat itself doesn’t let you share files with Instagram users you can remember the trick and get its advantage whenever you need it.

By the way if you experience any problems with any of the app you can try to update it. Both social networks are regularly upgraded by developers so can also keep an eye on such updates and also install them to make sure all the newest features and options are supported.

It’s amazing how quickly social networks grow and improve. Users spend a lot of time reading their friends’ posts, viewing photos and watching videos on Instagram, Facebook and other sites. Are you also one of such people?

AirPods Voice Control Commands That Don’t Require Internet Connection

Have you heard of Siri commands for your AirPods? While there are many iOS 10 tips that can help you make your personal assistant control headphones you can still find useful tricks and enable a different feature called Voice Control that works when you are offline. Let’s learn what popular and must-know AirPods commands exist and how you can use them.

You’ll love our AirPods secrets because they let you control this accessory without internet connection. The trick is simple. Just follow the guide below and get quick access to AiRpods control functions with voice commands.

AirPods Voice Control

How to Control AirPods

You can absolutely use Voice Control iPhone 7 assistant to control your new earphones. Siri likes to perform your tasks. Ask it to play your favorite song. Make it choose an album just for you. Your iOS 10 virtual assistant enjoys getting the job done. It can play music, skip tracks and pause songs for you.

Unfortunately Siri only responds to your AirPods voice commands when you are online. It doesn’t work when you have poor or no internet connection. Are there any iOS 10 tips and tricks for offline usage? Absolutely! You don’t even have to do everything manually since your wireless headphones can still be controlled on-the-go. By the way, read all the rumors about future iPhone 8 that should be released later in 2017.

AirPods Control Offline

How to Use AirPods on iPhone 7 with Voice Control Option

Follow these AirPods tips to discover new methods that simplify your life and make is easier to listen to music and respond to your desires. Use this feature when Siri cannot help you. Maybe you’ll like the idea of Voice Control for earphones on iPhone 7 so much that you will use only offline option and forget about your virtual assistant. It’s your decision [learn how to send Instagram disappearing photos]. We are just helping out a bit and explaining what exactly you should do to make this possible.

Step 1. There is no need to check on your internet connection because the Voice Control works perfectly well without it. So all you have to do is enable it. Take your iPhone or other iDevice and head over to Settings app.

Step 2. Select General menu to continue.

Step 3. Do you see Accessibility section? You should click on it to proceed.

Home Button iPhone 7 Settings

Step 4. You are almost there. It’s time to scroll down. Now click on Home Button.

Step 5. You should find AirPods Voice Control feature right under the section called Press and hold to speak. Have you found it? Great!

Enable Voice Control iPhone 7 Guide

Step 6. You have enabled the option.

You can now exit iOS 10 Settings on your smartphone or tablet device. Remember to also reduce your data usage on iPhone.

Once the option is turned on you should learn how exactly you are able to control your amazing headphones. By the way, Apple presented the interesting AirPods accessories after the official iPhone 7 and iPhone 7 Plus release. The wireless earphones have become pretty popular among ‘fruit’ fans and this is why you could wish to control them with your voice commands.

iOS 10 Voice Control

How to Use Voice Control for AirPods

Step 1. Activate the feature by clicking – holding your Home button. This is how Voice Control is enabled.

Step 2. Launch Music program. Play the song you like and then enable Voice Control (like described in previous Step 1).

Step 3. Say these commands:

  • Play (to play a song)
  • Pause (to pause music)
  • Skip (to skip the tune)
  • Play Album
  • Play Playlist

All simple phrases should be understood.

Of course, this is not Siri with it amazing options and smart functionality. Still when you have no internet access and don’t want to manually control your music you can use Voice Control iOS 10 feature and work with your earphones this way.

How to Make WhatsApp iPhone Messenger More Secure with 2 Step Verification

Not all users are happy with the default iMessage. Some users prefer working with third-party programs. If you like using WhatsApp iPhone program you might also wish to learn how you can enable the two step verification on this iPhone 7 application [learn how to set up Google Voice on your smartphone]. It’s a simple, fast and great thing to do because you can improve your account security.

What will happen exactly once you enable the two step authentication on WhatsApp? Your iPhone will ask for the passcode each time you decide to use your WhatsApp account on a different gadget with your phone number. In other words, people who don’t know your password and associated iPhone number will not be able to access and use your account. Would you like to implement this idea into life?

WhatsApp Tips for iPhone 7

WhatsApp iPhone Tips

Once you decide to download WhatsApp for iOS 10 device you’ll definitely have to learn how you can turn on the security feature and protect your account. Similar protection is used by many other services and apps. For example, ‘fruit’ fans like the two step verification system for their Apple ID on both iDevices and Mac computers. It is also possible to use the 2-step authentication for your Gmail account.

Anytime you enable such protection you’ll have to provide your passcode (it usually consists of 6 digits) which you create on your own. Most programs that support the 2 step verification feature do not generate the code to verify your personality. In other words, you are the one who makes up this code and uses it for future authentication. You can also easily turn words into emojis while typing.

How to turn on two step authentication on WhatsApp iOS 10

How to Enable WhatsApp iPhone Two Step Authentication Option

Step 1. Open WhatsApp once you download and install this iOS 10 application for iPhone 7.

Step 2. Go to Settings. You should see this section at the lower right part of your screen.

Step 3. Click on your Account.

Settings for WhatsApp on iPhone

Step 4. Choose the Two-Step Verification menu.

2 step verification option for WhatsApp iPhone 7

Step 5. You need to Enable it.

Step 6. Create a 6 digit passcode that will be used to protect your account. Think about the code you’ll remember.

Enter passcode for two step verification on WhatsApp

Step 7. Enter the same code to confirm it.

Step 8. Sometimes you might forget the password that is why it’s nice if you can also add your email address to the same account. It will be used to reset the passcode if you ever decide to do so. You can also skin this step if you don’t want to tie the email to your WhatsApp account. Keep in mind that you do not protect the account with an email you won’t be able to reverify the account for 7 days once you can’t remember your password. You’ll use your phone number after a week passes by however any pending messages you’ll receive during this week will be permanently deleted.

Step 9. Confirm the email in case you entered it and click on Done option.

Step 10. Use your passcode to verify your account and use WhatsApp just as you ordinary do.

Turn off two step verification on iPhone 7 WhatsApp

How to Turn Off Two Step Verification for WhatsApp on iPhone

We want to also share some WhatsApp tricks for iPhone 2017 users who wish to disable the verification in two steps:

Step 1. Launch WhatsApp application.

Step 2. Choose Settings.

Step 3. Go to your Account.

Step 4. Select the Two-Step Verification menu.

Step 5. Disable the service.

Step 6. Confirm your decision by clicking on Disable once again. Now you won’t have to enter the passcode when you wish to register your phone number with this application on a new device or decide to factory unlock your AT&T iPhone model.

If you cannot reverify your WhatsApp for iPhone 7 30 days after you forget your passcode you’ll have to use a new account. The program will delete your old account and make up a new one for you.

How to Enable and Disable Touch Bar Zoom Feature on MacBook Pro

It’s time to learn some interesting MacBook Pro tricks and secrets for its most popular feature called Touch Bar. Are you using Touch Bar zoom option or not? If you haven’t had time to discover how to enable, disable and use this awesome program you can explore your knowledge right now.

We’ll tell you how to enable Touch Bar Zoom, what you can do with its help and how to turn it off when you no longer need it on your computer. The feature enhances your experience but it arrives being disabled by default. In other words, you are not able to use it unless you first turn it on. You can also easily transfer videos from Mac to iPad.

Touch Bar feature on MacBook Pro

Touch Bar Features

The new models of MacBook Pro arrive with a lot of cool additions and extras compared to their predecessors. Touch Bar is a nice feature for your screen. It also comes with some features carefully packed by Apple. Touch Bar Zoom is a sweet little option found in Accessibility suit. It adds some cools things to do with your MacBook.

When you decide to turn on this option you’ll see a larger Touch Bar available. It’s perfect for users whose eyes get quickly tired because of small letters or who have low vision. Those who experience no issues with vision can still take advantages of the zooming addition.

How to Use Touch Bar Zoom on MacBook Pro

How to Use Touch Bar Zoom on MacBook Pro

Firstly, you need to enable MacBook Pro features you wish to enjoy. Secondly, you have to learn what exactly you can do.

Enable Touch Bar Zoom

Step 1. Use your computer. You should find System Preferences in the Dock and press on its icon.

Step 2. Access the Accessibility settings by click on its icon option or triple-clicking the Touch ID option. There is an alternative method: click the Option + Command + F5 on computer keyboard and the settings will be automatically launched.

Step 3. Look under your Vision menu. Click on Zoom.

Step 4. You should now check the option Enable Touch Bar zoom.

Step 5. Now work with the zooming and enjoy this feature.

Disable Touch Bar Zoom Feature

Step 1. Go to System Preferences – Accessibility.

Step 2. Press on Zoom feature under Vision section.

Step 3. Uncheck the feature called Enable Touch Bar zoom and it will be turned off.

How to Enable Disable Zoom for Touch Bar on MacBook Pro

MacBook Pro Tips: How to Zoom with Touch Bar

Once you turn on the feature you should learn how to zoom with Touch Bar. This is simple so you should face no problems.
The virtual Touch Bar can be found at the lower part of the display. It appears when you touch something with the regular Touch Bar. You can now enjoy the zoom view. Just touch – drag using your finger on the Touch Bar.

Use the Command (just click-hold it) along with two-finger pinching open / closed on the regular TB on your keyboard to zoom in and out.

Active various items from the physical TB by clicking and holding that item while also tapping somewhere on your virtual Touch Bar.

MacBook Pro Tips and Tricks

This is great when you can add some lifehacks to your Mac everyday experience, isn’t it? Of course, there could be situations when you might find no Touch Bar zoom while the option is enabled. There is a trick you can use to fix this issue:

Step 1. Launch System Preferences on Mac.

Step 2. Select Accessibility section.

Step 3. Choose VoiceOver option.

Step 4. Now just turn off VoiceOver and Touch Bar should be available with zoom in.

Quick iPhone Slow Motion Video Guide to Convert Slowmo to Normal Video

Slow motion videos are becoming more popular. A lot of iPhone 7, 6s and iPad users enjoy creating such movies. Sometimes you need to turn the slow motion file to regular speed. Sometimes you want to quickly slowmo a new video. Let’s learn how you can manage such tasks and easily create ordinary videos from slow motion movies.

Why would you need to covert video to slow motion online or record one directly on your phone? This is a cool experiment that helps you creating impressive moments. Why would anyone need to covert their slow motion videos to ordinary movies on iPhone or iPad? A lot of us eventually run out of space on the mobile device. Regular speed videos can save you some space since converted files usually get a reduced size compared to the original file.

In other words, there are situations when you have enough space and can slow down videos online with free editors or on the iPhone / iPad. Still once you notice almost no space left on the phone you search for a way how to replace your slow motion video with a regular one.

Turn Slow motion video to regular video file on iPhone iOS 10 guide

How to Convert Slow Motion to Regular Video on Your iPhone 7

Step 1. You need your iPhone with slowmo videos on it.

Step 2. Decide which file you wish to convert and launch Photos program from Home screen.

Step 3. Choose what you wish to make ‘normal’ again and click on it.

Step 4. Click on Edit option to return slow mo video to regular speed.

Step 5. There should be 2 sliders right under the file. You can drag anyone of them. This is how you are able to shrink one into the other one. It’s a simple way to get rid of slow motion part of the file.

Step 6. Once you are happy with the results you can click on Done option. It can be found at the lower right part of your mobile device.

Record slow motion videos on iPhone 7 iOS 10 How to guide

How to Slowmo a Video with Your Phone

Now let’s recollect how you can make slow motion video instead of regular one on iPhone with iOS 9 or newer iOS 10 version.

Step 1. Once you are sure that your mobile operating system version is iOS 9 or iOS 10 you can open Camera program on the iPhone.

Step 2. You should swipe to the right (do this twice) and this is how your Slo-Mo mode is enabled.

How to slow mo a video on iPhone

Step 3. Now you need to click on ‘Slo-Mo’ option at the lower left part.

Step 4. Click on the record button. Your slow motion video will begin recording.

Step 5. When you are done you should click on stop button.

You probably already know how to make a video slow motion on your PC or iPhone. There are special slow motion video editors that you can find and download for free. This interesting feature was introduced along with iOS 9 release back in 2015.

Users who have chosen to install iOS 10 firmware version also like to create and keep cute slow motion movies. If you don’t want to delete or convert such files into normal videos you can easily save them to your Mac, PC or external hard drive.