How to View Your Source Code in Safari Browser on Mac or iPhone

You probably know that all webpages are created using HTML language. This is special HyperText Markup code that is understood by all web browsers. Each page contains information about all images, text, script etc. Sometimes you need to view source in Safari on iOS 10 or your Mac device [learn how you can hide and show your Mac file extensions]. How is it possible to do?

View Source Code in Safari

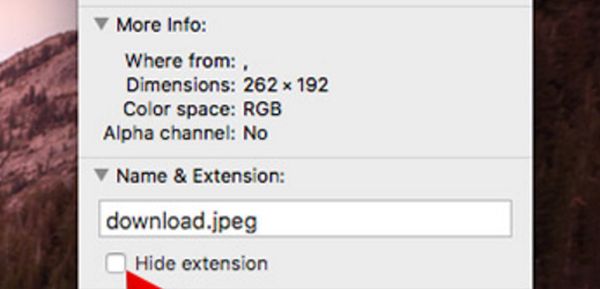
Both iPhone and Mac users can quickly access their pages source via Safari browser. Why would you need to find the HTML code of the particular page? Sometimes you want to know details about the image (for example, its size or description), link status (follow or no follow) etc. Programmers and developers as well as users who are creating and updating their website often review their source code to avoid errors, find parts of the documents and fix possible problems.

The whole idea is simple. Even if you are not a programmer but need to view the code you are able to succeed with a couple of clicks. Isn’t it great?

How to View Webpage Code in Safari on Mac

How to View Source Code in Safari on Mac

Firstly you should work with special Develop Mode [if you need to move your videos  from computer to iPad you can easily transfer movies from your Mac]. This is how you’ll be able to get to Safari view source shortcut or feature:

Step 1. Use your computer. Launch Safari browser.

Mac - Safari - Preferences menu

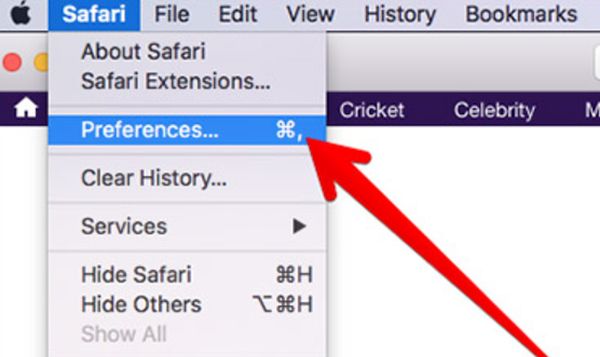
Step 2. Choose Safari – Preferences option.

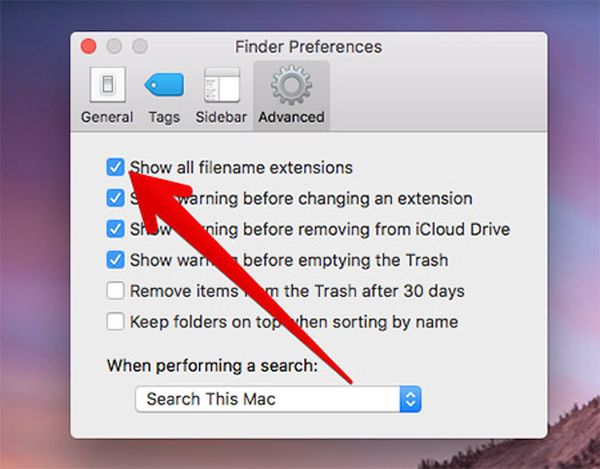
Step 3. Select Advanced settings.

Safari Develop Menu

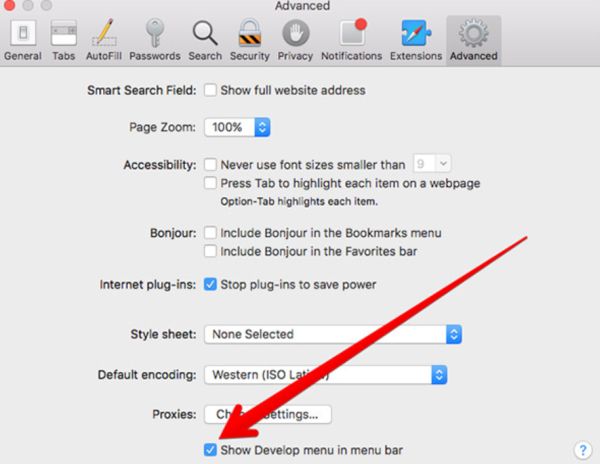
Step 4. You’ll see Show Develop feature in your tab. Just check the box near it.

Step 5. You will now find ‘Develop’ option present in your menu. This is how you have turned on your Develop Mode on Mac.

Safari Page Code Shortcut

Step 6. To view Safari page code on your computer you can:

  • Choose Develop from Menu while staying on a particular page and select ‘Show Source’ option;
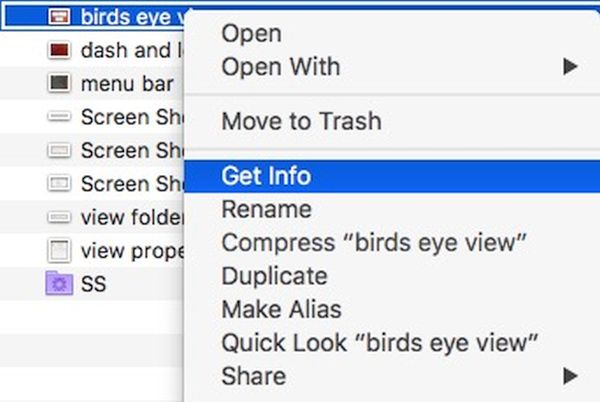
  • Right click on your webpage and choose ‘Show Source Code’ feature that will display what you are looking for in a new window;
  • Click on Option/Alt + Command + U simultaneously and the source code will be displayed to you.

Safari Source Code on iPhone

iPhone Safari View Source Code: How to Guide

Step 1. Before you can view source in Safari on iOS 10 you should download and install Source application. It costs $0.99.

Step 2. Once the tool is installed you can launch your mobile browser.

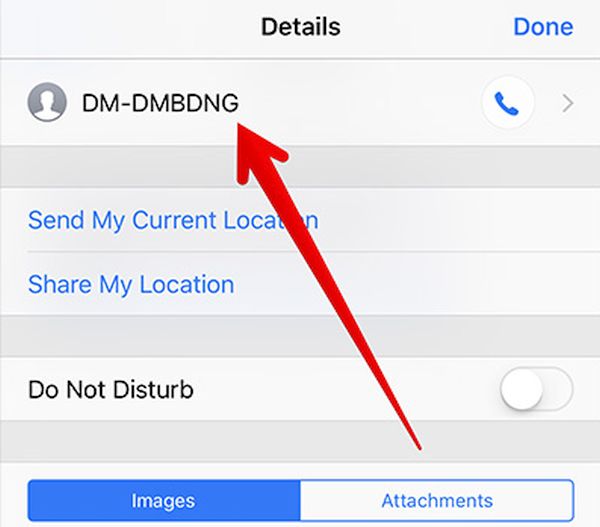
Step 3. Click on Share option.

View Page Code on iPhone Safari

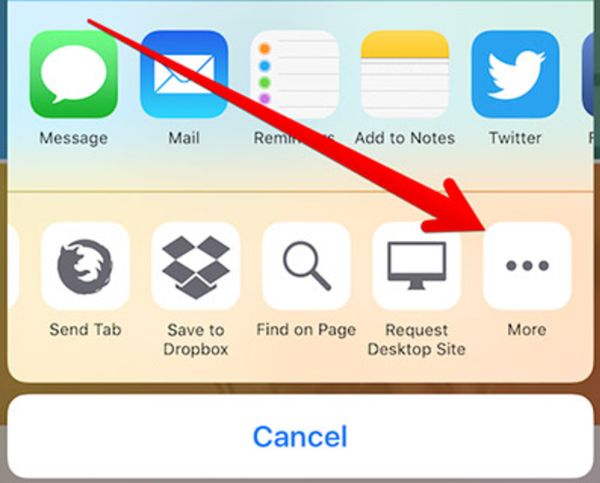
Step 4. Get down to the bottom to click on More option.

View Page Code in Safari on iOS 10 iPhone

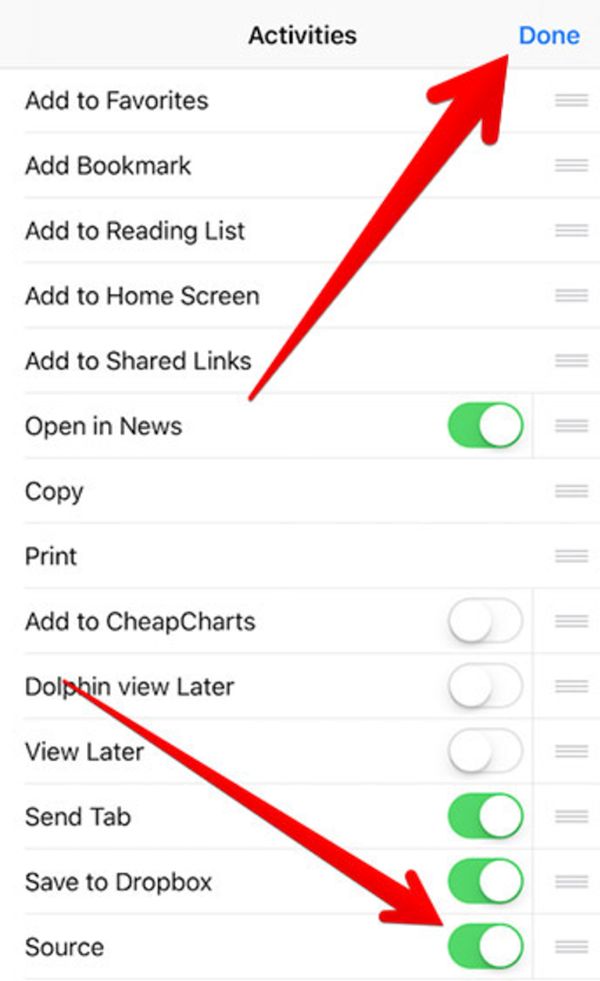
Step 5. Turn on Source feature and click one Done so that this change takes place.

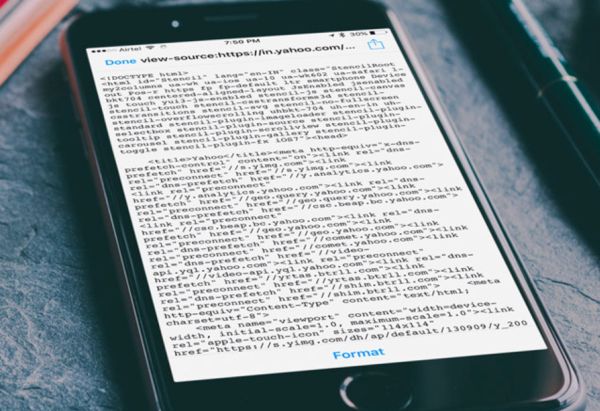
Step 6. Now you are ready to view page source on iOS 10 devices. Open Safari once again.

Step 7. Visit the webpage you wish to view the source for.

Step 8. Click on Share feature.

Step 9. Click on Source and you will get all the details about the code.

This is how you can enjoy Safari iOS and Mac tips for viewing source code on your Apple gadgets. This trick is useful not only for developers but also regular users who are studying SEO or web development. Since modern pages have complex code this is specific and unnecessary feature to most of us.

But in case you have to get to the code source you now know how you can view it using your Mac or iPhone, iPad Safari browser.

How to Work with Mac OS File Extensions: Hide and Unhide Guide

Let’s learn about some Mac OS Sierra hidden features [here is how to enable Night Shift feature on your Apple computer] and explore the interesting filename extensions. What are these options? Do you really need to deal with hiding and showing them up?

Mac OS File Extensions

Before you get to use your Mac filename extensions you might wonder what this feature means to you and why it could be useful and important in your everyday tasks. Hiding and unhiding the option is a must-know thing.

Each file has its own extension at the end. This way your computer can verify what program to use to open it. You are definitely familiar with such extensions as .jpg, .jpeg, .png etc. You can see that each file extension has a period which precedes the letters or numbers (for example, there are .mp4 video files).

It’s up to you whether to show filename extensions on Mac or hide them [learn more secrets about Touch Bar zoom option]. The files will still be opened by the programs. Hiding or showing them won’t make a ‘working’ difference. It’s only the matter of fact what you’ll see with your eyes, not how the correct applications will open these or those files.

How to Hide and Show File Extensions on Mac

How to Hide All File Extensions on Mac

Here are some incredible Sierra tips and tricks for making your file names look more accurate.

Step 1. You should only use your computer that is updated to MacOS Sierra. Follow the tips and you’ll be just fine.

Step 2. Launch Finder.

Step 3. You’ll see ‘Finder’ option at the upper left part of the screen. Press on it to continue.

Step 4. Click on Preferences – Advanced.

Hide Filename Extensions on OS Sierra

Step 5. You should enable Mac OS file extensions by checking the ‘Show all’ option.

Step 6. If you want to hide file extensions on Mac you need to disable the ‘Show all’ feature.

Keep in mind that your Mac filename extensions will be hidden for all the files you have. This happens even if you tried to hide or show only particular extension and then click on ‘Show all’ menu. This rule doesn’t work for showing all the full file names because this feature only reveals the files that are shown and hides the ones that are hidden individually.

How to Show Mac Filename Extensions Individually

It is possible to hide file extensions on MacOS Sierra one by one or individually. Let’s see how you can manage these tips:

Step 1. Choose the Mac file that you wish to display or not display its extension.

Step 2. Right click on your file.

How to Show or Hide particular filename extension on Mac

Step 3. Choose Get Info option.

Step 4. Look at Name & Extension option. Do you see a triangle near it? Press on it to proceed.

How to hide or show file name extension on Mac OS Sierra guide

Step 5. There should be more options displayed. You’ll see ‘Hide extension’ feature which you can enable by checking the box. You can also unhide it by unchecking that box.

We all have different taste. Some people like seeing file name extensions and other would like to hide them all or some of them. Now you know how to perform these tasks one by one or simultaneously.

Organize your Mac files the way you want. Just always remember that you should not change and remove your file extension by renaming it. Because this way you’ll lose the opportunity to launch the application, image, folder or program since your computer will not know what to do with it.

Hide and show your file format when you want and how you like it. It’s all possible with Mac OS Sierra tips you have just learned. Please enjoy!

How to Deal with Spam Messages on iPhone 7 on iOS 10

Do you receive many spam messages on your iPhone 7 or other model? Would you like to easily block all the texts you don’t want to get no since you’ve learned how to bypass iCloud activation lock? Let’s learn how to deal with spam on iPhone and follow the steps to achieve this goal.

How to Block Messages on iOS 10

Receiving iPhone spam text is not the most pleasant and wanted experience. How can it happen? Why am I getting spam text messages? There are ways how to get your phone number and scammers find such lists of numbers through apps, various programs and databases. Once you end up in their list you’ll keep getting messages again and again.

Until you block spam message on iPhone 7 or other handset model [here is how you can solve the problem with iPhone 7 dim screen]. Let’s explore the steps you should follow and you’ll get no unwanted texts from people and companies you don’t know and don’t wanna hear from.

iPhone Spam Stop guide

How to Deal with Spam on iPhone

Your mobile operator is probably doing its best to protect you from spam. Still it sometimes happens and you have to take care of everything on your own. Here is the guide that explains how to block text on iOS 10.

Step 1. You need to use your iPhone 7 or previous model updated to iOS 10 or newer iOS 10.3.

Step 2. Launch Messages program on the handset.

Step 3. Think of the conversation that looks like spam to you. Now just choose it.

iOS 10 Blocking Contact Settings

Step 4. Click on the ‘i’ option that is located at the upper right part of the screen.

Step 5. Click on the sender’s name.

How to Block iPhone Spam Contact

Step 6. Choose Block this caller option. It allows you to block all messages from this particular person or company.

Step 7. Confirm that you wish to block the contact.

That’s pretty much it. Once you block spam texts on iPhone you won’t get them. Unfortunately you’ll have to repeat the same steps for each contact that sends you unwanted messages.

Users who prefer using FaceTime can record their calls via Mac or smartphone.

Filter iPhone Text Senders

Since you know how to stop iMessage spam you should also get an idea how you can filter texts you receive. You can keep all unknown contacts in a special list. Why would you do this? You will use iOS 10 block text messages feature and also disable all notifications for the senders you are not interested in:

Step 1. Launch Settings on your iPhone 7.

Step 2. Select iOS 10 Messages application.

iPHone Filter Text Senders iOS 10

Step 3. You’ll see the Filter Unknown Senders feature. Enable it using the switch.

Step 4. Now all the text messages sended by people who are not in your contact list will be added to the separate list.

It’s great that you can use Messages tips to block people or phone numbers that bother you. This way you can fight with spam that is most likely received by you no matter what carriers do to protect you.

You are also advised to add your phone number to the National Do Not Call list. This is also a method of fighting with spam. Millions of users suffer from this problem. Do you also get calls and texts you wish to block?

iOS 10 iCloud Activation Lock Bypass Guide

Have you updated to iOS 10 or still running iOS 9? Your firmware version doesn’t matter much when it comes to iCloud activation bypass tool. No one can use your smartphone if you enable Find My iPhone that also features Activation Lock protection.

iCloud Activation Bypass iOS 10

The lock option is enabled automatically if you turn on Find My iPhone on your iOS 10, 9 or earlier firmware device. Sometimes you could forget your password. Sometimes you purchase a used phone and find out that its previous owner has made sure to use Activation Lock but cannot help you with the password.

How can you bypass iCloud activation lock in such situation? Is there a way to unlock your mobile gadget without entering the original owner’s Apple ID + password? Since this is your new handset it is important to unlock its screen and use in your everyday life. Otherwise you have paid for the brick.

We should note that iCloud activation bypass tools cannot guarantee simplicity of the unlocking procedure. This is a complicated task. Still once you master the complex tips you’ll be able to remove iCloud activation lock and enjoy using your iPhone 7, 7 Plus, 6s etc.

iPhone iCloud Lock Bypass Guide for iOS 10

How to Bypass iCloud Password

Step 1. Research iOS Activation Lock Bypass Tool Market

This is a very important tip you have to pay attention too. There are millions of iPhone users from across the world. They all live in different countries. It is better if you can make a research of your home market to find out reliable tools. There are numerous online sites and offline companies that are eager to help you out.

Pay attention to the reviews. Note how long the company exists. Compare the prices and make sure your payment method is supported before you place your order.

Step 2. Run IMEI Checker

Don’t hurry to order iOS 10 iCloud removal service. Firstly use the simple iPhone IMEI checker to make sure your iPhone is locked. Maybe it is not iCloud locked and you don’t even need to place any orders and everything can be fixed quicker and simpler.

Once you are sure that you 100% need iCloud bypass activation you can proceed with the best company you have found.

How to Bypass iCloud Lock on iOS 10 iPhone

Step 3. iOS 10 iCloud Unlock

You are not advised to download any iOS activation lock bypass software since this way you can easily find a virus or other dangerous program. It is better to use distant iOS 10 activation lock removal service that requires your IMEI number.

Of course, the best solution is when you can reach out to the original iPhone owner and ask hem or her to remove Find My iPhone and activation lock from your handset so that you can add this protection on your own with your password. Unfortunately this situation is often impossible with used smartphones.

If you cannot contact the previous owner you should follow our guide on how to bypass iOS 10 activation lock on your iPhone 7, 6s, 6, 5s etc.

Step 4. Visit the site you have found in previous steps. Make sure it is a company with a lot of reviews, with ‘https’ protection and nice price.

Step 5. Choose iCloud Unlock service and provide the information about your phone: its IMEI code, phone model etc.

Step 6. Place your order online and wait for a couple of days for your account to be unlocked.

Enjoy using your phone.

Setting Up Your iPhone Amazon App Language and Country: How To

There are a lot of popular apps used everyday on Apple devices. For example, you have download and installed Amazon app for iPhone 7 or older model upgraded to iOS 10 or 10.3 version. What tips can you follow to set up your preferences? How can you change your language or country?

Amazon iPhone App Settings

It is easier to use any application using your native language. You should agree that it is not comfortable to search various items and read product descriptions in the language you don’t know. Let’s imagine you have chosen the wrong language or country by mistake and now wish to change language in your iOS Amazon app.

How can you manage this [believe me this is as simple as deleting Snapchat history on your iPhone]? It’s actually simple to work with this program. Where is Amazon assistant when you need to set up a different language or country? Some manual manipulations can fix everything within moments. Just follow the guide below and you’ll successfully set up everything yourself.

How to Change language and country in Amazon app on iOS 10 iPhone 7

How to Change Country in Amazon App Store

Here are great iOS 10 tips for your iPhone app settings:

Step 1. Firstly you should install Amazon app on your iPhone 7 or other phone / iPad.

Step 2. Make sure you are running iOS 10 and your application is up-to-date. In case your phone screen is dim learn how to fix iPhone 7 brightness issue.

Step 3. Open the program on your mobile gadget.

Phone Amazon App

Step 4. Click on the menu. You’ll find it at the upper left part of the screen.

Step 5. Choose Settings to proceed.

Settings on mobile Amazon app on iPhone iOS 10

Step 6. Select Country & Language menu.

Step 7. Click on the arrow next to country.

Change country on iPhone Amazon app

Step 8. Choose the country you prefer using.

Select Country and Language on Amazon app on iPhone

Step 9. Click on the arrow next to language.

Step 10.Select the language supported in the country you have selected.

What languages are supported by Amazon app in USA on iPhone

Step 11. Click on Done once you are set up your preferences.

P.S. Sometimes the language you wish to use is not supported by the country you have chosen. In this situation the application will show you all the countries for which your particular language is currently available.

Setting Country and Language on Amazon App on iPhone iOS 10.3

Amazon Country Settings

The current Amazon iPhone app for iOS 10 firmware supports only a short list of languages and more countries. You can only select between Italian, Spanish, Chinese, German, Portuguese and French languages.

At the same time you can choose a big number of places from all over the world. This list is longer and it includes USA, Canada, Mexico, Brazil, the UK and many European countries, India, China etc.

It is surely easier to use your native language for searching and browsing through products or services. Maybe the program will soon add support for more countries and mother tongues. Right now you can only enjoy the most popular and widely used languages. For now you can play with your Night Shift mode on Mac or iPhone to make the screen easy for your eyes.

English, French, German etc… these languages are used across the globe. If you are living away form your native country you can still use your native language if it is supported by the iPhone app on iOS 10 platform. If you don’t want to change the settings you’ll have to get through with the default settings offered by Amazon. It usually sets up the main language supported by your chosen country. Still it is possible to switch your preferences on-the-go and make application usage more comfortable to your heart.

iPhone 7 Screen Is Dim: How to Fix This Brightness Problem

Is your iPhone 7 not bright any more? Do you experience this unpleasant problem on your new iPhone 7 Plus? Don’t worry. Just like you have learned how to enable Night Shift on your Mac, you can also fix the new issue with the mobile gadget. There are several methods you can follow in order to make your display look bright and pleasant to your eye again.

Fix Dim Screen on iPhone

What could possibly happen to your mobile device? Apple promises to deliver a good quality product with a lot of innovative features and its iPhones are extremely popular all over the world. This however doesn’t guarantee no problems with software or hardware.

What can cause your iPhone 7 screen to suddenly become dim? This brightness problem can be a glitch of your iOS 10 or other firmware version [by the way, here are some interesting iOS 10 tricks that make your WhatsApp photos disappear]. Sometimes it could be just the issue with configurations that you have to set up correctly to get rid of the bug.

How to Fix Dim Screen on iPhone 7 iOS 10

My iPhone Screen Is Dark: How Do I Fix It

So your iPhone 7 screen is already dim. Let’s list all possible repair guides you can follow to solve the problem at home.

Method 1. Get Rid of Auto-Brightness Option

Think about this. Have you tried using auto-brightness on your iPhone? It could turn out that everything you need is disable this feature. Here is what you should do:

Step 1. Go to Settings on your iPhone 7.

Step 2. Select Display & Brightness section.

Fix Dim Screen on iPhone: turn off auto brightness

Step 3. Turn off your Auto-Brightness option.

Step 4. Check your phone. Has iPhone 7 dim screen disappeared?

If the problem is solved you can also learn how to remove your old Dropbox cache to free up some space on your phone.

Method 2. No White Point Reduction

You can fight with the dim color this way:

Step 1. Go to Settings on the handset.

Step 2. Select General option.

Step 3. Go to Accessibility.

Step 4. Choose Display Accommodation.

Step 5. Do you see Reduce White Point feature? You need to disable it.

Are you finally lucky? Yes? It’s time to now share your current Google Maps location with your friends.

How to reset iPhone settings

Method 3. Return to Your Factory Settings

You can try to reset your iPhone and see if it helps with the iPhone dark screen problem:

Step 1. Go to Settings.

Step 2. Select General tab.

Step 3. Click on Reset.

Step 4. Choose to Reset All Settings.

Step 5. Check if the problem is gone or not.

Turn Off iPhone Color Filters to Fix Dim Screen Problem

Method 4. Colors and Filters

Make sure that these filters are not enabled:

Step 1. Open Settings option.

Step 2. Go to General section on the iPhone.

Step 3. Select Accessibility feature.

Step 4. Choose Display Accommodations.

Step 5. Now you should disable two switches. One is responsible for Invert Color and the other one is related to Color Filters.

Fix Dim Screen on iOS 10 How to Guide

Method 5. Disable Reduce Transparency

Follow the previous guide Steps 1-3 and once you are in Accessibility section you can continue:

Step 1. Click on Increase Contrast to continue.

Step 2. Turn off Reduce Transparency option if it is enabled.

Step 3. Disable Darken Colors feature.

There are other things you can try in order to fix your dim screen on iPhone. For example, you should try to reboot the gadget or install the most recent firmware version if you are still using an older one. You need to also play with your brightness levels which you can bring up by swiping up from the screen’s bottom. Move the slider left or right and try to fight the best option that resolves your dark iPhone problem.

In case nothing helps you might need professional iPhone 7 screen repair. This is the last thing to do. You’ll have to double check that the problem is really with your display. Contact Apple service center and find out what you should do to return brightness to your mobile device.

How to Clear Your Dropbox Cache Files on iPhone 7

You noticed that your dropbox is taking up space on your iPhone 7 or previous model? Just like it happens on your computer you need to clear your cache once in a while. Let’s explore how to clear Dropbox cache on your iPhone.

Simple Dropbox Cache Cleaner

Different files you save and exchange with your friends do not disappear on their own even if you are using your smartphone or tablet. It’s important to manage your storage and remove old data such as cache.

iPhone Dropbox Cache Cleaner How to Guide

It’s best when you can delete your Dropbox cache on iPhone once in a while. Don’t wait until you have no free storage left. Perform this easy and quick procedure from time to time and you’ll experience no issues with no valuable space at all.

Do you have to search for additional Dropbox clear cache apps to make it happen? Great news! This program has a hidden option on your iOS 10 gadget. You can delete all the cache on-the-go using the built-in feature. You only need to follow the walkthrough once and you’ll remember how to deal with the problem with your Dropbox taking up space on iPhone 7 or 6s. Isn’t it great?

How to delete Dropbox cache on iPhone 7

How to Remove Cache on Dropbox

Here come a step-by-step instruction. In case you deleted files from Dropbox but it is still full you should simply clean up your cache. This will not remove any offline files you store. The feature only deals with the junk you have on the smartphone.

Step 1. Take your handset.

Step 2. Launch Dropbox application on iOS 10 platform if you have updated to this firmware version.

Settings to clear cache for Dropbox

Step 3. There is the setting option at the upper left part of the screen. Click on this icon.

Dropbox cache cleaner option

Step 4. Get down the page until you see Clear Cache feature. You need to click on it to proceed.

Step 5. You should confirm you decision so click the Clear Cache option again to let Dropbox free up your iPhone space.

Step 6. That’s it. You will remove the junk files and your iPhone files should load quicker.

Delete search history on iPhone

Step 7. If you want you can also click on Clear Search History feature that is located above your Clear Cache button. This way you can free up even more space in case it is full.

Does Dropbox free up space on your iPhone? You see that it does once you master the settings and learn to fix full issue with cluttered space.

There are many ways how you can get more useful storage on the iDevices updated to iOS 10, for example, just remove your Snapchat history. It is necessary to clear your cache for Dropbox and other tools you are using, clean your web browser history, delete old files such as images and videos (that you no longer need), get rid of old text messages etc.

It’s always nice to have more space for your new projects, ideas and desires. If you delete applications and games you are not playing you will be able to download new and trendy programs instead. Once you remove old photos you can take new pictures, create short videos and have plenty of storage for all your dreams. Isn’t it wonderful?

How to Turn On Night Shift Option on Your Mac

The list of Mac OS features and benefits is so long you can discover all the advantages step by step. Since you are probably working on your computer day and night it’s nice to take care of your eyes in the first place. So let’s talk about Night Shift mode on your Mac and learn how to enable and disable it. Don’t let your eyes burning. Fix the problem on-the-go and you’ll be able to move forward with other secrets.

MacOS Sierra Night Shift

This option is a great one. It works once you update to Sierra system. How exactly can it save your eyes?

The new Night Shift mode on your Mac can transfer your display colors. Depending on the time of the day and darkness these colors can become warmer and this way your eyes won’t hurt when you read at night or stay in the dark room and enjoy a book or turn your live photos into still images and view them.

Let’s figure out how to use this Night Shift mode on Mac. It is possible to activate it automatically or ever create your personal schedule using customization option. Everything is pretty simple and you can quickly master this interesting feature that is supported on most devices, including Mac mini, MacBook versions, iMac, Mac Pro. It also works on some well-known displays such as LG UltraFine and Apple Thunderbold / LED Cinema.

Not all Mac OS features and functions work well when you connect a projector or TV to your computer. For example, the cool Night Shift option stops working in such conditions. It is necessary to keep this in mind to avoid being upset.

How to Enable Nigth Shift on Mac

How to Turn on Night Shift on Mac

Step 1. Double check your operating system version since you have to install macOS Sierra 10.12.4 to get the awesome tips and tricks.

Step 2. Look at the upper left part of your computer screen and launch Apple menu to discover one of the most interesting MacOS Sierra secrets.

Step 3. Choose System Preferences section.

Step 4. Select Displays.

How to Turn On Night Shift option on your Mac

Step 5. Enable Night Shift on Mac. You can either choose an existing schedule, create a custom one or choose the option to be activated automatically (in this case it will depend on sunset and sunrise).

For custom schedules you need to choose the time periods when you want to enjoy this feature and when it should stay disabled.

How to Turn Off Night Shift on Mac

Step 1. Launch Apple menu.

Step 2. Select your System Preferences on computer.

Step 3. Choose Displays.

Step 4. Select Night Shift option.

How to disable Night Shift mode on Mac OS Sierra

Step 5. There is a box near Manual. You have to uncheck it however this won’t completely disable the feature in case you set it up manually. Choose ‘Off’ through drop-down menu near Schedule to fully turn it off.

Other MacOS Sierra Tips for Night Shift Mode

You can play with the nice eyes-friendly option and adjust the warmness of the colors you see. Here is a short guide for this:

Step 1. Choose your Apple menu.

Step 2. Go to System Preferences just like you did when you enabled and disabled the feature.

Step 3. Select Displays section.

Step 4. Choose Night Shift.

Step 5. Play with the slider adjusting the temperature of the colors. You can make them warmer or colder.

P.S. Keep in mind that sometimes when you make colors much warmer this could possibly affect your onscreen motion. Still the nice Night Shift Sierra feature is must-use. It truly protects your eyes at night and improves the usages of Macs in the darkness.

How to Send Your Location from Google Maps to Someone with iPhone

Is it difficult to send location in Google Maps on your iPhone 7 or previous model that has iOS 10 firmware installed? You can tell your friends and sweethearts about your whereabouts using the nice trick. It’s simple and quick to use so you can share real-time locations within moments.

iOS 10 Google Maps Tips

You know that Apple introduced its own Maps application for smartphones. Still you are able to use Google Maps location share feature on your device if you install the tool. It is available on the App Store for your operating system. You can also learn how to remove your Snapchat history on iDevice.

It’s up to you who to share your current location with and for how long. Everything can be adjusted via settings. For example, if you are planning to go on a trip your friends and family members can follow your locations until you get to your final destination. It’s a good idea to share real-time location with people you love. They won’t worry about you if they can follow your every move, will they?

How to Send Locations on Google Maps iPhone

How to Share Location via Google Maps iPhone App

Step 1. Before you find details on how to use Google Maps on iPhone you should update this application. Just find the most recent version through App Store – Updates menu where you can choose your Google Maps program and click on Update if it is available.

Step 2. Now launch your updated iOS 10 application on the smartphone [fix iOS 10 bug with messages not being received or sent].

Step 3. Click on the menu option you’ll find at the upper left part of the display.

Step 4. There will be people icon at the upper right part which you have to click on to proceed.

Step 5. Choose the time period for how long you wish to share the location.

Step 6. Now click on Select people option.

Share Current Locations with iPhone Users

Step 7. You should choose with whom to share your current location.

Step 8. Once you made your choices you can click on Share feature.

Step 9. Once your friend gets a notification about your most recent location he or she can click on it and find where you are. The program will show your profile image along with your real-time location. Isn’t it great?

Now those people who care about you will follow your real time traffic through Google Maps on iPhone.

Send your Trip Real-Time Locations via Google Maps on iPhone 7

How to Send Trip Progress Locations

Step 1. You need to open Google Maps tool on iDevice. You can also back up your iPhone just in case.

Step 2. Select menu and click the option called Share trip progress.

Step 3. Choose contacts who will see your locations during the trip and they will be notified.

You have learned how to send Google Maps directions to someone with the iPhone. Now you can visit parties and take interesting trips without your friends worrying about you being late. They will know if you are stuck in the traffic or still travelling to your final spot. It’s a great control method that shows real-time locations using your mobile app.

There are other tips and tricks for iPhone 7 you can use in your everyday life. Even the new sharing option brought by Google on iOS Maps should soon arrive to worldwide users.

How to Fix Bluetooth Device Disconnect Issues on Mac

Some Mac owners get various Bluetooth issues once in a while. For example, you suddenly notice that your Bluetooth keyboard keeps disconnection on Mac. Similar problem can happen to your Trackpad and Magic Mouse. Is there a way how to quickly fix such troubles? We already explain how you can turn live images into still photos on Mac, so now let’s follow the instructions on how you can deal with Mac Bluetooth bugs.

Bluetooth Disconnects on Mac

There are a lot of wonderful tricks that work on Apple gadgets. Some of the tips will help you with your MacBook and MacBook Pro Bluetooth not connecting or suddenly disconnecting problems.

This guide works for Magic Trackpad, Mouse and wireless Keyboard. Many users came across such unpleasant moments so the solutions exist and all you have to do is use them to fix your particular issue. If you are using Apple iPhone and its camera is freezing learn how to fix iPhone 7 frozen camera problems.

Bluetooth Disconnect Issues Fix for Mac Users

Reasons Why Mac Bluetooth Devices Disconnect

What can happen to your computer and Bluetooth device to cause random disconnections? The list of possible reasons is pretty long so it might take some time to figure out what exactly happens and makes you upset.

Firstly, there could be issues with your signal strength. If it’s too poor your Bluetooth gadgets can easily disconnect when you need them the most. Secondly, it could the batteries that cause the bug. Thirdly, the issue can be related to some technical hiccups.

Anyways, no matter what makes your Mac keyboard disconnect Bluetooth connection we can try to solve the issue right away.

Mac Bluetooth Issues

How to Fix Bluetooth Connection Fails on Mac

Method 1: Charge Up Your Bluetooth Gadgets

Sometimes when your Apple mouse loses connection a lot or similar problem occurs to your keyboard or trackpad you have to charge them. If the devices are low on power they can easily disconnect. Once you fix this problem everything will function great again.

You can double check on your battery level through Bluetooth option where you can choose your gadget and find out this information.

How to find out your Bluetooth Device battery level on Mac

Method 2: Enable / Disable Bluetooth Devices

Try to either turn off and enable again your Bluetooth devices or learn how to reset Bluetooth on Mac [you can also easily hide – unhide photos on your Apple computer]. Sometimes both methods easily fix the problem.

Method 3: Reset Device Profile

You can remove your profile and add it back. Just choose your Menu and go to System Preferences where you can select Bluetooth option. You’ll see the X option which you have to click in order to delete your device profile. Confirm your decision by choosing Remove option and add this same gadget back again.

Bluetooth Mouse Disconnecting Fix: Change Batteries

Method 4: Fix Signal Strength

If your Mac mouse disconnects all the time there could be a problem with your signal strength. You should press on Bluetooth option along with Option Key and choose your gadget (mouse or keyboard). You can see how stroung your signal is through RSSI. If the number is low it means your signal is stronger. If you see numbers above 50 you have to understand that you have problems. If the number is -10, -20 it means everything is great.

Deal with bad signal by replacing the battery.

Method 5: Mac Update

Some issues can be quickly fixed with a simple computer update. Launch your App Store and check the Updates menu. Maybe there is a new upgrade you can install which solves all the bugs with Bluetooth Connection.

Mac Mouse Disconnecting Problem Fix Guide

Method 6: Fix the Battery Using Aluminum Foil

Here is what you can do to help your device stop disconnecting. Remove the battery and use a small piece of aluminum foil and wrap it around your battery’s negative terminal. The piece can be as small as 0.5” x 0.5”. Place the battery back into the device and test it. You can also repeat the same trick using a piece of paper to place on top of your batteries.

Hopefully some of these Mac tips can deal with your issues and stop Bluetooth devices from randomly disconnecting.