How to Delete iCloud Backup on Your iPhone to Free Up Space

A lot of iPhone and iPad users periodically back up their devices using iCloud or iTunes. Such backup files take space so once in a while you might wish to remove backups from iCloud and free up some of your valuable storage. You can actually get a lot of space if you have a lot of old files saved but unnecessary.

Delete Your Old iCloud Backups

There are several methods of how to clean your iCloud space [you can also use the free iCloud checker to learn more about your iPhone blacklist status]. You can delete some old files, documents, photos and some applications. You can also disable backing up your games and apps or some of them. However all these steps will not free up as much storage as simple removal of your old iCloud backups.

Think about this. Do you have more than one iDevice? Have you been using your iPhone, iPad, maybe even different models of the same gadget? If your answer is ‘yes’ it means that your old iPhone backup on iCloud must be deleted.

You probably wonder what happens when you delete iCloud backup. Well, if you remove information that was used for devices you have linked but no longer use, you will only free up some storage. Just make sure you have recent backup saved. All previous versions can be easily deleted for good.

Old Backup Removing Guide for iPhone

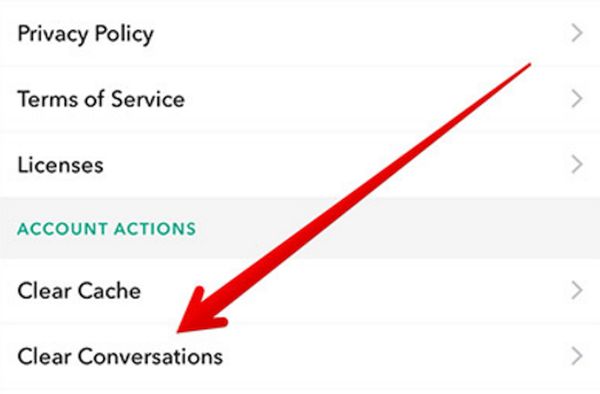
How to Delete iCloud Backup on iPhone

Let’s figure out how exactly you can delete data from iCloud. Remember that this time we are only talking about removing your backups. This is not a guide how to delete photos from iCloud. It is completely focused on back up of your iPhone 7, 6s, 6, 5s, iPad and other iDevices.

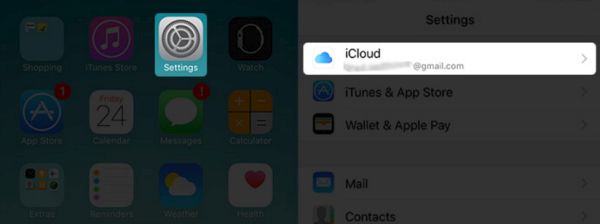
Step 1. Launch Settings on your smartphone or tablet device.

Step 2. Go to General section.

Step 3. Select Storage & iCloud Usage menu as this is where you can delete iPhone backup from iCloud.

Step 4. Look at your iCloud section. Do you see Manage Storage option? Click on it to proceed. If you don’t want to take four steps you can choose Settings – iCloud menu – Storage and select the same Manage option.

Manage storage on iPhone

Step 5. You should now see all your backup files for one Apple ID. If there is only one file available it means that you have one backup for your Apple ID on the smartphone or tablet you are currently using.
If the list is pretty long let’s see how to delete backup from iPhone or iPad [learn how to manage your iPhone 7 files].

Step 6. Choose the backups for your old gadgets that you don’t need any more. Maybe it’s your old iPhone that was exchanged or replaced with a newer version. Anyways, these should be those files that you can remove and forget about.

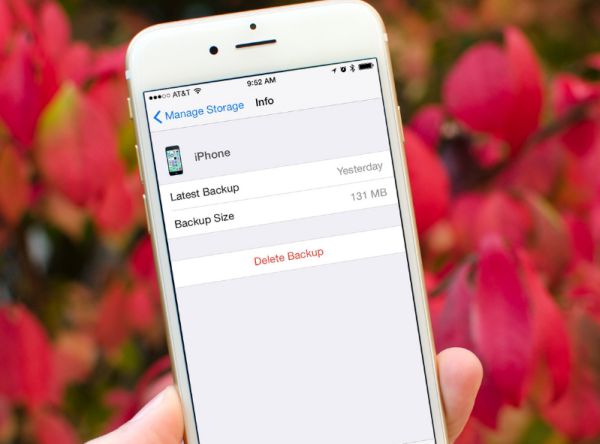
Step 7. Look under Backup menu. Click on the gadget’s name.

Step 8. Click on Delete Backup.

Delete old iCloud backup files on iPhone or iPad

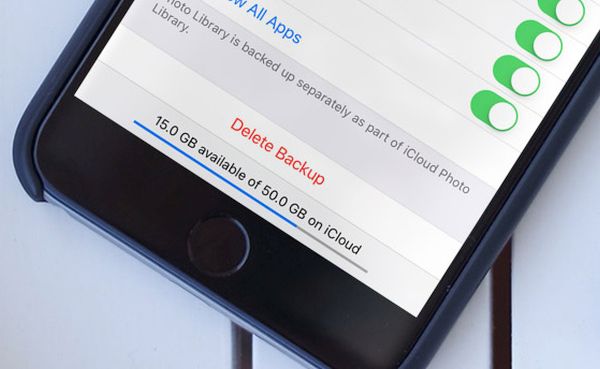
Step 9. You’ll be asked to confirm that you are planning to get rid of your older phone or tablet backups. Do so via Turn Off & Delete feature.

Step 10. Hooray. You have successfully removed old backup files and you should have more storage space available for new backups, photos, apps etc.

Maybe you think that once you transfer your older backup to a newer device it will be automatically removed from your Apple ID. However this doesn’t happen. The copy stays and unless you manually remove it you’ll have to share your storage space with the data you no longer use and need.

How to Turn On Night Shift Option on Your Mac

The list of Mac OS features and benefits is so long you can discover all the advantages step by step. Since you are probably working on your computer day and night it’s nice to take care of your eyes in the first place. So let’s talk about Night Shift mode on your Mac and learn how to enable and disable it. Don’t let your eyes burning. Fix the problem on-the-go and you’ll be able to move forward with other secrets.

MacOS Sierra Night Shift

This option is a great one. It works once you update to Sierra system. How exactly can it save your eyes?

The new Night Shift mode on your Mac can transfer your display colors. Depending on the time of the day and darkness these colors can become warmer and this way your eyes won’t hurt when you read at night or stay in the dark room and enjoy a book or turn your live photos into still images and view them.

Let’s figure out how to use this Night Shift mode on Mac. It is possible to activate it automatically or ever create your personal schedule using customization option. Everything is pretty simple and you can quickly master this interesting feature that is supported on most devices, including Mac mini, MacBook versions, iMac, Mac Pro. It also works on some well-known displays such as LG UltraFine and Apple Thunderbold / LED Cinema.

Not all Mac OS features and functions work well when you connect a projector or TV to your computer. For example, the cool Night Shift option stops working in such conditions. It is necessary to keep this in mind to avoid being upset.

How to Enable Nigth Shift on Mac

How to Turn on Night Shift on Mac

Step 1. Double check your operating system version since you have to install macOS Sierra 10.12.4 to get the awesome tips and tricks.

Step 2. Look at the upper left part of your computer screen and launch Apple menu to discover one of the most interesting MacOS Sierra secrets.

Step 3. Choose System Preferences section.

Step 4. Select Displays.

How to Turn On Night Shift option on your Mac

Step 5. Enable Night Shift on Mac. You can either choose an existing schedule, create a custom one or choose the option to be activated automatically (in this case it will depend on sunset and sunrise).

For custom schedules you need to choose the time periods when you want to enjoy this feature and when it should stay disabled.

How to Turn Off Night Shift on Mac

Step 1. Launch Apple menu.

Step 2. Select your System Preferences on computer.

Step 3. Choose Displays.

Step 4. Select Night Shift option.

How to disable Night Shift mode on Mac OS Sierra

Step 5. There is a box near Manual. You have to uncheck it however this won’t completely disable the feature in case you set it up manually. Choose ‘Off’ through drop-down menu near Schedule to fully turn it off.

Other MacOS Sierra Tips for Night Shift Mode

You can play with the nice eyes-friendly option and adjust the warmness of the colors you see. Here is a short guide for this:

Step 1. Choose your Apple menu.

Step 2. Go to System Preferences just like you did when you enabled and disabled the feature.

Step 3. Select Displays section.

Step 4. Choose Night Shift.

Step 5. Play with the slider adjusting the temperature of the colors. You can make them warmer or colder.

P.S. Keep in mind that sometimes when you make colors much warmer this could possibly affect your onscreen motion. Still the nice Night Shift Sierra feature is must-use. It truly protects your eyes at night and improves the usages of Macs in the darkness.

How to Send Your Location from Google Maps to Someone with iPhone

Is it difficult to send location in Google Maps on your iPhone 7 or previous model that has iOS 10 firmware installed? You can tell your friends and sweethearts about your whereabouts using the nice trick. It’s simple and quick to use so you can share real-time locations within moments.

iOS 10 Google Maps Tips

You know that Apple introduced its own Maps application for smartphones. Still you are able to use Google Maps location share feature on your device if you install the tool. It is available on the App Store for your operating system. You can also learn how to remove your Snapchat history on iDevice.

It’s up to you who to share your current location with and for how long. Everything can be adjusted via settings. For example, if you are planning to go on a trip your friends and family members can follow your locations until you get to your final destination. It’s a good idea to share real-time location with people you love. They won’t worry about you if they can follow your every move, will they?

How to Send Locations on Google Maps iPhone

How to Share Location via Google Maps iPhone App

Step 1. Before you find details on how to use Google Maps on iPhone you should update this application. Just find the most recent version through App Store – Updates menu where you can choose your Google Maps program and click on Update if it is available.

Step 2. Now launch your updated iOS 10 application on the smartphone [fix iOS 10 bug with messages not being received or sent].

Step 3. Click on the menu option you’ll find at the upper left part of the display.

Step 4. There will be people icon at the upper right part which you have to click on to proceed.

Step 5. Choose the time period for how long you wish to share the location.

Step 6. Now click on Select people option.

Share Current Locations with iPhone Users

Step 7. You should choose with whom to share your current location.

Step 8. Once you made your choices you can click on Share feature.

Step 9. Once your friend gets a notification about your most recent location he or she can click on it and find where you are. The program will show your profile image along with your real-time location. Isn’t it great?

Now those people who care about you will follow your real time traffic through Google Maps on iPhone.

Send your Trip Real-Time Locations via Google Maps on iPhone 7

How to Send Trip Progress Locations

Step 1. You need to open Google Maps tool on iDevice. You can also back up your iPhone just in case.

Step 2. Select menu and click the option called Share trip progress.

Step 3. Choose contacts who will see your locations during the trip and they will be notified.

You have learned how to send Google Maps directions to someone with the iPhone. Now you can visit parties and take interesting trips without your friends worrying about you being late. They will know if you are stuck in the traffic or still travelling to your final spot. It’s a great control method that shows real-time locations using your mobile app.

There are other tips and tricks for iPhone 7 you can use in your everyday life. Even the new sharing option brought by Google on iOS Maps should soon arrive to worldwide users.

How to Fix iOS 10 Contacts Disappeared Problem on iPhone 7

Some of us remember the problem with contacts disappeared from iPhone 6. It looks like a similar issue can occur on newest iPhone 7 and 7 Plus models as well. You can easily bring up your contact list and experience no unpleasant moments. Just follow the instruction below and you’ll learn how to deal with iOS 10 contacts disappeared bugs on any Apple handset model.

Missing Contacts on iPhone

Just imagine the situation. You wake up, decide to make an important phone call and suddenly realize that your iPhone contacts are not showing up in your address book. What should you do? Will you be upset? Different bugs can happen on any Apple mobile firmware version so it shouldn’t make you wonder why you could experience this issue on iOS 10.

Remember that you can follow the tips and tricks to deal with your phone contacts disappearing randomly. The solution is often so simple you’ll love how easily everything can be fixed right away.

iPhone 7 Cannot Find Contacts How to Fix

How to Fix Contacts Disappeared from iPhone 7 or iPhone 6 Problem

Method 1: iPhone Contacts Are Not Showing Due to iCloud Bug

Here is what you can try to do:

Step 1. Launch Settings on your mobile device.

iPhone iCloud Settings menu

Step 2. Select iCloud menu [by the way you can use free iCloud blacklist checker just in case you need it].

Step 3. Use Sign Out option to get out from your account.

Step 4. Return to Settings and Sign In back to your iCloud account. This could fix the bug.

Method 2: Resync iCloud Contacts Missing – No Names Only Numbers Solution

Step 1. Open Settings tool on your phone.

Step 2. Select iCloud option.

Step 3. You’ll see the switch near your Contacts. Disable it.

Delete from My iPhone option

Step 4. Click on Delete from My iPhone to remove all the synced contacts right away.

Step 5. Close your Settings app.

Step 6. Restart your smartphone.

Step 7. Launch Settings again and select iCloud menu.

Step 8. Enable the switch near Contacts and your problem with iPhone contacts disappeared on iOS 10 should be gone.

You can also try to disable Contacts again, choose Keep in My iPhone, wait for a while and turn on your Contacts switch back on. If you are asked to merge your contacts just do so.

Method 3: Full iPhone Restore

Do you still notice that some of your iPhone contacts disappeared and are not returned using the methods described above? Here is another fix you might like.

Step 1. Back up your iPhone or user your previous backup copy.

Step 2. Use the cable to connect your phone to your computer and open iTunes program.

Step 3. Choose your device from iTunes menu.

How to Restore Backup iPhone

Step 4. Select Restore Backup option.

Step 5. You need to use the most recent backup file.

Step 6. Click on Restore and wait till the process is complete.

Step 7. Try any program that helps you restore lost information you haven’t backed up. You can look for any good tool in case you need to recover some of your data.

Step 8. Now you should have no issues with your contact list missing.

You can see that there are several working solutions that deal with contact names not showing up or contacts completely or partly missing on your iPhone 7 or iPhone 6 [even though there are many more iOS 10 problems you can come across]. You can always try a different method if one of them is not helping you out.

How to Use Read Later On Mode on iPad and iPhone in Chrome

There are several great apps that let you read your web pages offline. You can also save your favorite page to read later on directly on iPhone or iPad. This task is as simple as sharing analytics data on your mobile device. You’ll quickly master everything and become an expert in saving amazing stories, news and blogs through Google Chrome right on your Apple device.

Save Chrome Pages to Read Offline on iDevice

iPhone Read Later Offline

There are a lot of users who prefer Chrome browser to Safari. Still you’ll be happy to learn that both browsers have a similar option to read later offline. It is called ‘Read Later’ in Chrome and is known as ‘Add to Reading List’ in Safari.

We all enjoy browsing. Sometimes you find a very interesting article you wish to read however you are busy, hurrying somewhere or cannot devote 5 minutes right here right now. You can tell yourself you’ll read it later and forget about it. If you don’t save your article for quick access later on you will most likely never get a chance to read it.

It’s incredible when you can save pages to read later on and it doesn’t matter much if you are using a mobile phone or tablet computer. Both iPhone and iPad support this feature so let’s learn what exactly you need to do to activate and use it.

P.S. Remember to check your activation lock status on iPhone 7 since this option is available at no cost.

Update Chrome App on iPhone iOS 10

How to Use Read Later On iPhone and iPad

Step 1. You can enjoy the awesome Read Later Chrome feature on iPad and iPhone. There is no need to find the Getpocket Chrome application since you can do everything using the native mobile option offered in the latest browser edition. Just make sure you have upgraded your mobile Chrome version to the most recent release.

Step 2. Open the update browser on your mobile gadget.

Step 3. Find the article or articles if you want to save several web pages to read later.

Step 4. Look at the upper right part of the display. There you’ll see Chrome menu. Click on it.

Step 5. Select the Share option on the left.

Read Later Chrome Option

Step 6. Choose ‘Read Later’ feature that replaces apps that let you read web pages later on.

Step 7. Your story is now saved.

Fans of Chrome can also install Google Voice on their ‘fruit’ gadget.

How to Read Web Pages Later on iPad or iPhone

Once you master how to save web pages to read later on iPad or your phone you should learn how exactly you can access your saved articles to enjoy them offline.

Step 1. Launch browser on iDevice. Remember that we are using Chrome.

Step 2. Click on the menu option.

Step 3. Choose Reading List which displays all the articles you didn’t read.

Step 4. Click on the story you wish to read right now.

Step 5. Read your saved page offline.

How to Remove Pages Saved to Read Later on iPhone Chrome

How to Delete Saved Stories for Offline Reading

Step 1. Launch your Chrome mobile browser.

Step 2. Choose your menu.

Step 3. Select Reading List option.

Step 4. Choose Edit from the lower right part of the screen.

Step 5. Choose an article you plan to remove.

Step 6. Click on Delete option.

Step 7. The saved page will be successfully removed from your Read Later list on iDevice.

How to Mark Saved Pages as Read or Unread in Chrome on iOS 10

Step 1. Launch Chrome browser on iOS 10 iPhone or iPad.

Step 2. Choose menu.

Step 3. Click on your Reading List.

Step 4. Click on Edit option which is located at the lower part of your screen.

Step 5. Choose Mark All feature.

Step 6. Now you have to either click on Mark (All) Read or Unread depending on how you wish to mark articles that you saved for reading offline.

Step 7. Click on Done.

You see that there is no need to download apps to read articles offline because Chrome browser has this feature built-in its latest iOS 10 updates.

How to Fix Bluetooth Device Disconnect Issues on Mac

Some Mac owners get various Bluetooth issues once in a while. For example, you suddenly notice that your Bluetooth keyboard keeps disconnection on Mac. Similar problem can happen to your Trackpad and Magic Mouse. Is there a way how to quickly fix such troubles? We already explain how you can turn live images into still photos on Mac, so now let’s follow the instructions on how you can deal with Mac Bluetooth bugs.

Bluetooth Disconnects on Mac

There are a lot of wonderful tricks that work on Apple gadgets. Some of the tips will help you with your MacBook and MacBook Pro Bluetooth not connecting or suddenly disconnecting problems.

This guide works for Magic Trackpad, Mouse and wireless Keyboard. Many users came across such unpleasant moments so the solutions exist and all you have to do is use them to fix your particular issue. If you are using Apple iPhone and its camera is freezing learn how to fix iPhone 7 frozen camera problems.

Bluetooth Disconnect Issues Fix for Mac Users

Reasons Why Mac Bluetooth Devices Disconnect

What can happen to your computer and Bluetooth device to cause random disconnections? The list of possible reasons is pretty long so it might take some time to figure out what exactly happens and makes you upset.

Firstly, there could be issues with your signal strength. If it’s too poor your Bluetooth gadgets can easily disconnect when you need them the most. Secondly, it could the batteries that cause the bug. Thirdly, the issue can be related to some technical hiccups.

Anyways, no matter what makes your Mac keyboard disconnect Bluetooth connection we can try to solve the issue right away.

Mac Bluetooth Issues

How to Fix Bluetooth Connection Fails on Mac

Method 1: Charge Up Your Bluetooth Gadgets

Sometimes when your Apple mouse loses connection a lot or similar problem occurs to your keyboard or trackpad you have to charge them. If the devices are low on power they can easily disconnect. Once you fix this problem everything will function great again.

You can double check on your battery level through Bluetooth option where you can choose your gadget and find out this information.

How to find out your Bluetooth Device battery level on Mac

Method 2: Enable / Disable Bluetooth Devices

Try to either turn off and enable again your Bluetooth devices or learn how to reset Bluetooth on Mac [you can also easily hide – unhide photos on your Apple computer]. Sometimes both methods easily fix the problem.

Method 3: Reset Device Profile

You can remove your profile and add it back. Just choose your Menu and go to System Preferences where you can select Bluetooth option. You’ll see the X option which you have to click in order to delete your device profile. Confirm your decision by choosing Remove option and add this same gadget back again.

Bluetooth Mouse Disconnecting Fix: Change Batteries

Method 4: Fix Signal Strength

If your Mac mouse disconnects all the time there could be a problem with your signal strength. You should press on Bluetooth option along with Option Key and choose your gadget (mouse or keyboard). You can see how stroung your signal is through RSSI. If the number is low it means your signal is stronger. If you see numbers above 50 you have to understand that you have problems. If the number is -10, -20 it means everything is great.

Deal with bad signal by replacing the battery.

Method 5: Mac Update

Some issues can be quickly fixed with a simple computer update. Launch your App Store and check the Updates menu. Maybe there is a new upgrade you can install which solves all the bugs with Bluetooth Connection.

Mac Mouse Disconnecting Problem Fix Guide

Method 6: Fix the Battery Using Aluminum Foil

Here is what you can do to help your device stop disconnecting. Remove the battery and use a small piece of aluminum foil and wrap it around your battery’s negative terminal. The piece can be as small as 0.5” x 0.5”. Place the battery back into the device and test it. You can also repeat the same trick using a piece of paper to place on top of your batteries.

Hopefully some of these Mac tips can deal with your issues and stop Bluetooth devices from randomly disconnecting.

How to Permanently Delete Snapchat History on iPhone 7 or iPad

How do you remove Snapchat history on iPhone or iPad? It is actually very easy to delete your conversations if you don’t want someone to read them while using your phone. Let’s learn how you can erase your Snapchat messages in the simplest way possible.

Snapchat History Delete

Why would you need to pay attention to your chat history? Firstly, your numerous conversations can simply clutter your application. This means that you have to get rid of old messages once in a while to keep the program uncluttered. Secondly, you might borrow your phone to your friends and this means that you might want to hide or remove some of your Snapchat chats. Besides, you can easily remove your iPhone 7 widgets using the 3D Touch option.

Snapchat is pretty popular among many people who like to share hilarious stories with their friends and family members. You can delete either the whole history of your mobile chat or some individual conversations. Everything depends on your goal and why you wish to delete Snapchat history on iPhone 7, 6s or older models.

Snapchat History Eraser Photo

How to Permanently Delete Snapchat Messages

Step 1. If you need a Snap history eraser app to delete only one or a couple of chats it’s better to download no programs. You just need your iPhone 7 or other model with Snapchat conversations on it.

Step 2. Launch Snapchat tool on the phone.

iPhone Snapchat

Step 3. Click on the program’s icon that is located at the upper left corner of the app.

Step 4. You’ll see the Settings option at the upper right part of the screen. Click on it.

Settings for Snapchat on iPhone 7

Step 5. You should scroll down a bit.

Step 6. Find Clear Conversations feature and click on it.

How to Delete Snapchat Messages

Step 7. There will be an ‘X’ button next to each chat you have. Click on the X next to the conversation you want to remove.
Step 8. You’ll see a popup window with Clear option which you have to press on.

Step 9. Once you confirm your decision the individual conversation will be removed permanently.

P.S. If you are a fan of WhatsApp you can amaze your friends by sending disappearing photos or video files.

Delete History on Snapchat on iPhone

How to Delete Snapchat Conversation History

Step 1. Sometimes you are searching for Snapchat history eraser app download while there is no need to look for such tool because you can remove all conversations at once directly on the iPhone with no additional apps.

Step 2. Open Snapchat.

Step 3. Choose the application icon.

Step 4. Go to Settings.

Step 5. Choose Clear Conversations.

Delete Snapchat History on iPhone

Step 6. There will be a Clear All option at the upper right part of the screen.

Step 7. Click on Clear Feed and you’ll successfully remove all the chats using this simple Snapchat history eraser guide.

It’s pretty simple to remove the messages you want to hide. You should not face any snapchat conversations issues because you can clear your history using Snapchat settings. Hopefully you’ll find the instruction above useful.

Remember that even if you don’t want to hide your old chats you might still want to clear your Snap history to clear some space. It is a super fast solution that requires no third-party applications or extra services. This is something you can manage yourself.

How to Check Your iPhone Activation Lock Status for Free Online

A lot of us still remember the Activation Lock status web-site created and later removed by Apple. It was a quick way to get details about your iPhone Activation lock. Unfortunately those days are gone while millions of iPhone owners still have the need to check their iPhone IMEI status and wish to find another simple and fast solution.

Check iPhone Lock Status

How can you do this task? Is there a method that makes everything possible online without any additional software? We know one great free option you can use. It is an easy method you can use on-the-go. You don’t have to install any programs, tools or third-party apps on your iPhone, Mac or Windows PC. You only need active internet connection and your favorite browser.

The previous free iPhone IMEI check online service wasn’t perfect. It could be possible to hack the tool and even activate smartphones that were bricks. Some experts assure that that web page could allow hackers to even change the iPhone serial number by entering the handset’s IMEI number and successfully bypass the iCloud Activation Lock.

You can no longer use that status page however there is another loophole in the Cupertino-based company’s site which you can take advantage of and perform a simple iPhone activation lock check procedure for your personal needs.

How to Check Activation Lock on iPhone

How to Check iPhone iCloud Activation Lock Status

Keep in mind that this particular iPhone check service works only for some of us. It might not work for you because the loophole can be fixed by Apple at any moment. Give it a try and maybe you’ll successfully check your activation lock status by IMEI.

Step 1. Use any mobile web browser you like. You can do this on your iPhone or computer. It doesn’t matter which device you are using.

Step 2. Visit Apple Support page.

Step 3. You’ll get a list of gadgets where you can point to your smartphone.

Step 4. You should select any hardware category and problem. For instance, you can click on Battery, Power & Charging section and click on battery issue.

Step 5. No matter which category you choose you’ll get the choice to Send or Bring your device for repair.

Step 6. You can now type your serial number or IMEI for activation lock check. The service is free and you don’t have to complete the repair request.

Reasons to Check Activation Lock Status on iPhone

Possible iPhone IMEI Check Issues through Apple Service

There could be situations when the service works well but you see the following issue: ‘Sorry but we can’t create a repair while Find my iPhone is active.’ What does it mean? Why can’t you use the free iPhone lock status check at no cost?

This message means that you have either turned on Activation Lock or enabled Find My iPhone service on the phone. Disable these features and check your status once again.

There are many paid services that can answer the question about your Activation Lock status. It’s surely easier to find a no-cost option but if the loophole is fixed you’ll have to search for alternative methods and solutions. Right now you still have a chance to figure out your status using your iPhone IMEI code and Apple Support web page.

Such services are very useful when you are planning to buy a used phone. It’s always great to know that its IMEI is clean. In other words, it’s nice to double check that your used iPhone hasn’t been stolen or lost. Am I right?

How to Record FaceTime Calls with Sound on Mac and iPhone 7

Thinking of recording your FaceTime calls? It is possible to record your video and audio using your iPhone 7 or Mac. Both Apple devices are able to help you achieve your goal. There is no need to search for third-party applications that work as FaceTime recorder since everything can be done with the help of QuickTime. It’s easy, quick and you’ll enjoy the results.

Recording FaceTime Calls

There is more than one call recorder for FaceTime. You can choose any program you like since recording video and audio for FaceTime (if you are a fan of this video calling tool) is must have for various situations. Learn how to record FaceTime on Mac with sound or directly on your iPhone and you’ll solve several problems at once.

You do need to use third-party apps to help record FaceTime video on iPhone and your computer [here is how to fix iPhone 7 camera freeze bug]. We’ll tell you what application is number 1 and better to download and you’ll repeat the guide, learn cool tips and master this task.

FaceTime Video and Audio Recording on iPhone or Mac

How to Record FaceTime Calls with QuickTime on iPhone + Mac

You need your smartphone and Mac in order to record FaceTime audio and video calls on iPhone. You should also get a 30-pin or Lightning cable to connect the handset to your Mac. Besides, you should use FaceTime program and QuickTime app.

Step 1. Use the cable to connect your iOS 10 or iOS 9 phone to your computer.

Step 2. Launch QuickTime program on Mac machine.

Step 3. Choose File – New Movie Recording option.

Record FaceTime Calls with QuickTime App

Step 4. You’ll see the record option and an arrow next to it. Press on this arrow to continue.

Step 5. Unlock your phone. It’s screen will be shown on your computer. Turn up the volume so that QuickTime ‘hears’ your phone call.

Step 6. Now you can open FaceTime on iPhone 7 [you can also turn your iPhone Live photos into still images].

iPhone FaceTime App

Step 7. You can now click on Record button on Mac’s QuickTime tool.

Step 8. Now you can enjoy FaceTime call on your smartphone.

Step 9. Remember to click on Stop in QuickTime when you finish with your phone call.

Step 10. Now choose File – Save and give your recording a name. Choose where you wish to save it and click on Save option.

How to Save FaceTime Call

This is how you record FaceTime on iPhone. You see that this is not a direct method since there is now way how you can record your phone calls directly on iOS 9 or 10 handset [by the way, if you are using WhatsApp you can send disappearing photos and videos from your smartphone to your friends]. Let’s find out how different this guide is for your computer recordings.

Mac FaceTime Calls Recording Guide

How to Save FaceTime Calls on Your Mac

Step 1. Launch QuickTime tool on your computer.

Step 2. Select File section.

Step 3. Choose New Screen Recording option.

How to Record Screen on Mac

Step 4. You’ll see the arrow near Record option which you have to click.

Step 5. Choose Built-in Microphone option or select Internal Microphone feature.

Step 6. Open FaceTime program on your computer.

Record FaceTime Calls on Mac

Step 7. There should be Record option in QuickTime app as well. Click on it.

Step 8. You can record the Mac screen or only FaceTime calls. Choose Screen option or just press-drag over your FaceTime window to decide which feature you need to use. P.S. You can also hide and unhide images on Mac without any issues.

Step 9. Place your FaceTime call.

Step 10. When your call is over you should choose the Stope Recording option in QuickTime Menu.

Save FaceTime Video Audio on Mac

Step 11. Choose File – Save to save your new recording. You need to give it a name.

Step 12. Once the name is given you should press on Save once again.

That’s it. You’ve learned how to record Facetime audio and video for iPhone or Mac. Both methods are performed on your computer since it is currently not possible to make such recordings directly on your smartphone screen.

iPhone 7 Camera Freezes: iOS 10 Tips and Tricks to Fix It

It doesn’t matter how new your smartphone is. There could be issues even with the latest iPhone 7 and 7 Plus models not speaking about previous iPhone 6s, 6, 5s and earlier phones. Sometimes the problems are related to software and sometimes you have to deal with hardware bugs. Let’s talk more about possible iPhone 7 camera issues and learn how to fix the issue as soon as you notice it.

iPhone 7 Camera Freeze Bug

This is what can actually happen to you one day. Users report that their iPhone 7 camera suddenly stops responding or completely freezes. This unpleasant situation can occur on both 7 and 7 Plus versions so no models are protected from this problem.

Explore the possible tips and you’ll easily deal with the bug when your iPhone camera is not working when you really need to take a picture, selfie or record a short video.

How to Fix Camera Freezing on iPhone 7

When iPhone Camera Can Freeze

Sometimes you notice that your iPhone camera freezes when switching to front camera. According to some Apple customers, they noticed the problem when they were trying to capture an impressive moment with their Portrait Mode on iOS 10 firmware.

The issue can happen once in a while, occur once or twice or bother you every day which won’t make you happy. The guide on how to fix iPhone camera freeze problem offers several solutions you can try. Maybe one of the tips will quickly solve your issue. If one trick doesn’t work for you – just follow a different tip and test all the solutions to find the right one for your iDevice. You can also learn how to remove and add widgets using 3D Touch on your handset.

How to Fix Camera Bugs on iPhone

How to Fix Camera Problem on iPhone 7

Tip 1. iOS 10 Update

Sometimes all you have to do is upgrade to the latest available firmware version and all minor bugs will be fixed on their own:

Step 1. Launch Settings on your handset.

Step 2. Choose General menu.

Step 3. Select Software section.

Update to iOS 10.2 on iPhone 7

Step 4. If you see an update you should install it. For example, you can update to iOS 10.2 if you are running the first iOS 10 version.

Tip 2. iPhone Reboot

A lot of issues are gone after force reboot. Thus you can try this solution when you experience issues with your iPhone 7 camera:

Step 1. You need to force quit the programs on your phone. Just double click on your Home button and swipe up on your application card. This way you can close all background apps at once.

Step 2. Hold both On / Off and Volume Down buttons and count till 10. You’ll see the famous Apple logo.

Step 3. Wait for the restart.

Step 4. Open your Camera app again and take a shot.

How to Turn Off Location Services

Tip 3. Disable App Refresh / Location Services

The bug could happen because of two many services working at once on your smartphone. You can try to turn off some of the most battery-draining tools and hopefully your camera will work properly again:

Step 1. Open Settings and choose Privacy.

Step 2. Select Location Services and disable this option.

Step 3. Now get back to Settings app and select General section.

Step 4. Go to Background App Refresh and turn off this feature.

Step 5. It is also better to update all pending apps through App Store – Updates where you can select the option called Update All.

Step 6. Restart your iPhone 7 or iPhone 7 Plus.

Step 7. Launch Camera iOS 10 program and start recording videos and creating new amazing photos. Everything should be fixed.

Nothing Worked?

The camera could freeze because of hardware bugs. In this situation you should contact Apple Support and get help with your iPhone camera problems.