Let’s learn about some Mac OS Sierra hidden features [here is how to enable Night Shift feature on your Apple computer] and explore the interesting filename extensions. What are these options? Do you really need to deal with hiding and showing them up?
Mac OS File Extensions
Before you get to use your Mac filename extensions you might wonder what this feature means to you and why it could be useful and important in your everyday tasks. Hiding and unhiding the option is a must-know thing.
Each file has its own extension at the end. This way your computer can verify what program to use to open it. You are definitely familiar with such extensions as .jpg, .jpeg, .png etc. You can see that each file extension has a period which precedes the letters or numbers (for example, there are .mp4 video files).
It’s up to you whether to show filename extensions on Mac or hide them [learn more secrets about Touch Bar zoom option]. The files will still be opened by the programs. Hiding or showing them won’t make a ‘working’ difference. It’s only the matter of fact what you’ll see with your eyes, not how the correct applications will open these or those files.

How to Hide All File Extensions on Mac
Here are some incredible Sierra tips and tricks for making your file names look more accurate.
Step 1. You should only use your computer that is updated to MacOS Sierra. Follow the tips and you’ll be just fine.
Step 2. Launch Finder.
Step 3. You’ll see ‘Finder’ option at the upper left part of the screen. Press on it to continue.
Step 4. Click on Preferences – Advanced.
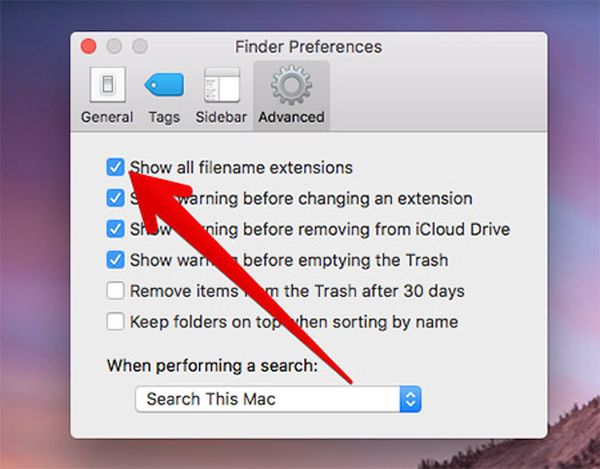
Step 5. You should enable Mac OS file extensions by checking the ‘Show all’ option.
Step 6. If you want to hide file extensions on Mac you need to disable the ‘Show all’ feature.
Keep in mind that your Mac filename extensions will be hidden for all the files you have. This happens even if you tried to hide or show only particular extension and then click on ‘Show all’ menu. This rule doesn’t work for showing all the full file names because this feature only reveals the files that are shown and hides the ones that are hidden individually.
How to Show Mac Filename Extensions Individually
It is possible to hide file extensions on MacOS Sierra one by one or individually. Let’s see how you can manage these tips:
Step 1. Choose the Mac file that you wish to display or not display its extension.
Step 2. Right click on your file.
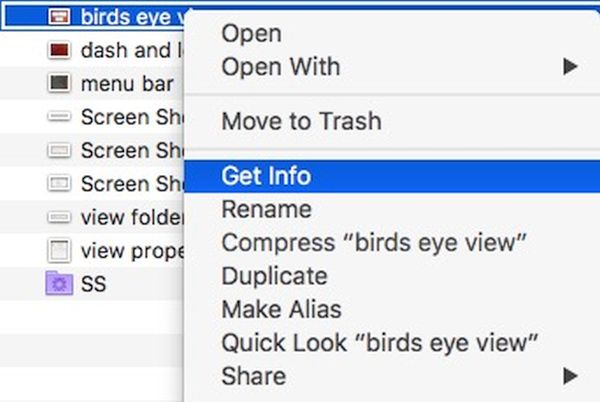
Step 3. Choose Get Info option.
Step 4. Look at Name & Extension option. Do you see a triangle near it? Press on it to proceed.
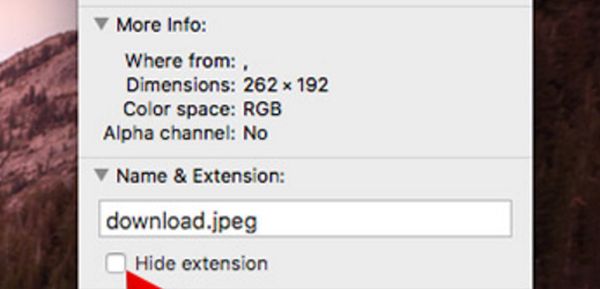
Step 5. There should be more options displayed. You’ll see ‘Hide extension’ feature which you can enable by checking the box. You can also unhide it by unchecking that box.
We all have different taste. Some people like seeing file name extensions and other would like to hide them all or some of them. Now you know how to perform these tasks one by one or simultaneously.
Organize your Mac files the way you want. Just always remember that you should not change and remove your file extension by renaming it. Because this way you’ll lose the opportunity to launch the application, image, folder or program since your computer will not know what to do with it.
Hide and show your file format when you want and how you like it. It’s all possible with Mac OS Sierra tips you have just learned. Please enjoy!