How to Adjust iOS 10 Share Sheet Settings on iPhone

Looking for interesting iOS 10 tips you can use to customize your iPhone features. There is share sheet you might be using since this option allows sharing your content with your social network friends. Let’s learn how you can arrange icons in Share Sheet.

Share Sheet on iOS

It is possible to control how your icons are located in your menu. Just follow the simple instruction and you’ll customize your options within moments. If you often use Twitter, Facebook or other sites you can arrange your iPhone share sheet how you like it and get a quicker access to the networks you prefer in your everyday life and work.

We’ll describe 2 different methods of how to arrange apps icons on iPhone for your Share Sheet. There is nothing difficult. The simplicity always rocks and you are about to discover some great secrets of iOS 10 firmware.

Set Up Share Sheet on iPhone iOS 10

How to Arrange Icons in Share Sheet

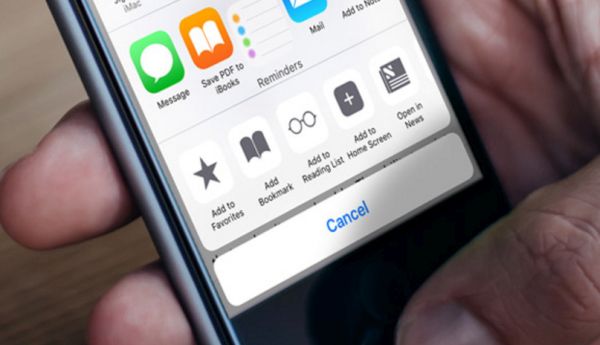
As you probably know your phone makes it easy to Bookmark things you like, Add them to Favorite list, share via Twitter etc. This is what your phone Share Sheet allows doing. Here is how you can rearrange everything to your personal likes.

By the way, you can try the following iOS 10 tips [learn how to block spam calls] on both your handset and iPad. All Apple mobile devices should support these features.

First Solution: Share Sheet Settings

Step 1. Think of the application you wish to text. You can play with Safari or use Notes or similar tools that support share sheet option.

Step 2. Open your share sheet.

Click on More in Share Sheet iOS 10

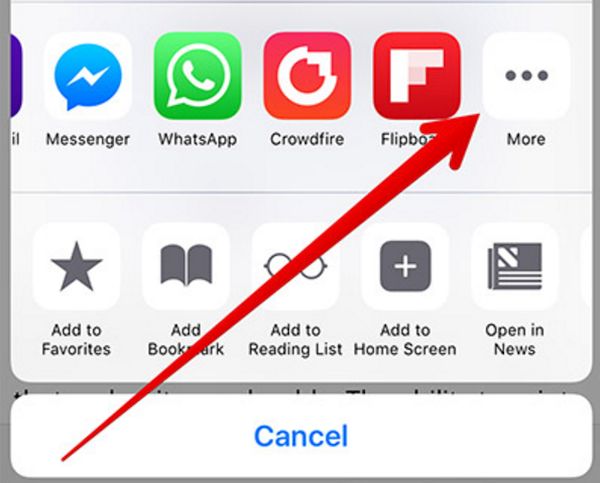
Step 3. You should get to More feature. Do this by swiping from right to left on your activity icons. Click on More to proceed.

Step 4. There are 3 horizontal lines you should notice near activity so clik-hold on them.

Replace Icon on Share Sheet iOS 10

Step 5. Drag your icons the way you want.

Step 6. Click on Done when you are ready to set up everything.

Step 7. That’s it.

Second Solution: iPhone Share Sheet Menu Options

Step 1. Once again you should launch the program that supports share sheet feature.

Step 2. Click on Share option.

How to Rearrange Share Sheet on iOS 10 Iphone

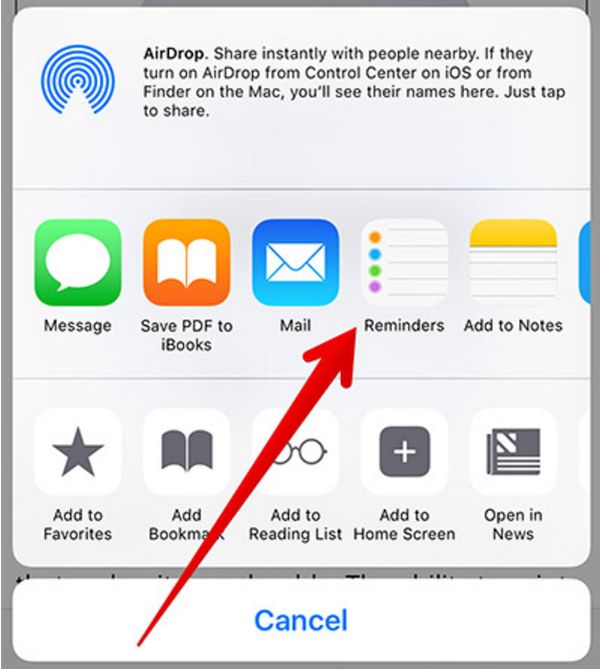
Step 3. Click and hold your application icon that you wish to rearrange. Move it to where you would like it to be placed.

Customize Share Sheet on iPhone 7

Step 4. That’s it. The icon will be placed to a different area of your screen.

iOS 10 Share Sheet Hiding Icons

It is easy to hide some icons on your sheet:

Step 1. On iPhone 7 launch Safari or other program that supports sharing.

Step 2. Click on Share option to proceed.

Step 3. You need to swipe from right to left on the application to get to More feature.

Step 4. Click on More to continue.

Hide Options on Share Sheet iPhone or iPad with iOS 10 firmware

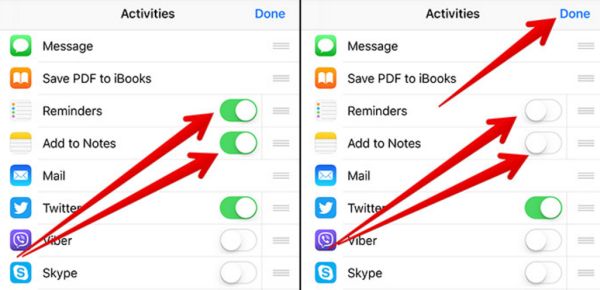
Step 5. There are ‘hide’ features next to different share sheet icons. Just disable the switch for the parts you want to stay hidden.

Step 6. Confirm that you want to hide things by clicking on Done.

Step 7. That’s pretty much all curious iOS 10 tips for Share Sheet on iPhone and iPad.

We hope you find the guides above useful to update your settings and rearrange or hide icons on share sheet feature.

How to Fix Touch ID Failed Issue on iPhone 7 and 7 Plus

A number of Apple fans has already experiences various issues with their fingerprint sensor. Some were unable to complete Touch ID set up or tasks, others noticed that this wonderful feature stopped working suddenly. If you are unable to activate Touch ID on your iPhone iOS 10 you should follow the simple steps below and successfully solve the problem.

iPhone 7 Touch ID Not Working

This should not be a common problem. So when you notice that something is wrong with your fingerprint identity sensor on iPhone 7, 7 Plus or earlier model updated to iOS 10 firmware version you have to take some action and resolve the bug as soon as possible.

Why would the sensor act this way? What should you do when you are unable to activate touch id on this iphone? The reason could be silly. Maybe your finger is sweaty or you don’t place it correctly on the Touch ID sensor. Let’s see what simple steps you can follow to deal with such situations.

How to Fix iPhone 7 Touch ID Problems

How to Fix Touch ID on iPhone 7 Plus and 7

Method 1. If Touch ID Failed on iPhone 7

Follow all these steps to solve the issues on-the-go:

Step 1. Wash your hands to make sure your fingers are clean and not sweaty. You should also dry them before trying to press on Touch ID button again.

Step 2. Gently clean your Home Button on the iPhone. Use a smooth cloth for this purpose.

Step 3. Try to click on your Home Button again with less pressure. Don’t apply too much force.

Step 4. Make sure you are pressing on both Home button and metal ring on the phone.

Step 5. Keep your finger in one place, don’t move and this way your Touch ID not working iOS 10 issue could be gone without extra methods.

Step 6. If your fingers are cold or it’s too cold outside you should first warm the finger and when it gets back normal try to click on the fingerprint sensor once again.

Method 2. Re-Add Fingerprints If iPhone 7 Fingerprint Sensor Is Not Working

You can always remove your fingerprints and re-add them again. This way you can deal with Touch ID issues on iPhone 7:

Step 1. Go to Settings on your handset.

Step 2. Select Touch ID & Passcode section.

iPhone Settings - Touch ID & Passcode

Step 3. Type the passcode you are using.

Step 4. Click on the fingerprint.

Step 5. Now choose Delete Fingerpint option. You have to repeat this step for each fingerprint you have registered.

iPhone Delete Fingerprint

Step 6. Hard reboot the phone by holding volume down + power buttons.

Step 7. Return to Settings program – Touch ID & Passcode.

Step 8. Choose Add a Fingerprint.

Step 9. You have to register it just like you ordinary do. This is one of the methods how to fix Touch ID on iPhone 7.

Fix Touch ID Isses by updating to latest iOS firmware

Method 3. Smartphone Upgrading

If you are still unable to activate Touch ID on this iPhone with iOS 10 firmware version, you should update to iOS 10.3:

Step 1. Open Settings app on your mobile gadget.

Step 2. Go to General menu.

Step 3. Select Software Update and be patient. Once your Apple device updates you should get no problems with the fingerprint scanner.

Method 4. Turn On Rest Finger to Open iPhone

Step 1. Go to Settings on your iDevice.

Step 2. Select General section.

Accessibility on iPhone 7

Step 3. Go to Accessibility.

Step 4. Choose Home Button option.

Rest Finger to Open to fix Touch ID not working problem

Step 5. You’ll ass the Rest Finger to Open option. Turn it on.

You can now use Touch ID to open your mobile gadget since you have enabled this feature. Hopefully you will no longer face iOS 10 Touch ID failed problem.

How to Unlock iPhone 6, 6s or 7 from Sprint via 2 Great Methods

Do you have iPhone 6, 6s, or newest iPhone 7 locked to Sprint network in the USA? It is possible to use great Sprint domestic unlock to easily switch your mobile device to any other network besides this mobile operator. The process is actually simple and fast if you know all the details we are about to share.

Unlock iPhone Sprint USA

Do you think about switching to a different network? This is impossible unless you purchase a second handset or find Sprint iPhone unlocker software or online service. Luckily this whole unlocking process can be a breeze if you follow our tips.

If you try to install a different SIM card in your phone without unlocking Sprint iPhone 7, 6s, or 6 you will see the warning message that your smartphone doesn’t support this card ‘under activation policy.’ In other words, your device cannot connect to any network besides Sprint but you can change this situation once you find a way how to unlock Sprint phone online.

SIM Unlock for Sprint iPhone 6 and other models

Sprint iPhone Unlock Service

There are 2 main methods to reach your goal. Firstly, you can request Sprint unlock for iPhone 6, 6s, or 7 directly from this carrier. This method requires filling out many forms, waiting and there is always a chance that the company will deny your request. Secondly, you can use factory unlock Sprint iPhone 6 or other phone model service and save your time and nerves.

How to SIM unlock your iPhone Sprint domestic and international service

Method 1. How to Unlock Sprint iPhone 6s Directly by Carrier

Step 1. Double check with your mobile operator that you are eligible for unlock. If you got a gadget before February 2015 you might not get a chance to unlock directly by Sprint. In such situation you can always go with the factory unlocking service.

Step 2. You’ll have to leave two separate unlock requests if you are need to unlock your phone for international and domestic use.

Step 3. Check your IMEI before asking for SIM unlock because blacklisted and blocked as well as lost and stolen smartphones are not eligible for the service. You can also check what network you are locked to.

Step 4. Your gadget has to be active for at least fifty or ninety day with Sprint’s network (depending on type of service you are looking for, domestic or international). Besides, your account has to be in a good standing.

Step 5. Once you have checked everything and attentively read the Sprint unlocking policy on the networks’ website you can request unlock for Sprint iPhone 6 model online or via 1-888-211-4727 for domestic service (888-226-7212 for international).

It’s worth to note that iPhone 6, 6s and 7 / 7 Plus support both GSM and CDMA networks unlike older Apple smartphones. In other words, you can unlock your Sprint handset for AT&T, Verizon and T-Mobile without any problems.

Step 6. Once the network lets you know that you are unlocked you can turn of your mobile device and switch a SIM card.

Step 7. Restart the phone and set it up by following the on-screen guide.

Factory SIM unlock iPhone from Sprint network

Method 2. Factory Unlock for iPhone 6 Sprint

An third-party service can help you become SIM free and complete Sprint domestic or international unlock for iPhone 6, 6s, 7 and 7 Plus.

Step 1. Choose a trusted company that offers to unlock Sprint iPhone 6 for AT&T, T-Mobile, Verizon or any worldwide carrier.

Step 2. Find out your IMEI number because you still need to use blacklist checker and also check your iPhone for activation status and other details.

Step 3. Fill out your details (your device model, carrier, IMEI etc.), place your order and pay for it.

Step 4. Make sure you fill in the correct email address. This is where you’ll receive order and iPhone unlocking confirmation. It usually takes a couple of days to complete this task.

Step 5. Once you are SIM free you can switch the card and connect to iTunes. The program will check Apple database and see your new status. You’ll be able to connect to any network from now on.

Isn’t it cool to be free of any carriers?

How to Solve Issues with iPhone 7 Stuck on Apple Logo with Black Screen

Is your iPhone 7 stuck on black screen with Apple logo? Do you see the black screen and the white logo in the middle? Is there a way how to quickly solve this issue and get your mobile device work properly again?

iPhone Stuck on Apple Logo

We know what iOS 10 tips and tricks can help you. Don’t worry when your new phone suddenly gets stuck on ‘fruit’ logo. There are several solutions you can try in order to deal with the problem. Some of them might not work for you but you’ll surely find the right one for your situation.

Users whose iPhone 6 stuck on Apple logo screen probably face this bug due to jailbreaking their smartphone. iPhone 7 owners could also face this bug even though they are using factory model. It might occur while you are trying to restore or update your device.

iPhone 7 Stuck on Apple Logo and Black Screen How to Fix iOS 10 Tips

How to Fix iPhone Stuck on Apple Logo

Tip 1. iPhone 7 Apple Logo Stuck Fix by Restart

The first thing you should do when something is wrong with your handset is to restart it. This simple trick can solve various problems and help you return your gadget to the working condition.

Step 1. Take your iPhone that is frozen on the popular logotype.

Step 2. Click and hold the On / Off option and slide to turn off your gadget.

Step 3. Wait till the device powers on and maybe the issue is gone.

Enter DFU to Fix iPhone 7 Apple Logo Stuck Issue

Tip 2. DFU Fix to iPhone 7 Stuck on Apple Logo

How can you fix iPhone stuck on Apple logo without losing data? You can try using DFU mode.

Step 1. You need to use your Mac or Windows PC where you should open iTunes.

Step 2. Use a cable to connect the problematic phone to your computer.

Step 3. Turn off your handset by holding sleep / wake button. Once you see a black screen you should hold your On / Off button for approximately three seconds.

Step 4. Press on Home button (or Volume down option on iPhone 7 and 7 Plus) while still holding down the On / Off option. Count till ten and let go of the On / Off button but keep press on Home or Volume.

Step 5. The black screen means you are in Device Firmware Update mode known as DFU.

Step 6. iTunes will ask if you want to restore your iPhone. Agree.

Step 7. You can either restore from a backup file or return to your factory settings.

Step 8. Keep in mind that you can lose data you haven’t backed up if you follow this method.

Use Recovery Mode on iPhone 7 to fix stuck on Apple logo screen

Tip 3. iPhone 7 Stuck on Apple Logo iOS 10 and Recovery Mode

Enter the Recovery Mode to try return to your iPhone factory settings and update to iOS 10.3 which is currently the most recent update. Just like with DFU mode, this trick can lose your data if you haven’t previously backed it up.

If your iPhone 7 is still stuck on black loading screen with Apple logo and you wish to back up your data while restoring the device, you can try using various third-party programs. For example, use the Tenorshare ReiBoot app.

Tip 4. Restore with Third-Party Applications to Backup Data

Step 1. Find an app that lets you enter recovery mode and backup at the same time.

Step 2. Download the application (such as Tenorshare ReiBoot or other) for your operating system (Mac or Windows PC). Launch it.

Step 3. Connect the handset to your computer. Make sure it is in the Recovery mode.

Step 4. Press on Exit recovery mode.

Step 5. The issue should be resolved.

Hopefully one of the iOS 10 tips described above helps you to deal with the black screen and Apple logo on iPhone 7 or other handset model.

How to Set Up Your iPhone 7 Equalizer for Best Sound

What are the best iOS 10 eq settings for your iPhone music app? It’s great when you can improve your mobile music experience with a couple of clicks. We know how you can even make your favorite songs sound terrific! Just follow the quick instruction on how to set everything up and you’ll love the new sound.

Setting Equalizer for Best Sound

There are so many wonderful tunes and amazing songs. Listening to music helps you to relax, organize your thoughts and get some mind rest. You might have so many wonderful tracks on your iPhone 7 or other smartphone updated to iOS 10 or latest iOS 10.3 firmware version.

There is a way how you can get the best iPhone eq setting for particular songs. The idea is neat and you’ll enjoy the simplicity of the setting procedure. Let’s get some interesting tips for your iPhone 7 equalizer and make specific tracks sound even better than they are used to.

Set up iPhone Music Equalizer

How to Set Up iOS 10 Music Equalizer

Step 1. iPhone 7 or other model with the latest firmware version is not enough to correctly set up your iOS 10 equalizer. You also need either speakers or headphones. This is the best way to control how your songs sound.

Step 2. Think of a track that you are planning to equalize right now.

Step 3. Go to Settings on the handset.

Settings - Music on iOS 10 iPhone 7

Step 4. Click on your Music app.

Step 5. Look at your Playback feature and you’ll see the EQ which you have to click.

Music equalizer on iPhone

Step 6. You’ll find 23 settings which you can play around with. Change the options for whatever EQ you need and check the results by listening to your song.

iPhone iOS EQ Settings

It could take some time to find the right setting for Equalizer for the best possible sound. You have your iPhone Music player to test all the changes and find the most wonderful sound you can create.

How to Disable iPhone Music Equalizer Settings

You have learned how you can master your mobile sound through Apple Music equalizer app. Now let’s figure out how to turn of this setting on iOS 10 devices.

Step 1. Go to your iPhone settings.

Step 2. Get down to your iPhone Music equalizer via Music application.

Step 3. Press on EQ option right under Playback feature.

How to Disable iPhone Equalizer for Music

Step 4. Turn off the eq.

This is how you can adjust your music equalizer settings on iPhone or iPad. Yay, the same options work on your tablet computer.

You can now easily liven up the songs time on iDevices. Since the list of possible changes is pretty long (over 20 EQs) you need to think about the tune you are about to listen to. Play with the bass, high frequencies and make the song sound just perfect. You might be able to even reach the illusion of being at the live concert if you adjust the settings based on the type of music you love.

Master the settings and enjoy your favorite artists day and night.

How to Delete iCloud Backup on Your iPhone to Free Up Space

A lot of iPhone and iPad users periodically back up their devices using iCloud or iTunes. Such backup files take space so once in a while you might wish to remove backups from iCloud and free up some of your valuable storage. You can actually get a lot of space if you have a lot of old files saved but unnecessary.

Delete Your Old iCloud Backups

There are several methods of how to clean your iCloud space [you can also use the free iCloud checker to learn more about your iPhone blacklist status]. You can delete some old files, documents, photos and some applications. You can also disable backing up your games and apps or some of them. However all these steps will not free up as much storage as simple removal of your old iCloud backups.

Think about this. Do you have more than one iDevice? Have you been using your iPhone, iPad, maybe even different models of the same gadget? If your answer is ‘yes’ it means that your old iPhone backup on iCloud must be deleted.

You probably wonder what happens when you delete iCloud backup. Well, if you remove information that was used for devices you have linked but no longer use, you will only free up some storage. Just make sure you have recent backup saved. All previous versions can be easily deleted for good.

Old Backup Removing Guide for iPhone

How to Delete iCloud Backup on iPhone

Let’s figure out how exactly you can delete data from iCloud. Remember that this time we are only talking about removing your backups. This is not a guide how to delete photos from iCloud. It is completely focused on back up of your iPhone 7, 6s, 6, 5s, iPad and other iDevices.

Step 1. Launch Settings on your smartphone or tablet device.

Step 2. Go to General section.

Step 3. Select Storage & iCloud Usage menu as this is where you can delete iPhone backup from iCloud.

Step 4. Look at your iCloud section. Do you see Manage Storage option? Click on it to proceed. If you don’t want to take four steps you can choose Settings – iCloud menu – Storage and select the same Manage option.

Manage storage on iPhone

Step 5. You should now see all your backup files for one Apple ID. If there is only one file available it means that you have one backup for your Apple ID on the smartphone or tablet you are currently using.
If the list is pretty long let’s see how to delete backup from iPhone or iPad [learn how to manage your iPhone 7 files].

Step 6. Choose the backups for your old gadgets that you don’t need any more. Maybe it’s your old iPhone that was exchanged or replaced with a newer version. Anyways, these should be those files that you can remove and forget about.

Step 7. Look under Backup menu. Click on the gadget’s name.

Step 8. Click on Delete Backup.

Delete old iCloud backup files on iPhone or iPad

Step 9. You’ll be asked to confirm that you are planning to get rid of your older phone or tablet backups. Do so via Turn Off & Delete feature.

Step 10. Hooray. You have successfully removed old backup files and you should have more storage space available for new backups, photos, apps etc.

Maybe you think that once you transfer your older backup to a newer device it will be automatically removed from your Apple ID. However this doesn’t happen. The copy stays and unless you manually remove it you’ll have to share your storage space with the data you no longer use and need.

How to Fix iOS 10 Contacts Disappeared Problem on iPhone 7

Some of us remember the problem with contacts disappeared from iPhone 6. It looks like a similar issue can occur on newest iPhone 7 and 7 Plus models as well. You can easily bring up your contact list and experience no unpleasant moments. Just follow the instruction below and you’ll learn how to deal with iOS 10 contacts disappeared bugs on any Apple handset model.

Missing Contacts on iPhone

Just imagine the situation. You wake up, decide to make an important phone call and suddenly realize that your iPhone contacts are not showing up in your address book. What should you do? Will you be upset? Different bugs can happen on any Apple mobile firmware version so it shouldn’t make you wonder why you could experience this issue on iOS 10.

Remember that you can follow the tips and tricks to deal with your phone contacts disappearing randomly. The solution is often so simple you’ll love how easily everything can be fixed right away.

iPhone 7 Cannot Find Contacts How to Fix

How to Fix Contacts Disappeared from iPhone 7 or iPhone 6 Problem

Method 1: iPhone Contacts Are Not Showing Due to iCloud Bug

Here is what you can try to do:

Step 1. Launch Settings on your mobile device.

iPhone iCloud Settings menu

Step 2. Select iCloud menu [by the way you can use free iCloud blacklist checker just in case you need it].

Step 3. Use Sign Out option to get out from your account.

Step 4. Return to Settings and Sign In back to your iCloud account. This could fix the bug.

Method 2: Resync iCloud Contacts Missing – No Names Only Numbers Solution

Step 1. Open Settings tool on your phone.

Step 2. Select iCloud option.

Step 3. You’ll see the switch near your Contacts. Disable it.

Delete from My iPhone option

Step 4. Click on Delete from My iPhone to remove all the synced contacts right away.

Step 5. Close your Settings app.

Step 6. Restart your smartphone.

Step 7. Launch Settings again and select iCloud menu.

Step 8. Enable the switch near Contacts and your problem with iPhone contacts disappeared on iOS 10 should be gone.

You can also try to disable Contacts again, choose Keep in My iPhone, wait for a while and turn on your Contacts switch back on. If you are asked to merge your contacts just do so.

Method 3: Full iPhone Restore

Do you still notice that some of your iPhone contacts disappeared and are not returned using the methods described above? Here is another fix you might like.

Step 1. Back up your iPhone or user your previous backup copy.

Step 2. Use the cable to connect your phone to your computer and open iTunes program.

Step 3. Choose your device from iTunes menu.

How to Restore Backup iPhone

Step 4. Select Restore Backup option.

Step 5. You need to use the most recent backup file.

Step 6. Click on Restore and wait till the process is complete.

Step 7. Try any program that helps you restore lost information you haven’t backed up. You can look for any good tool in case you need to recover some of your data.

Step 8. Now you should have no issues with your contact list missing.

You can see that there are several working solutions that deal with contact names not showing up or contacts completely or partly missing on your iPhone 7 or iPhone 6 [even though there are many more iOS 10 problems you can come across]. You can always try a different method if one of them is not helping you out.

Secret iPhone Shortcuts Tips: How to Create and Use Text Shortcut

It is probably impossible to know all the iOS 10 tips and tricks. There are so many secret ways how to master your Apple iPhone that most users only explore the features that are must-have in their everyday life. All other secrets remain hidden. When it comes to iPhone text shortcuts it is better to set them up and use while typing your text messages as this way you can send your respond to just any SMS instantly.

How to Set Up and Use Text Shortcuts on iPhone

How to Create Shortcuts on iPhone

It is not only necessary to setup and create your shortcuts but also learn how exactly you can use them on your iOS 10 iDevice. iOS 10 is the latest firmware version for iPhone and iPad. Apple is currently working on its new iOS 10.3 upgrade however it won’t bring any major changes to the platform. Thus once you update to any earlier ‘10’ system version you can explore the amazing shortcuts on iOS 10 phone and implement them into your life.

A lot of use like to send text messages. Of course, there are many people who prefer talking over the phone to sending SMS still it is great when you can quickly type your message without being interrupted from whatever you’ve been doing.

Let’s see in details how you can use text shortcuts on your iPhone. Follow the instruction below and you’ll master the way for sending quick short messages no matter what phrases you are using to build your sentences.

It is possible to create as many iPhone text shortcuts as you need. Think of all the quick phrases that can be useful to use and create shortcuts for each one. You can also easily block unwanted phone numbers on your Apple handset.

iPhone Text Shortcuts Usage

How to Set Up Shortcuts on iOS 10 iPhone

Step 1. Take your phone and make sure it is already updated to iOS 10 version (any version that exists).

Step 2. Open Settings program.

Step 3. Select General menu.

Step 4. Go to Keyboard section.

iPhone Settings - Keyboard

Step 5. Click on Text Replacement section.

iPhone Settings - Text Replacement

Step 6. There should be a ‘plus’ button (+) at the upper right part of your display. Click on it to proceed.

iPhone iOS 10 SMS Shortcuts Creation

Step 7. Enter the phrase that you want to turn into a shortcut. Now name your shortcut. Be brief as you’ll type your shortcut and it will turn down into your phrase. For example, type ‘cml’ for ‘call me later’ sentence. Hit on Done and Save your shortcut.

iOS 10 Keyboard Shortcuts

How to Use Your Secret iPhone Shortcuts

Step 1. Once you have created your shortcuts you should use them in your text messages. Launch the app that helps you typing your SMS. For example, use Messages program or similar app.

Step 2. Type your shortcut name. For example, type cml and it will automatically be shows in your predictive bar as the original phrase.

Step 3. Click on your corresponding message and send your SMS.

Remove Text Shortcuts on iPhone

How to Delete iPhone Keyboard Text Shortcuts

Step 1. Go to Settings when you wish to get rid of your old shortcuts.

Step 2. Select General menu and go to Keyboard.

Step 3. Choose Text Replacement option and hit Edit.

Step 4. You’ll see a red button next to your shortcuts. Click on this button for each phrase you wish to delete.

Step 5. Click on Delete – Done to confirm your decision.

If you only wish to edit your existing shortcuts you should repeat this guide up to Step 3 and instead of removing phrases you can change them and save those changes.

It’s really simple to create and use your shortcuts. For example, if you are tired of searching for a question mark you can create question mark text shortcut on your iPhone by choosing ‘qm’ name for this mark. Why not?

You see how you can adjust, edit, delete and create short phrases for different messages to reply as quickly as possible to important SMS when you are busy. Master your iPhone and iOS 10 features and you’ll love how everything is so simple and fun.

Can You Use Any Third Party Remote with Apple TV?

It does happen in real life: you break things or simply lose them. This often happens to my remote for Apple TV. I try to keep it at the same place however my dog is always there to play with it, lick it, carry around or choose on it. The result is pretty upset. My remote control often breaks and I have to get a new one, original or universal remote.

What is the best third party Apple TV remote? Does any remote work with this TV set or only original devices sold by the Cupertino-based company? I can share my experience with you. Maybe you’ll also like this idea since it’s not that comfortable to experiment with various alternatives in hopes to find the right one or work with Siri remote.

Anyways, this is just a quick simple instruction on how to use any (right, just ANY) third party remote when you have lost or broken your own gadget. By the way, some users really don’t like the remote that goes with their Apple TV and are also searching for the bigger and prettier remote control.

Original Apple TV Remote Controller was broken or lost

Best Universal Remote for Apple TV

No matter why you are planning to replace your original controller you can find a good alternative. There are many third party remotes for Apple TV that are cute, easy-to-use, fit perfect in your hand and are just wonderful.

Don’t worry about jailbreak because the guide below explains how to use your best third party Apple TV remote without any third-party activity [learn how you can customize new iPhone 7 without jailbreak]. The famous iPhone giant allows its customers choosing their ATV controller.

Best Universal Remote for Apple TV: how to use guide

How to Use Remote for Apple TV from Third Party Companies

Step 1. Find a remote you like. Remember it doesn’t have to be the original device created and sold by the iOS company.

Step 2. On the ATV you have, go to Settings.

Step 3. You should get down to the list of options and select Remotes and Devices.

Apple TV learns new remote

Step 4. Click on Learn Remote feature.

Step 5. Select Start option to begin this interesting process.

Step 6. Work with your Apple TV and new remote by following the on-screen guides. Just press the buttons on remote and your ‘fruit’ set should learn the signal and get other information about your alternative controller.

Step 7. Give the remote a name.

Step 8. If you wish your TV set to understand commands sent by new remote you are advised to ‘train’ it to play Fast-Forward, Pause and Rewind features through Set Up Playback Buttons feature.

Step 9. In a few moments the procedure should be over and your Apple Remote button will assign your remote.

Since you can now assign any third-party remote to Apple TV let’s learn how to delete it if needed. Maybe you would like to use Siri remote or get an original accessory instead.

Apple TV Settings - Remotes and Devices

How to Delete Alternative Apple TV Remote

Step 1. Open Settings program on your TV set.

Step 2. Scroll down till you reach Remotes and Devices.

Step 3. Select your alternative remote name.

Step 4. There will be option called Delete Remote. Click on it.

Step 5. Confirm your decision by clicking on Delete Remote again.

You see that everything is simple [have you heard about wireless charging on iPhone 7?]. You don’t jailbreak your Apple TV and install no unknown tools. You only assign the third-party remote which you can later delete. Hopefully the instructions are useful and will save your time.

Best Way to Add Multiple Photos or Videos to Instagram on iOS 10 iPhone

Can you add more than one photo to your Instagram account? Absolutely! You can share multiple pictures at once using your iPhone and amazing iOS 10 tips. Just follow the guide below and you’ll love adding several videos or pictures all at the same time. This way you’ll save your time and share your joy with friends and other social network users. Isn’t it great?

How are you able to accomplish this task? Should you download any third-party apps for iOS 10 firmware or find a different way? We know some incredible Instagram iOS tips you should know about. Let’s discover them.

How to Add Several Pics to Instagram

Instagram Multiple Photos Feature

The iOS 10 secrets for Instagram are simple. This program itself supports the option for sharing multiple files at once. The feature you’ll be using is called Carousel. It works for both iPhone 7 and iPad as well as earlier Apple handset models.

It’s cool that you don’t have to download any extra programs to enjoy the feature. Use your iPhone or iPad that has Instagram installed on it and make sure you have updated to iOS 10 because earlier operating system versions might not support the great changes.

Share Multiple Videos and Pics on Instagram iOS 10 Tips

How to Share Multiple Pictures on Instagram

Before we share the guide below you should learn some iPhone Instagram tips. Firstly, you can really post more than one image or video at a time. Secondly, there is the maximum amount of files that can be shared simultaneously. The app currently supports sharing up to 10 files at once.

Anyways, it’s amazing that you are allowed to post 10 pics at once instead of adding them one by one as you were used to do. Sharing unforgettable moments of your life was never that easy before!

All the files you will add using carousel option will appear inline so your Instagram feed will show only the first photo of the post and users can view all other images by swiping over your main photograph.

Here is how you can share multiple photos on Instagram:

Step 1. Check your iPhone or iPad firmware version. Is it iOS 10? You are good to go. If you are still running previous iOS 9 you are advised to update now.

Step 2. Make sure you have the most recent version of Instagram on iDevice.

Step 3. Open Instagram app on your mobile gadget.

Add Several Videos or Photos to Instagram

Step 4. Do you see the ‘+’ (plus) option at the lower part of the screen? Click on it.

Step 5. Select Library section.

Step 6. Click on Select Multiple feature.

Step 7. Choose videos and / or pictures from your photo library. You can select 10 files at most. You can also adjust the images in the frame.

Step 8. Click on Next to proceed.

Step 9. If you want to apply filters to your files you can click on filter option at the bottom of your screen. Edit photos one by one.

Step 10. You can now click – drag images to adjust their order. To delete an image from your future post you’ll have to click and drag it to the trash button.

Step 11. Press on Next and add captions and location to your post. You can also tag each image or video file by clicking the Tag feature and choosing those people who you wish to tag.

Step 12. Click on the Share button and your post will appear in your feed.

Carousel Tips Instagram iOS 10

All your friends will see the first image of your post just as they regularly do. However since your post now features the Carousel icon at the upper right part it is possible to see all the images attached by swiping over it. Here is how you can download pics from Instagram on your handset.

How do you like the Carousel Instagram update for iPhone 7 and other Apple devices? Is it more comfortable to share your life moments with other from now on?