How to View Your Source Code in Safari Browser on Mac or iPhone

You probably know that all webpages are created using HTML language. This is special HyperText Markup code that is understood by all web browsers. Each page contains information about all images, text, script etc. Sometimes you need to view source in Safari on iOS 10 or your Mac device [learn how you can hide and show your Mac file extensions]. How is it possible to do?

View Source Code in Safari

Both iPhone and Mac users can quickly access their pages source via Safari browser. Why would you need to find the HTML code of the particular page? Sometimes you want to know details about the image (for example, its size or description), link status (follow or no follow) etc. Programmers and developers as well as users who are creating and updating their website often review their source code to avoid errors, find parts of the documents and fix possible problems.

The whole idea is simple. Even if you are not a programmer but need to view the code you are able to succeed with a couple of clicks. Isn’t it great?

How to View Webpage Code in Safari on Mac

How to View Source Code in Safari on Mac

Firstly you should work with special Develop Mode [if you need to move your videos  from computer to iPad you can easily transfer movies from your Mac]. This is how you’ll be able to get to Safari view source shortcut or feature:

Step 1. Use your computer. Launch Safari browser.

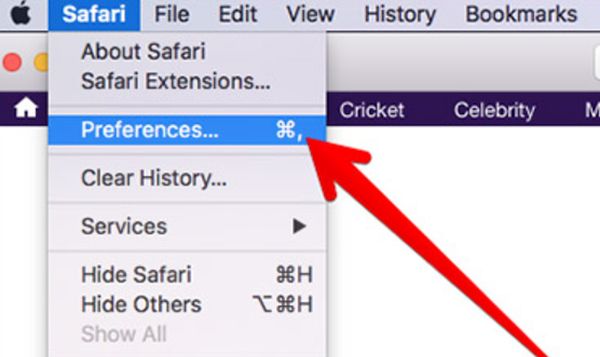
Mac - Safari - Preferences menu

Step 2. Choose Safari – Preferences option.

Step 3. Select Advanced settings.

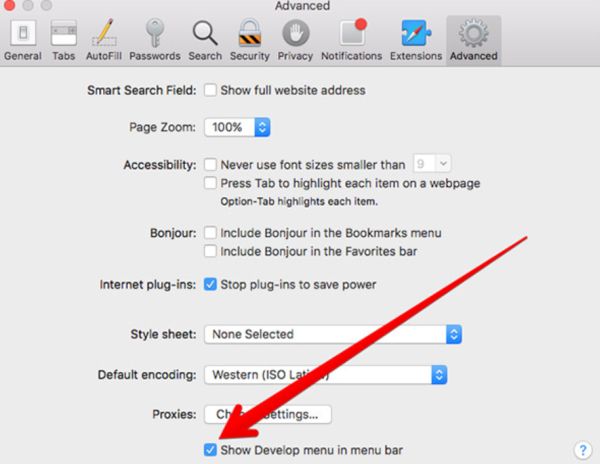
Safari Develop Menu

Step 4. You’ll see Show Develop feature in your tab. Just check the box near it.

Step 5. You will now find ‘Develop’ option present in your menu. This is how you have turned on your Develop Mode on Mac.

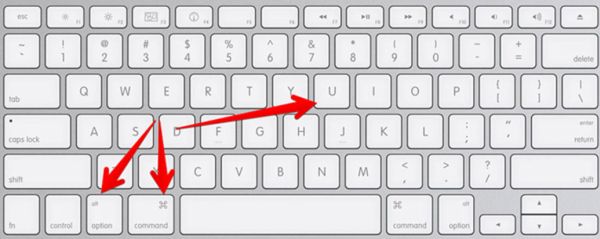
Safari Page Code Shortcut

Step 6. To view Safari page code on your computer you can:

  • Choose Develop from Menu while staying on a particular page and select ‘Show Source’ option;
  • Right click on your webpage and choose ‘Show Source Code’ feature that will display what you are looking for in a new window;
  • Click on Option/Alt + Command + U simultaneously and the source code will be displayed to you.

Safari Source Code on iPhone

iPhone Safari View Source Code: How to Guide

Step 1. Before you can view source in Safari on iOS 10 you should download and install Source application. It costs $0.99.

Step 2. Once the tool is installed you can launch your mobile browser.

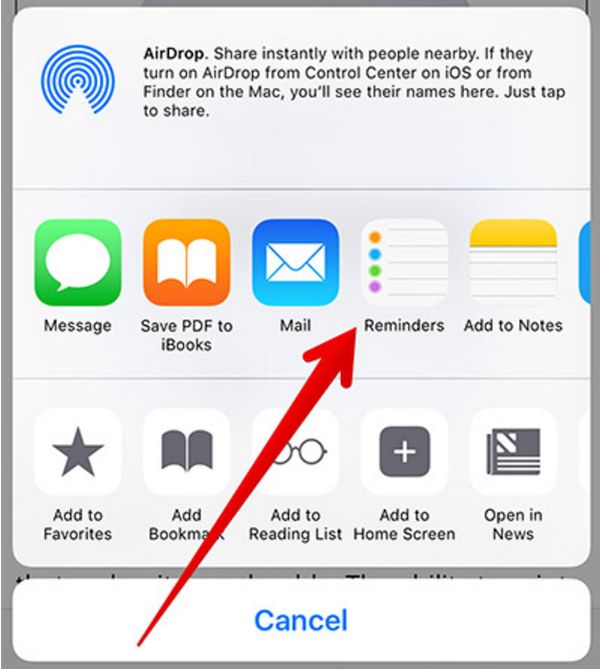
Step 3. Click on Share option.

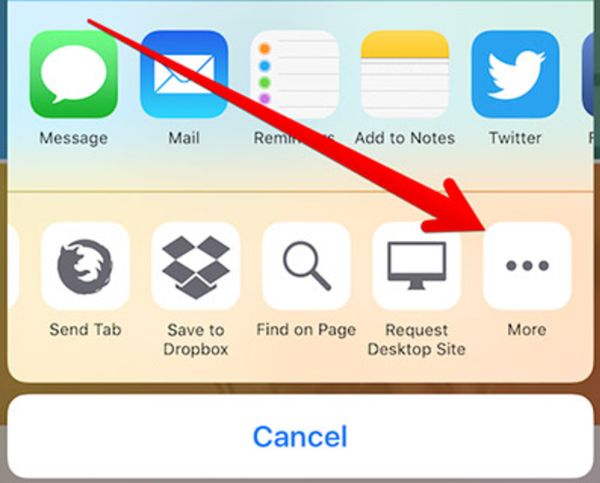
View Page Code on iPhone Safari

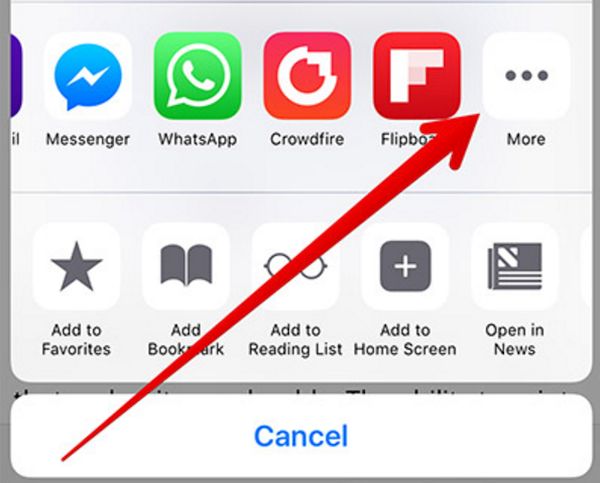
Step 4. Get down to the bottom to click on More option.

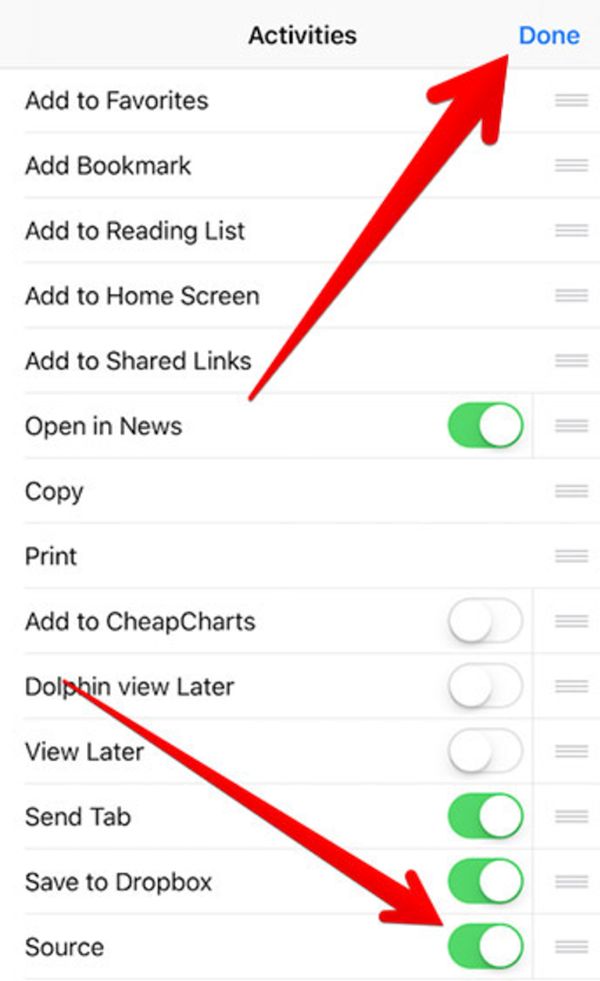
View Page Code in Safari on iOS 10 iPhone

Step 5. Turn on Source feature and click one Done so that this change takes place.

Step 6. Now you are ready to view page source on iOS 10 devices. Open Safari once again.

Step 7. Visit the webpage you wish to view the source for.

Step 8. Click on Share feature.

Step 9. Click on Source and you will get all the details about the code.

This is how you can enjoy Safari iOS and Mac tips for viewing source code on your Apple gadgets. This trick is useful not only for developers but also regular users who are studying SEO or web development. Since modern pages have complex code this is specific and unnecessary feature to most of us.

But in case you have to get to the code source you now know how you can view it using your Mac or iPhone, iPad Safari browser.
How to Work with Mac OS File Extensions: Hide and Unhide Guide

Let’s learn about some Mac OS Sierra hidden features [here is how to enable Night Shift feature on your Apple computer] and explore the interesting filename extensions. What are these options? Do you really need to deal with hiding and showing them up?

Mac OS File Extensions

Before you get to use your Mac filename extensions you might wonder what this feature means to you and why it could be useful and important in your everyday tasks. Hiding and unhiding the option is a must-know thing.

Each file has its own extension at the end. This way your computer can verify what program to use to open it. You are definitely familiar with such extensions as .jpg, .jpeg, .png etc. You can see that each file extension has a period which precedes the letters or numbers (for example, there are .mp4 video files).

It’s up to you whether to show filename extensions on Mac or hide them [learn more secrets about Touch Bar zoom option]. The files will still be opened by the programs. Hiding or showing them won’t make a ‘working’ difference. It’s only the matter of fact what you’ll see with your eyes, not how the correct applications will open these or those files.

How to Hide and Show File Extensions on Mac

How to Hide All File Extensions on Mac

Here are some incredible Sierra tips and tricks for making your file names look more accurate.

Step 1. You should only use your computer that is updated to MacOS Sierra. Follow the tips and you’ll be just fine.

Step 2. Launch Finder.

Step 3. You’ll see ‘Finder’ option at the upper left part of the screen. Press on it to continue.

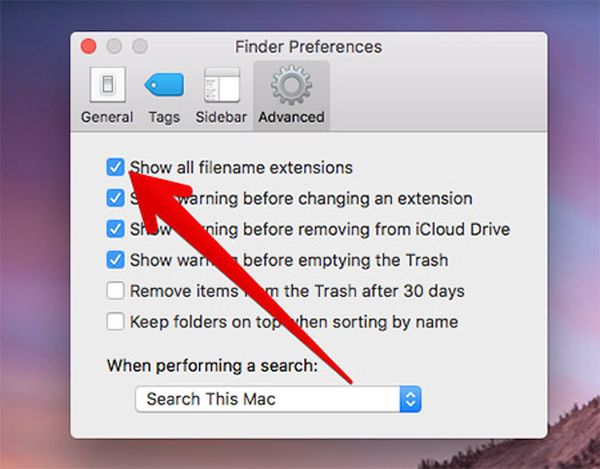
Step 4. Click on Preferences – Advanced.

Hide Filename Extensions on OS Sierra

Step 5. You should enable Mac OS file extensions by checking the ‘Show all’ option.

Step 6. If you want to hide file extensions on Mac you need to disable the ‘Show all’ feature.

Keep in mind that your Mac filename extensions will be hidden for all the files you have. This happens even if you tried to hide or show only particular extension and then click on ‘Show all’ menu. This rule doesn’t work for showing all the full file names because this feature only reveals the files that are shown and hides the ones that are hidden individually.

How to Show Mac Filename Extensions Individually

It is possible to hide file extensions on MacOS Sierra one by one or individually. Let’s see how you can manage these tips:

Step 1. Choose the Mac file that you wish to display or not display its extension.

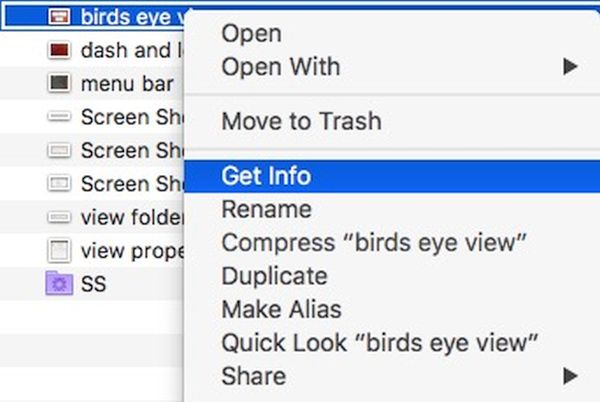
Step 2. Right click on your file.

How to Show or Hide particular filename extension on Mac

Step 3. Choose Get Info option.

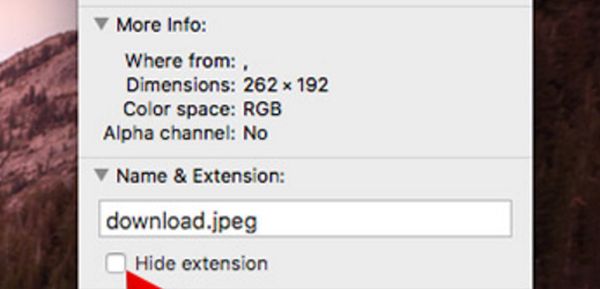
Step 4. Look at Name & Extension option. Do you see a triangle near it? Press on it to proceed.

How to hide or show file name extension on Mac OS Sierra guide

Step 5. There should be more options displayed. You’ll see ‘Hide extension’ feature which you can enable by checking the box. You can also unhide it by unchecking that box.

We all have different taste. Some people like seeing file name extensions and other would like to hide them all or some of them. Now you know how to perform these tasks one by one or simultaneously.

Organize your Mac files the way you want. Just always remember that you should not change and remove your file extension by renaming it. Because this way you’ll lose the opportunity to launch the application, image, folder or program since your computer will not know what to do with it.

Hide and show your file format when you want and how you like it. It’s all possible with Mac OS Sierra tips you have just learned. Please enjoy!

How to Adjust iOS 10 Share Sheet Settings on iPhone

Looking for interesting iOS 10 tips you can use to customize your iPhone features. There is share sheet you might be using since this option allows sharing your content with your social network friends. Let’s learn how you can arrange icons in Share Sheet.

Share Sheet on iOS

It is possible to control how your icons are located in your menu. Just follow the simple instruction and you’ll customize your options within moments. If you often use Twitter, Facebook or other sites you can arrange your iPhone share sheet how you like it and get a quicker access to the networks you prefer in your everyday life and work.

We’ll describe 2 different methods of how to arrange apps icons on iPhone for your Share Sheet. There is nothing difficult. The simplicity always rocks and you are about to discover some great secrets of iOS 10 firmware.

Set Up Share Sheet on iPhone iOS 10

How to Arrange Icons in Share Sheet

As you probably know your phone makes it easy to Bookmark things you like, Add them to Favorite list, share via Twitter etc. This is what your phone Share Sheet allows doing. Here is how you can rearrange everything to your personal likes.

By the way, you can try the following iOS 10 tips [learn how to block spam calls] on both your handset and iPad. All Apple mobile devices should support these features.

First Solution: Share Sheet Settings

Step 1. Think of the application you wish to text. You can play with Safari or use Notes or similar tools that support share sheet option.

Step 2. Open your share sheet.

Click on More in Share Sheet iOS 10

Step 3. You should get to More feature. Do this by swiping from right to left on your activity icons. Click on More to proceed.

Step 4. There are 3 horizontal lines you should notice near activity so clik-hold on them.

Replace Icon on Share Sheet iOS 10

Step 5. Drag your icons the way you want.

Step 6. Click on Done when you are ready to set up everything.

Step 7. That’s it.

Second Solution: iPhone Share Sheet Menu Options

Step 1. Once again you should launch the program that supports share sheet feature.

Step 2. Click on Share option.

How to Rearrange Share Sheet on iOS 10 Iphone

Step 3. Click and hold your application icon that you wish to rearrange. Move it to where you would like it to be placed.

Customize Share Sheet on iPhone 7

Step 4. That’s it. The icon will be placed to a different area of your screen.

iOS 10 Share Sheet Hiding Icons

It is easy to hide some icons on your sheet:

Step 1. On iPhone 7 launch Safari or other program that supports sharing.

Step 2. Click on Share option to proceed.

Step 3. You need to swipe from right to left on the application to get to More feature.

Step 4. Click on More to continue.

Hide Options on Share Sheet iPhone or iPad with iOS 10 firmware

Step 5. There are ‘hide’ features next to different share sheet icons. Just disable the switch for the parts you want to stay hidden.

Step 6. Confirm that you want to hide things by clicking on Done.

Step 7. That’s pretty much all curious iOS 10 tips for Share Sheet on iPhone and iPad.

We hope you find the guides above useful to update your settings and rearrange or hide icons on share sheet feature.