Fun Guide for Using iPhone Wallet Passes and Mac Apple Pay Cards

How does Apple Pay work on iPhone 7 and other ‘fruit’ devices? This question has been answered for so many times. Now it’s time to talk about Apple Wallet app and how you can share your Wallet pass on different iDevices. There is also great Apple Pay on the Web feature that becomes useful on new Mac computers. Users who have the smartphone, tablet and computer from the famous Cupertino company can enjoy all the awesome payment features without issues.

Are you going to the event and have extra pass you would like to share with a friend? It’s easy to do on the iPhone and iPad if you follow some simple steps. There is no need to cancel the tickets you have booked if your plans suddenly change. Offer them to your family members or friends and quickly share the pass or several passes.

Apple Wallet for iPhone 7 iPad

How to Share Wallet Passes on iPhone 7 and iPad

What is Apple Wallet? This is a cool application that lets you book tickets for different programs and movies. Its supports iOS 10 firmware devices and earlier versions such as iOS 9, 9.x. It can book tickets and you are ablet to share PassBook iPhone invitations with others.

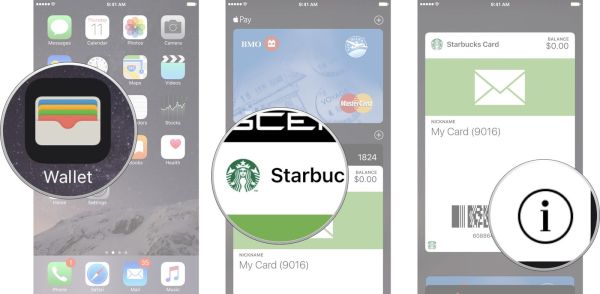
Step 1. We won’t focus on how to use Apple Wallet. We’ll pay closer attention to how you can share your passes with others. So launch Wallet application on your smartphone or tablet device.

Step 2. Find the pass you are planning to share.

Step 3. Click on the pass and press on ‘i’ icon that you’ll see at the lower right part of the screen.

How to Share Pass on iPhone 7 iPad Wallet

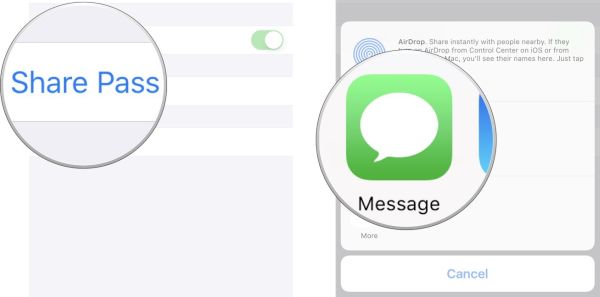
Step 4. Choose ‘Share Pass’ and select the one of the few options. There is iMessage, AirDrop, email and you can choose the most suitable. Thus if your friend with his or her iPhone is near you you should click AirDrop. If not, you can send an email or share the pass through iMessage.

To enjoy your Passbook iPhone options you need to add the pass your friend shared with you. Here is how you can complete this goal:

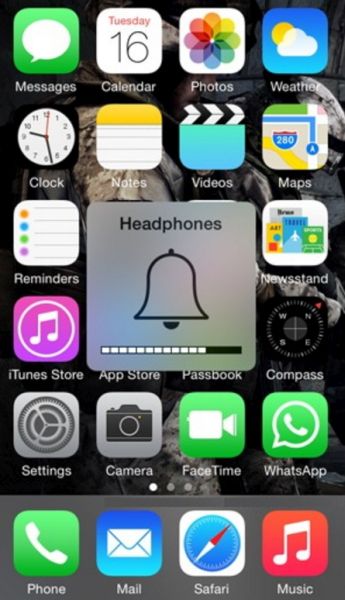
Step 1. Click on the pass you have received via email or other method.

Step 2. The shared ticket will pop-up and you’ll be able to click on ‘Add’ option.

Step 3. The pass will appear in your Apple Wallet app on iOS 10 platform.

Apple Pay iPhone Mac iPad

Great Apple Pay on the Web

There are several Apple payment options you can enjoy. It is possible to buy and share wallet passes and shop with numerous retailers with your iDevice. You are also able to manage your Apple Pay cards on your Mac computer.

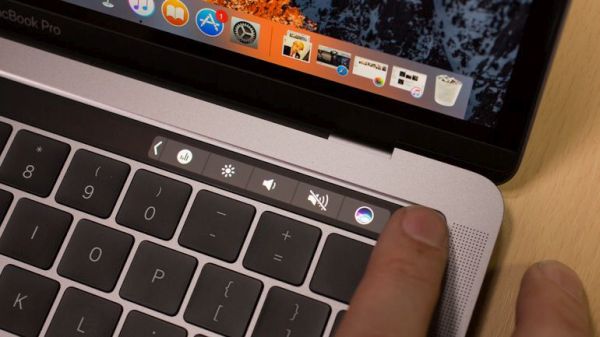
It’s not the time to explain how to use Apple Pay on iPhone, this time it’s more interesting to explore Apple Pay cards. How does Apple Pay work on your Mac after you install macOS Sierra? Manage your cards and you’ll figure everything out.

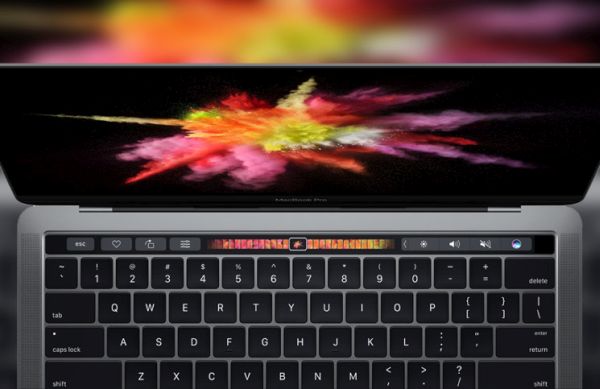
Users who purchase the new MacBook Pro 2016 and wish to use Apple Pay should manage their credit / debit cards.

Step 1. You should go to System Preferences on your computer.

Step 2. Select Wallet & Apple Pay option (icon).

Step 3. You will see all the information you need on the sidebar. It includes your transactions, contacts, billing data etc.

Step 4. When you wish to manage your cards on older computers you’ll have to do this on your iPhone.

Apple Pay Manage Cards

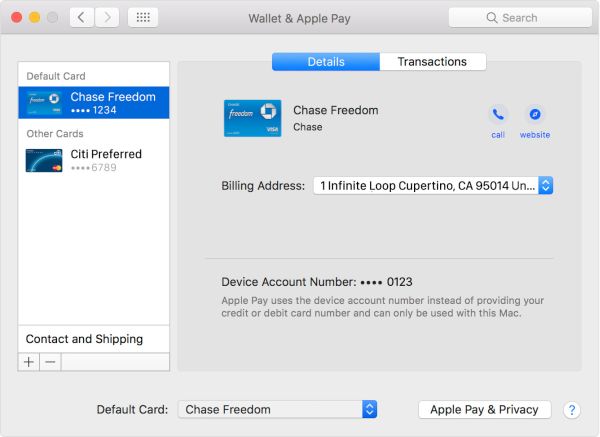
Step 5. Follow Steps 1 and 2 when you have plans to change your Apple Pay default card. There will be drop-down list at the lower part of the screen. Here is where you select that card to make it your default payment option.

Step 6. Use the same sidebar when you have plans to delete the card you were using.

Step 7. With the card selected you will find the Delete option at the lower part of the sidebar. Click on this button.

Step 8. Confirm your decision. The credit card will be removed from your Apple Pay account.

You see how easy it is to share your Wallet passes with new iPhone 7 and iPad users and manage your Apple Pay cards on the brand new MacBook Pro 2016 model.

Control Your iPhone Mobile Data Usage for iOS 10 TV App

A lot of Apple customers want to learn more about iPhone reduce data usage. This is important even if you don’t want videos on-the-go. However it becomes even of more importance when you enjoy such iOS 10 features as TV app streaming since this option can ‘eat up’ all your data.

It is actually possible to reduce your iPhone mobile data usage and still enjoy watching movies and videos via TV program. This app could be a great addition to your brand new MacBook Pro that boasts Touch Bar feature or the most recent iPhone 7 and iPhone 7 Plus. Still it might be handy to learn some secrets, tips and tricks to not overuse your previous mobile / cellular data.

Are you a fan of interesting iOS 10 apps? Do you have the TV app installed? There are so many advantages of using additional programs. You can watch TV shows, the movies you love, different videos and switch between films via single sing-on option. You can use WiFi connection as this is the best choice for cheap iPhone mobile data usage. What do most of us do when there is no active WiFi nearby? That’s right. You start streaming videos and TV shows via mobile data. Its consumption can be rapid and you could need to adjust the setttings.

Reduce iPhone TV Data Usage

How to Reduce Mobile Data Usage on iPhone: for TV App Users

Remember that you can also reduce data consumption on your iPhone AT&T or other carrier and get more of the impressive iOS 10 features and newest iOS 10 apps. But this is a different story. Right now let’s explore the TV app settings and make this program use less cellular data. By the way, this guide works on both iPhone and iPad devices and it doesn’t matter if you own iPhone 7, 7 Plus or earlier iPhone 6s, 6s Plus 6, etc. You should update to iOS 10.2 before you can run the application. For your ATV you need to update to tvOS 10.1 (it is available in beta stage).

Step 1. When you wish to know how to reduce data usage on iPhone 7 TV app the first place to head to is your iPhone Settings.

Step 2. Now you should scroll down a little bit. You will find TV option so click on it.

Step 3. Do you see the feature ‘Use Cellular Data for Playback?’ You should toggle its switch.

That’s not the end of the adjustments. It’s also important to reduce iPhone streaming TV data usage while you are watching a program online. There is a simple method a lot of people prefer choosing. It has its one big disadvantage and some benefits (you’ll enjoy one more advantage once you stop iPad from ringing).

How to Reduce Video Quality on iPhone

How to Reduce Mobile Data Usage on iPhone: Video Quality

It is extremely easy. When you want to know how to reduce data usage you should play with the quality of the videos you’ll be watching.

Step 1. Take your iPhone or iPad and launch Settings. You might want to backup iPhone before you apply any changes.

Step 2. Select TV app.

Step 3. Double check that you have successfully enabled ‘Use Cellular Data for Playback and proceed.

Step 4. Click on Playback Quality – Cellular.

Step 5. The default option you should notice is called ‘Best Available’ and it consumes much data than you wish. You should switch to ‘Good to let videos consume less data’ and you are done.

iOS 10.2 Beta Version for iPhone iPad

It’s also possible to mess up with the definition quality. You don’t need High Definition quality when you have plans to reduce data consumption:

Step 1. Open Settings and select TV app.

Step 2. Click on Purchases and Rentals.

Step 3. There are two definitions. You should select Standard Definition quality for videos instead of the default High one.

Now you can watch all that you want. The video quality won’t be perfect but your data will be preserved.

Learn How to Get iPhone 7 Out of Headphone Mode

The ‘fruit’ devices always have various issues and bugs you have to solve or wait for the Cupertino-based giant to fix on your behalf. Some Apple users might even remember the iPhone 6 stuck in headphone mode water problem. It seems to also happen to new iPhone 7 models. What should you do when you can’t deal with iPhone headphone mode?

There could be more than one method for iPhone stuck in headphone fix. We’ll share several ways you can try to get our of iPhone headphone mode and use your handset the regular way again. Remember that you can always try a different method if one doesn’t work for you.

Can it be the problem with the latest iOS 10 firmwaver version? If the issue is with the operating system, it might be eventually fixed by Apple. However it could be a different problem that causes the ‘stuck’ mode. It’s curious when you see the bug when your headphones are not even plugged in. In other words, the issue might be with the headphones, your iPhone hardware or the bug with the software version you are using.

iPhone 7 Stuck in Headphone Mode

How to Solve iPhone 7 Stuck in Heaphone Mode

Since there could be multiple reasons for the problems there is more than one solution. Don’t get upset in case nothing helps you out. Even with the iPhone 7 handset running iOS 10 you can experience issues. So let’s try something out and hopefully figure out how to get iPhone out of headphone mode.

iPhone Stuck in Headphones Mode Fix: Method 1

Since the problem can be with your accessories and not iPhone or iOS 10 (iOS 9 or earlier version if you happen to still use iOS 8) you need to try plug in your headphone and then plug it out. Why could this solve the problem?

Sometimes when you remove headphones too quickly your mobile operating systemmight not detect this action and thus iPhone 7 or iPhone 6 thinks headphones are plugged in while they are not (learn what to do if your iPhone 6 starts to restart on it own). Be gentle when you plug out the accessories and the system will have enough time to ‘understand’ your operation.

Do you still face the bug?

iPhone Headphone Mode Fix

iPhone Stuck in Headphone Mode Fix: Method 2

You have probably read so much about iOS problems and bugs. Different versions of Apple firmware suffer from different issues. Even iOS 10 is not perfect. Thus when the problem is not with your headphones or ports you could try to restart your handset.

Simple iPhone restart can solve many problems with ease. The software restarts and ‘clears’ issues so you get rid of the bug. Restarting is safe as you lose no information or your data.

iPhone 7 Restore from Backup

iPhone 6 Stuck in Headphone Mode Solution: Method 3

If you back up your new iPhone 7 or other model once in a while you can try to restore from previous backup versions. It’s great to back up so that you can restore and get all your information back (including apps, games, personal data etc.).

Keep an eye on iOS updates. You can download and install the most recent firmware because every new release fixes some previous bugs.

iPhone 7 Heaphones Accessory

iPhone Headphone Mode Fix: Method 4

You can borrow your friend’s headphones and try to use them instead of yours. Maybe the problem is with the accessories and you can fix everything by plug in a different pair of headphones.

iPhone port might not detect your old headphones because of the metal used in them. If they are not original, if you are using a cheaper version – this could cause the problems.

iPhone Port Problem: Method 5

Is everything right with your 3.5 mm port? Gently try to clean it with a toothpick. Maybe there is some dust inside.

At last but not least. If the problem still exists and you tried everything to solve it, you have to try another method. Take your iPhone to your closest Apple Store and hopefully your warranty can cover the repair or iPhone replacement.

This year the ‘fruit’ giant presented the iPhone 7 with more storage and some interesting features. Still most customers are looking forward the next generation because iPhone 8 could offer so much more than all previous devices.

Enjoy Mac Touch ID on Old Models Released Before 2013

Do you have one of those old Mac computers released prior to 2013? Do you know that you can still enjoy Mac Touch ID option and unlock your laptop or desktop machine without issues? Surely, all newest computers arrive with a great feature that is built-in and can be used by customers right out of the box. Still this doesn’t mean that Touch ID MacBook option is available on newest devices only (learn details about MacBook Pro touch bar customization). Users who still own an older model and don’t wish to upgrade can learn about curious tricks and perform them in everyday life. This way you can truly get more features and surprise yourself and your friends.

Should you find a real fingerprint scanner for Mac or is there any other trick to use on old Mac? There is no need to enter a passcode to unlock your iDevice. This is not comfortable and still you can enjoy your Mac ID to auto-lock your desktop or laptop computer.

How to Unlock Mac with Touch ID

About Mac Touch ID and macOS Sierra

Unfortunately that awesome auto-unlock option comes with macOS Sierra. While there is no need to enter your password every time to want to unlock you computer you cannot use this feature on old Macs. Right, even if you are able to install macOS Sierra on an old Mac the newest features won’t be supported by your machine.

Computers released before 2013 can run macOS Sierra version but they do not support the Auto-Unlock feature. Still you are able to unlock Mac with Touch ID of your other iDevices (such as the new iPhone 7, older iPhones and Apple Watch wearable).

Mac ID is a great tool that works on Apple gadgets. This is the program that helps you to unlock computers with other ‘fruit’ devices. The whole idea is pretty similar to Auto-Unlock option.

Mac ID supports a lot of gadgets from 2011-2016 (including the new MacBook Pro 2016 model). It works with newest iPads and iPhones as well as old iMac 2012, Mac Mini from 2011 and 2012, MacBook Pro from 2012 and iMac back from 2012 or newer. In other words you can take an incredible advantage of such Mac Touch ID similar feature.

How to Unlock Old Mac with Touch ID Fingerprint Scanner

How to Get Touch ID on Older Devices

So you need no fingerprint scanner for Mac if it’s an old computer. But you need Mac ID application for both your old Mac computers and iPhone or iPad. You can find a free version for old Mac laptop but you’ll have to pay $3.99 for iOS Mac ID release.

Step 1. Before you can create your cool Mac Touch ID option you should set up Mac ID on both Mac and iDevice.

Step 2. Launch programs on both gadgets.

Step 3. The Mac ID on Mac wills how he list where you can select your iPhone or iPad that is also running this program. Make sure everything is ok with Bluetooth.

Step 4. Enter your login credentials before you can press on Continue option.

Step 5. The program should now work. So simply lock your computer.

Step 6. On the iPhone or other Apple device that really supports Touch ID and has Mac ID installed, you need to hold Home button with the finger you registered for Touch ID. Ta-da, your computer will unlock.

Learn how to set up MacBook Pro with touch bar and find out what else you can do with the additional application.

How to Schedule Mac Auto Wake Option

Mac Auto Wake Feature

Step 1. Look at the Mac Menu bar. Press on Mac ID.

Step 2. There will be Proximity Wake in the drop window.

Step 3. Enable it.

Step 4. Press on Custom if you wish to add some adjustments to the proximity. Choose the distance for waking up your Mac screen with a phone.

Step 5. Your computer will automatically wake up when you enter the room with the right iDevice.

Let’s pay more attention to the proximity option. The distance threshold has several options. You can select the default ones (low, medium or high) or go with your customized solution.

Mac Tap Pattern Unlock

There is one more thing you can try. It is called Tap Pattern. It requires some options. It only works when you have the Magic Mouse or a trackpad. Here is what you should do:

Step 1. Go to Menu on your computer and select Mac ID.

Step 2. Choose the Tap to Unlock feature.

Step 3. Select Set up option.

Step 4. You can set a pattern using the physical or virtual trackpad (or Magic Mouse).

Step 5. Now press on Menu – Mac ID and Tap to Unlock. Now you should see the notification via Taps visible on Lock screen. P.S. You can also unlock your iPhone from any carrier once and forever.

Step 6. Select the option to provide passcode only when the primary gadget is connected. Otherwise choose to unlock your computer with Magic Mouse or trackpad.

Step 7. Now press the Tap pattern also locks Mac and you are done.

It’s simple, isn’t it?

Awesome Instagram Secrets for iPhone 7 Users

It really doesn’t matter much if you prefer to download older version of Instagram for your smartphone or get the most recent update for new iPhone 7 model and explore Instagram tips for business. It’s more important to get Instagram secrets after you start using this popular network on your handset.

Actually, Instagram boasts over 400 million active accounts thus it is extremely important to learn more about this network if you wish to use Instagram for business in 2016 or 2017, or even in the future. There are a lot of companies that already know how to attract new customers through this network. Ordinary users also enjoy it since this is a great way to socialize with friends and family. Everything becomes simpler when you know how to use the program, right?

iPhone 7 Instagram app secrets

Instagram Download Reasons

In case you are not using this network yet, let’s see why others enjoy it so much. Instagram for iPhone 7 or older iPhone models is a fast way to share your photos and images. It also users popular hashtags to promote your posts and help you find new friends. Of course, this is also the reason why Instagram for business 2016 is so popular.

Big companies and small businesses are searching for customers by making their photos popular. You can like images others post and photos that get the most amount of likes get to the top of searches by hashtags. This is why it’s important to use hashtags and receive as many likes as possible.

iPhone Instagram Secrets

Download Instagram for iPhone Without App Store

Is it possible? Can you find the iOS 9 or iOS 10 program somewhere except iTunes and App Store? Absolutely!

You can search for the program file and even download older version of Instagram as long as it supports your version of mobile operating system. Always remember to double check the files you download to avoid any possible viruses. If you don’t trust a source with the program file you are highly advised to visit the App Store and safely download and install the tool directly from the ‘fruit’ platform.

Instagram Secrets for iPhone 7

After Instagram download and installation you can explore all the opportunities offered by this program. Instagram iPhone 7 users (as well as other iDevice owners) are welcome to post photographs, videos, images and comment, like posts shared by others.

Remember that you can use Instagram for business 2016 and in the future. Let’s speak about the iOS 10 features you can enjoy with your social networking program. Firstly, we can make your account private (this way you can approve followers that will be able to view and comment on your photographs).

Step 1. This is Instagram sign up moment. You need to launch the tool on your phone and sing in using your credentials or register a new account.

Step 2. You’ll find a profile icon at the lower right part of the screen. Click on it.

Instagram Settings Gear iPhone

Step 3. Now click on the ‘gear’ at the upper right part of the screen.

Step 4. You’ll see Private Account option under your Account. Enable it.

Instagram Notifications Enable iPhone

There are other interesting Instagram tips for business you can try along with other secrets to keep in mind. Let’s learn how you can save your iPhone data via this social network:

Step 1. Launch Instagram on the mobile gadget and sing in.

Step 2. Click on Profile icon – gear and select Settings.

Step 3. Firstly, you can enable Push Notification Settings. Secondly, you can select Mobile / Cellular Data Use where you can enable Use Less Data option. This way you’ll limit your data consumption on the smartphone and make the program consume less data.

What else can you set up in settings? There a couple of interesting things you can change. For example, once you get to Instagram Settings you can disable Save Original Photos option. This way the original files you upload to your account won’t be saved on your iPhone.

There is one more secret to share. You can Clear Search History (this option is presented under ‘gear’ icon) and you are advised to complete this step once in a while.

AT&T iPhone 7 Data Usage Check for Current Period

Every new Apple handset user wonders how to check data usage on iPhone 7 or other model. We decided to mention the iPhone 7 and iPhone 7 Plus because these two models are the latest in the market. The company officially released both phones in the fall 2016 and a lot of customers expect to find one under their Christmas tree.

Why should you control data usage iPhone 7? Well, there were good old days when users enjoyed the true unlimited data. Those days are gone and although many of use still miss them you should keep a track of everything you perform with your smartphone. This includes both application and AT&T internet data usage. Learn how to save money or simply control your data on-the-go.

Let’s learn how to check data usage on iPhone 6, 7 and other models [remember to set up iPhone 7 as soon as you get it]. It’s truly doesn’t matter what Apple phone model you have. Besides, you might not even be locked to AT&T. This guide is devoted to AT&T iPhone data usage check as well as any other mobile operator in the USA or from across the world. The whole system is pretty similar anywhere you live or travel to.

Check AT&T iPhone Data Usage

Cellular Data Usage Current Period

If you need information about ‘data usage iPhone 7’ you can get it for free, especially if you are using AT&T as your mobile carrier. You don’t have to worry about your text and talk data since this is an unlimited offer by most U.S. networks. You are charged for mobile usage so this is what you should control.

Use one of the methods described below to get the information about your current billing cycle to avoid overcharges. You can check your data usage directly from your mobile device so this is fast, easy and free.

How to Check Data Usage on iPhone

Let’s start your AT&T internet data usage checking with the simplest method first. New iPhone 7 and older iPhone 6 users should take advantage of using star codes. What is this? Star code is a combination of symbols and numbers. You dial them and your smartphone quickly provides the information you seek to get.

For AT&T, you should use the special star code for iPhone data usage check. So here is what you need to do:

Step 1. Take your iPhone and make sure your carrier is AT&T. You will see AT&T icon at the left top menu of your screen.

Step 2. Launch Phone program on your handset.

Step 3. Click on your Keypad to start typing.

Dial *3282# to Check Cellular Data Usage AT&T iPhone 7

Step 4. Type in *3282# (if you need information in English) and dial it via a green Dial icon. Users who prefer to receive information in Spanish should dial a different combination of *3286# – this is also simple.

P.S. If you need to know how to translate the numbers above on your keypad: the words are DATA and DATO correspondingly.

Step 5. There will be an on-screen message with your personal data usage information.

It is also easy to learn your AT&T minutes via a similar method. The combinations are *646# for English version and *876# for users who prefer messages in Spanish.

myAT&T App for iOS 10 iPhone 7

iPhone Data Usage App for AT&T Network

If you are not a fan of star codes but still need to control your monthly data usage with AT&T you can download and use the free myAT&T application. It is available at the App Store and it’s a no-cost program that shows your billing cycle’s usage for ‘current data’ as well as information about past cycles. You can even get details about shared usage if you have subscribed to family Mobile Share data plan.
Anyways, you need to complete some steps before you get the information:

Step 1. Download and install the free myAT&T app.

Step 2. Launch the application on your iPhone 7 or other model.

Step 3. Log in using your AT&T account login / password.

Step 4. Go to Overview – Data menu.

How to Check AT&T Data Usage iPhone 7

Step 5. Get the details and you’ll see your data usage. Family members can see the information broken down via a pie chart. It’s pretty simple and detailed.

By the way, AT&T users always receive message alerts (via email or SMS) when they are about to reach their data limit per month. You can also call AT&T at 800-331-0500 if you need assistance or help.

You can always factory unlock iPhone 7 from AT&T or other networks and save even more on your data plans.

Nice MacBook Pro Touch Bar Customization Secrets

Even though there aren’t major changes with new MacBook Pro released in 2016 by Apple – a lot of users hurry to purchase this computer. Some customers like MacBook Pro touch bar while not being totally happy with only 16GB of memory and absence of built-in SD card reader. Others are sure that it’s enough to have the touch bar to enjoy the latest launch, especially when you are able to use numerous Mac desktop customization tools to make your Touch Bar even more special.

We’ll teach you how to customize MacBook Pro and make it more personal to you. The tips and tricks are simple. Anyone who loves changes will enjoy using the updated OLED panel. It’s must-do when you like exclusive options.

Just think about this. The recently presented MacBook Pro 2016 was able to outsell all Apple laptops in only 5 days. This is a great achievement for the famous ‘fruit’ company that presented several new gadgets this fall along with iPhone 7 and iPhone 7 Plus [both smartphone models can boast incredible 256GB of storage space].

MacBook Pro 2016 Customize Touch Pad

Customize MacBook Pro Appearance

Search for flavours for Mac was never as easy as it happens with MBP that arrives with new Touch Bar. Users had to find and customize MacBook pro skins, search for flavours but they had no Touch Bar to change. This year you can improve the new OLED panel and interact with application to your full excitement and enjoyment.

Once you learn how to use your Touch Bar you can customize MacBook Pro appearance. Here is what you should do:

Step 1. So you need a new MacBook Pro released in 2016.

Step 2. To start getting new flavours for Mac, you should choose a program first.

Step 3. Now you can use amazing Mac desktop customization tools. For example, let’s choose a new Control Strip by pressing on your desktop screen.

Step 4. Press on View in the application menu.

Step 5. Select the feature called ‘Customize Touch Bar’ that is also available through a drop-down menu.

Step 6. The panel has a special tool (you should select and drag it down to the display’s bottom).

Step 7. Once the tool is moved on your Touch Bar you can move it within the application section and change the appearance to your personal likes.

By the way, if you only got a new computer you should learn how to set up BacBook Pro (version 2016).

Touch Bar MacBook Pro 2016 Customization

MacBook Pro Touch Bar Tools: How to Remove Them

Sometimes you get tired of the tools presented in your Touch Bar. Well, why won’t you remove them? This is so simple and you’ll enjoy how to customize MacBook Pro on-the-go and add new changes.

Step 1. Just like when you act while adding tools to your new Touch Bar you should choose the application to work with.

Step 2. Press on desktop display to add changes to the Control Strip.

Step 3. Look at the program’s menu options to select View.

Step 4. You should choose one option from the new menu. Go with Customize Touch Bar feature.

Step 5. Once the customization panel becomes visible you should touch-hold your Touch Bar tool and wait for it to enter wiggle mode.

Step 6. Now drag the tools you wish to remove to the trash can. You’ll see the right icon to the left of MBP Touch Bar. Do this for each tool, one by one.

Step 7. Once you are done you should click on Done. This way you’ll confirm your decision.

A lot of Mac users also have an iPhone. Learn how to fix iOS 10 problems with bubble effect.

How to Customize MacBook Pro 2016 Touch Bar

In case you only wish to reorganize your tolls you should continue with the guide below:

Step 1. Ok, select the app to begin.

Step 2. Press on desktop screen and you’ll be able to change Control Strip.

Step 3. Select Views – Customize Touch Bar to proceed.

Step 4. Click and hold the tool which you wish to move to a new location and wait till you see the wiggle mode. Now you are able to drag and reorganize it within the program section.

Step 5. Don’t forget to confirm your new location by clicking on ‘Done’ option.

Isn’t it simple?

It’s always great to know how to get refund from iTunes directly on your Mac.

Awesome WhatsApp Animated Images for iPhone 7: How to Search and Send GIFs

Modern WhatsApp iPhone program has a lot of interesting possibilities for users who like to send text messages to family and friends. For example, you can add emojis to make your SMS unique or add videos and images to make it pretties and funner. Short videos, live photos, GIFs – these are incredible things you can use through WhatsApp animated images feature.

iPhone 7 Apple model has different options to boast. Customers get more storage, better cameras and longer battery life, new colors and water-resistance. All these features are even more improved since you are running iOS 10 version.

How to Send GIF Messages iPhone WhatsApp

So along with nice iPhone 7 colors and other cool extras you can also enjoy various improvements offered by third-party apps. You know that you can always send iMessages via iMessage app which is a default program created by Apple. At the same time there are other tools that help you send SMS with emojis, photos, videos and text. And WhatsApp animated images are one of the many great third-party iOS 10 features to explore.

By the way, WhatsApp iPhone tool is extremely popular. This popularity will only grow since the app finally starts to support GIF messages along with Live photos iPhone 7 option and videos support.

How to Find and Send iPhone GIFs Text Message on iOS 10

Step 1. Firstly, you should user any iPhone that supports iOS 10 firmware version. You can either purchase new iPhone 7 and enjoy its great options or use any previous model.

Step 2. Now you need to download the most recent release of WhatsApp. It is free of charge and, by the way, it works with all mobile operating systems starting with old iOS 6.

Step 3. Open your updated WhatsApp tool.

Step 4. Now open a conversation where you wish to use iPhone GIF file.

Photo & Video Library WhatsApp iOS 10

Step 5. Do you see the Plus? Click on ‘+’ and choose Photo & Video Library.

Step 6. You can easily search the web for cute GIFs by clicking on GIF option [lower left part of the screen].

Step 7. Select the animation you enjoy the most from the big choice of GIFs you’ll see. Just tap on the one you like.

Step 8. Now send the text message as you would normally do. It will contain the selected GIF image.

The iPhone 7 Apple device is not what a lot of users expected. The design reminds of previous iPhone 6s and 6. No major changes are introduced. Still there are many customers who are excited about the colors, storage capacity, battery and cameras. Besides, the iOS 10 features also make this gadget pretty interesting compared to smaller iPhone SE or previous 6s.

Turn Live Photo iPhone 7 into GIF Message

You can also include live photos on iPhone 7 and videos to your text message. It’s actually so simple to make your Live Photo a GIF image:

Step 1. You need to open WhatsApp tool on your smartphone running the latest firmware.

Step 2. Open a new conversation.

Step 3. Press on the Plus option.

Step 4. You’ll see a section with Photo & Video Library option. Choose it.

Step 5. You’ll get to your Live photos. Select the one you wish to turn into GIF file.

Step 6. You should 3D Touch and swipe up to be able to the ‘Select as GIF’ action.

Step 7. Send your message.

Make GIF from Video iPhone WhatsApp

It is even possible to make a short video a GIF file. Here is how you can perform this iOS 10 trick:

Step 1. Record a video (6 seconds long at the most) on your handset.

Step 2. Launch WhatsApp.

Step 3. Start a new conversation and click on the ‘+’ option.

Step 4. Select Photo & Video Library and choose the video file.

Step 5. Turn on GIF feature [use a toggle] and your short video will become an animated GIF image.

Step 6. You can now send your text message. Isn’t it incredible?

You have learned how to SMS GIFs, short videos and Live Photos as GIF files. Create pretty messages and surprise your friends with simple animations. Learn how to add emojis to your iPhone message.

In case you want to add your GIF to starred section for quicker access while searching you should go to your WhatsApp conversation, click-hold that GIF file and choose the star option.

How to Download YouTube Videos and Turn Off YouTube Autoplay on iPhone 7

iPhone YouTube users know that this service has strict rules and you can’t just download any video when you want it. There are some tips and tricks you can follow to turn off YouTube autoplay and download YouTube videos directly to iPhone or iPad. We want to share the main secrets with you and help you enjoy both watching and saving videos to watch later on.

You might remember those times when you could use a simple browser plugin for YouTube iPhone download but this doesn’t work nowadays. Such additions are blocked or patched. Still there are tools that make everything possible. Let’s see what becomes helpful when good old methods stop working. In case you are running iOS 10 operating system version and having some issues here is how to fix bubble effect for iPhone messages.

How to Download YouTube Videos on iPhone

How to Download YouTube Videos on iPad / iPhone

There is iPhone YouTube app you can use. Since it’s free to download it’s pretty popular among users. We’ll explain how to save YouTube videos to iPhone Camera roll for both iPhone 6 and newest iPhone 7. The program also supports others Apple handset models. You need to double check that your firmware version is supported before you get it.

The program Titan Downloader used to be on iTunes. It was a free application you could download and use. Now you have to find the link on your own to get it.

Step 1. Install your new iPhone YouTube Titan Downloader on the phone or iPad [there is a different My Video Downloader tool on iTunes these days and it’s also free of charge].

Step 2. There are some tricks you have to know about. The official feature that once allowed downloading videos from YouTube is now blocked. So when you find a video via this app and try to download it you will see a warning about ‘copyright issues’ – you have probably guessed that nothing will work this way. So let’s see what the bypass is.

Step 3. Launch Safari browser on your iDevice.

Step 4. Search Safari for your wished YouTube iPhone download video. Copy the video’s URL [link].

Step 5. Now launch Titan YouTube downloader for iPhone 7 with numerous features and paste that link to watch the video.

Step 6. Start watching it and as soon as video begins playing you should quickly click on ‘Done’ option [it is located at the top left part of the screen].

Step 7. Now once the video window is shrinked down you should click-hold your finger on this window and wait. The special menu should appear.

Download YouTube Videos to iPhone Camera Roll

Step 8. This menu has two options. One is called ‘Download’ and the other one is known as ‘Download As’ – use one of these features to download the file within the application.

Step 9. If you want to download YouTube videos directly to iPhone you should select ‘Videos’ section located at the bottom. Make sure you click-hold the video icon so that you can save the video to Camera Roll.

This is a nice YouTube downloader for iPhone 6, 6s, 7 and iPads. You can enjoy the hidden feature even though it is banned.
Now since you’ve learned how to download videos on iPhone from Safari using a trick, let’s see what you can do with autoplay option.

You can also find out how to transfer information, files and other data from Android to iPhone. This could be useful.

How to Turn Off YouTube Autoplay

How to Turn Off YouTube Autoplay

If you are tired of all the videos playing automatically on your Apple device you can disable this feature and play them only on demand.

Step 1. Open YouTube on iPhone or iPad.

Step 2. Go to ‘Up Next’ menu.

How to Disable YouTube Videos on iPhone 7

Step 3. Disable Autoplay option you’ll find at the upper part.

Step 4. That’s it. All the videos should stop playing on their own now. When you wish to enable this feature you have to repeat the same guide but turn on Autoplay instead of disabling it. P.S. If you haven’t got the latest phone model you can easily upgrade to iPhone 7 online.

We hope you enjoyed our short how to save YouTube videos to iPhone camera roll instruction and now know how to disable autoplay option.

iPhone Call Blocking Tool: How to Block and Unblock Number on iOS 10

The amazing iPhone call blocking feature allows you to stop receiving unwanted phone calls. Isn’t it cool when you can block caller ID on iPhone 7 or iPhone 7 Plus and do this with a couple of clicks?

The most recent iOS 10 firmware version brings a lot of great changes to all supported mobile devices. Customers who chose to purchase the newest generation gadgets are even luckier because they received some unique and long-awaited specs others can only dream of.

You can affect your Truecaller iPhone incoming calls option by blocking and unblocking phone numbers that you don’t like or find scammers. We’ll explain below how exactly to reach the goal and help you avoid all those ad calls, robo-callers and telemarketers who are searching for customers and don’t care about troubling you. Here is how you can easily manage your iOS 10 files.

The introduction of iOS 10 makes this goal simpler. The ‘fruit’ giant did an incredible job and improved its mobile firmware version so that users can enjoy more features and set up everything much easier and quicker.

Truecaller iPhone Caller iD iOS 10 Feature

How to Block Calls iPhone Instruction for iOS 10 Platform

Apple finally allowed game and application developers to take advantage of different extensions of the stock programs. This way you get more features and are able to keep away the calls you don’t want to get.

Truecaller iPhone incoming calls controller is a great thing. You’ll find its advantages as soon as you decide to give it a try. It’s great that all your important call will go through. Only unwanted ones will be blocked on your behalf.

Block Spam Calls on iOS 10

Block Caller ID on iPhone 7

Step 1. Before you can get the features on your phone you need to download and install Truecaller which is absolutely free and takes only a couple of moments.

Step 2. The block calls iPhone advantages start when you click on Call Blocking and Identification. It’s located right below Calls.

Step 3. Enable Truecaller. You’ll have to toggle it on.

Step 4. What happens when you block a number on iPhone 7 Plus that got an exclusive dual-lens camera system? Actually the app does everything for you. It can automatically identify who is calling you. All the spam calls are automatically blocked and you receive only the phone calls from real people.

Are there other tools that support iPhone call blocking? Of course, there are! You can take a closer look at Who Called application or Hiya app. There are other helpful extras you can try and find the best tool that protects you from scammers.

How to See Blocked Messages on iPhone Running iOS 10

The program blocks everything automatically if you are using Truecaller. So when you wish to read all your blocked messages you need to launch the application on your iPhone and select all messages option. This way you will see all the text messages that you have received, including the blocked ones.

Block Spam Fraud iPhone Calls on iOS 10

Why to Block Calls on iPhone 7?

This is an interesting question. A lot of us might wonder if it’s important or not to block phone calls. There are a lot of scammer companies that obtain the lists of real phone numbers and send the spam messages. This could be done for advertising or trying to steal your money. Just think about it, nearly 20 million customers from the U.S. alone lose over $7B because of spam calls every year. This information is provided by Truecaller.

The spamming is a big threat to everyone no matter what country you are from and where you live. iPhone unblock number option is not available iin Truecaller because you block nothing manually. The app takes care of this by analyzing the phone number that is calling you with its database of scammers, telemarketers and robo-callers.

You can also enjoy one little trick offered by the call blocking program. It has the feature called Announce Calls. You can turn it on when you launch this tool. If it is enabled you will hear the caller names spoken aloud by the app but only if this name is in your contact list on iOS 10 smartphone. If you don’t have this number in your list you will hear that an unknown number is calling you.

Have you purchased the iPhone 7 or bigger iPhone 7 Plus with dual-camera already? Do you have plans on updating to one of these phone models?