Enjoy Mac Touch ID on Old Models Released Before 2013

Do you have one of those old Mac computers released prior to 2013? Do you know that you can still enjoy Mac Touch ID option and unlock your laptop or desktop machine without issues? Surely, all newest computers arrive with a great feature that is built-in and can be used by customers right out of the box. Still this doesn’t mean that Touch ID MacBook option is available on newest devices only (learn details about MacBook Pro touch bar customization). Users who still own an older model and don’t wish to upgrade can learn about curious tricks and perform them in everyday life. This way you can truly get more features and surprise yourself and your friends.

Should you find a real fingerprint scanner for Mac or is there any other trick to use on old Mac? There is no need to enter a passcode to unlock your iDevice. This is not comfortable and still you can enjoy your Mac ID to auto-lock your desktop or laptop computer.

How to Unlock Mac with Touch ID

About Mac Touch ID and macOS Sierra

Unfortunately that awesome auto-unlock option comes with macOS Sierra. While there is no need to enter your password every time to want to unlock you computer you cannot use this feature on old Macs. Right, even if you are able to install macOS Sierra on an old Mac the newest features won’t be supported by your machine.

Computers released before 2013 can run macOS Sierra version but they do not support the Auto-Unlock feature. Still you are able to unlock Mac with Touch ID of your other iDevices (such as the new iPhone 7, older iPhones and Apple Watch wearable).

Mac ID is a great tool that works on Apple gadgets. This is the program that helps you to unlock computers with other ‘fruit’ devices. The whole idea is pretty similar to Auto-Unlock option.

Mac ID supports a lot of gadgets from 2011-2016 (including the new MacBook Pro 2016 model). It works with newest iPads and iPhones as well as old iMac 2012, Mac Mini from 2011 and 2012, MacBook Pro from 2012 and iMac back from 2012 or newer. In other words you can take an incredible advantage of such Mac Touch ID similar feature.

How to Unlock Old Mac with Touch ID Fingerprint Scanner

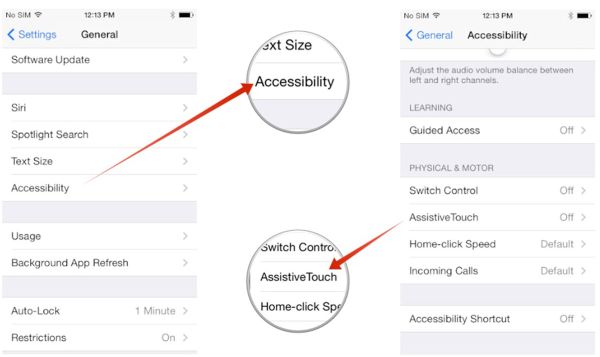
How to Get Touch ID on Older Devices

So you need no fingerprint scanner for Mac if it’s an old computer. But you need Mac ID application for both your old Mac computers and iPhone or iPad. You can find a free version for old Mac laptop but you’ll have to pay $3.99 for iOS Mac ID release.

Step 1. Before you can create your cool Mac Touch ID option you should set up Mac ID on both Mac and iDevice.

Step 2. Launch programs on both gadgets.

Step 3. The Mac ID on Mac wills how he list where you can select your iPhone or iPad that is also running this program. Make sure everything is ok with Bluetooth.

Step 4. Enter your login credentials before you can press on Continue option.

Step 5. The program should now work. So simply lock your computer.

Step 6. On the iPhone or other Apple device that really supports Touch ID and has Mac ID installed, you need to hold Home button with the finger you registered for Touch ID. Ta-da, your computer will unlock.

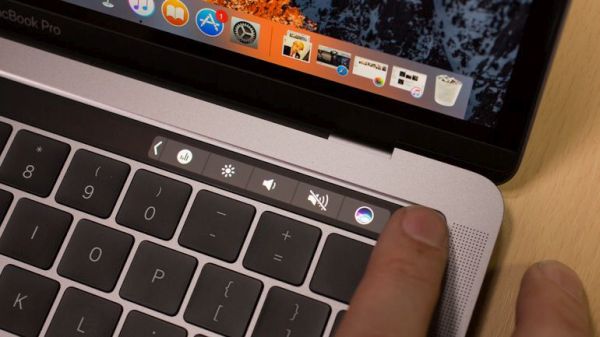
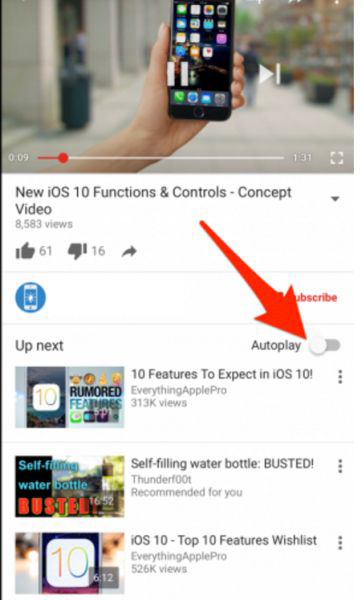
Learn how to set up MacBook Pro with touch bar and find out what else you can do with the additional application.

How to Schedule Mac Auto Wake Option

Mac Auto Wake Feature

Step 1. Look at the Mac Menu bar. Press on Mac ID.

Step 2. There will be Proximity Wake in the drop window.

Step 3. Enable it.

Step 4. Press on Custom if you wish to add some adjustments to the proximity. Choose the distance for waking up your Mac screen with a phone.

Step 5. Your computer will automatically wake up when you enter the room with the right iDevice.

Let’s pay more attention to the proximity option. The distance threshold has several options. You can select the default ones (low, medium or high) or go with your customized solution.

Mac Tap Pattern Unlock

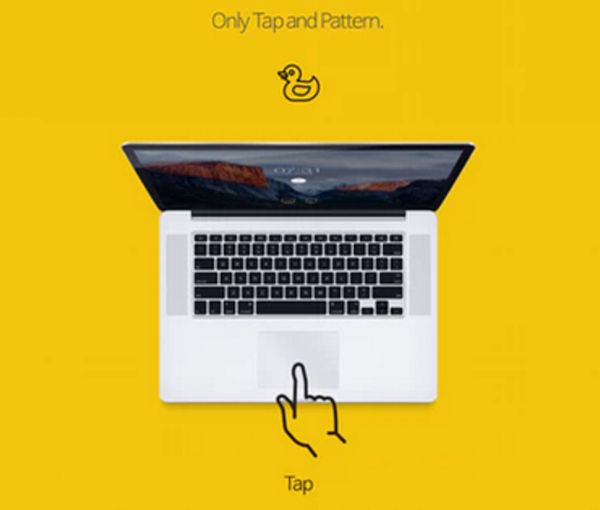
There is one more thing you can try. It is called Tap Pattern. It requires some options. It only works when you have the Magic Mouse or a trackpad. Here is what you should do:

Step 1. Go to Menu on your computer and select Mac ID.

Step 2. Choose the Tap to Unlock feature.

Step 3. Select Set up option.

Step 4. You can set a pattern using the physical or virtual trackpad (or Magic Mouse).

Step 5. Now press on Menu – Mac ID and Tap to Unlock. Now you should see the notification via Taps visible on Lock screen. P.S. You can also unlock your iPhone from any carrier once and forever.

Step 6. Select the option to provide passcode only when the primary gadget is connected. Otherwise choose to unlock your computer with Magic Mouse or trackpad.

Step 7. Now press the Tap pattern also locks Mac and you are done.

It’s simple, isn’t it?

Nice MacBook Pro Touch Bar Customization Secrets

Even though there aren’t major changes with new MacBook Pro released in 2016 by Apple – a lot of users hurry to purchase this computer. Some customers like MacBook Pro touch bar while not being totally happy with only 16GB of memory and absence of built-in SD card reader. Others are sure that it’s enough to have the touch bar to enjoy the latest launch, especially when you are able to use numerous Mac desktop customization tools to make your Touch Bar even more special.

We’ll teach you how to customize MacBook Pro and make it more personal to you. The tips and tricks are simple. Anyone who loves changes will enjoy using the updated OLED panel. It’s must-do when you like exclusive options.

Just think about this. The recently presented MacBook Pro 2016 was able to outsell all Apple laptops in only 5 days. This is a great achievement for the famous ‘fruit’ company that presented several new gadgets this fall along with iPhone 7 and iPhone 7 Plus [both smartphone models can boast incredible 256GB of storage space].

MacBook Pro 2016 Customize Touch Pad

Customize MacBook Pro Appearance

Search for flavours for Mac was never as easy as it happens with MBP that arrives with new Touch Bar. Users had to find and customize MacBook pro skins, search for flavours but they had no Touch Bar to change. This year you can improve the new OLED panel and interact with application to your full excitement and enjoyment.

Once you learn how to use your Touch Bar you can customize MacBook Pro appearance. Here is what you should do:

Step 1. So you need a new MacBook Pro released in 2016.

Step 2. To start getting new flavours for Mac, you should choose a program first.

Step 3. Now you can use amazing Mac desktop customization tools. For example, let’s choose a new Control Strip by pressing on your desktop screen.

Step 4. Press on View in the application menu.

Step 5. Select the feature called ‘Customize Touch Bar’ that is also available through a drop-down menu.

Step 6. The panel has a special tool (you should select and drag it down to the display’s bottom).

Step 7. Once the tool is moved on your Touch Bar you can move it within the application section and change the appearance to your personal likes.

By the way, if you only got a new computer you should learn how to set up BacBook Pro (version 2016).

Touch Bar MacBook Pro 2016 Customization

MacBook Pro Touch Bar Tools: How to Remove Them

Sometimes you get tired of the tools presented in your Touch Bar. Well, why won’t you remove them? This is so simple and you’ll enjoy how to customize MacBook Pro on-the-go and add new changes.

Step 1. Just like when you act while adding tools to your new Touch Bar you should choose the application to work with.

Step 2. Press on desktop display to add changes to the Control Strip.

Step 3. Look at the program’s menu options to select View.

Step 4. You should choose one option from the new menu. Go with Customize Touch Bar feature.

Step 5. Once the customization panel becomes visible you should touch-hold your Touch Bar tool and wait for it to enter wiggle mode.

Step 6. Now drag the tools you wish to remove to the trash can. You’ll see the right icon to the left of MBP Touch Bar. Do this for each tool, one by one.

Step 7. Once you are done you should click on Done. This way you’ll confirm your decision.

A lot of Mac users also have an iPhone. Learn how to fix iOS 10 problems with bubble effect.

How to Customize MacBook Pro 2016 Touch Bar

In case you only wish to reorganize your tolls you should continue with the guide below:

Step 1. Ok, select the app to begin.

Step 2. Press on desktop screen and you’ll be able to change Control Strip.

Step 3. Select Views – Customize Touch Bar to proceed.

Step 4. Click and hold the tool which you wish to move to a new location and wait till you see the wiggle mode. Now you are able to drag and reorganize it within the program section.

Step 5. Don’t forget to confirm your new location by clicking on ‘Done’ option.

Isn’t it simple?

It’s always great to know how to get refund from iTunes directly on your Mac.

Awesome WhatsApp Animated Images for iPhone 7: How to Search and Send GIFs

Modern WhatsApp iPhone program has a lot of interesting possibilities for users who like to send text messages to family and friends. For example, you can add emojis to make your SMS unique or add videos and images to make it pretties and funner. Short videos, live photos, GIFs – these are incredible things you can use through WhatsApp animated images feature.

iPhone 7 Apple model has different options to boast. Customers get more storage, better cameras and longer battery life, new colors and water-resistance. All these features are even more improved since you are running iOS 10 version.

How to Send GIF Messages iPhone WhatsApp

So along with nice iPhone 7 colors and other cool extras you can also enjoy various improvements offered by third-party apps. You know that you can always send iMessages via iMessage app which is a default program created by Apple. At the same time there are other tools that help you send SMS with emojis, photos, videos and text. And WhatsApp animated images are one of the many great third-party iOS 10 features to explore.

By the way, WhatsApp iPhone tool is extremely popular. This popularity will only grow since the app finally starts to support GIF messages along with Live photos iPhone 7 option and videos support.

How to Find and Send iPhone GIFs Text Message on iOS 10

Step 1. Firstly, you should user any iPhone that supports iOS 10 firmware version. You can either purchase new iPhone 7 and enjoy its great options or use any previous model.

Step 2. Now you need to download the most recent release of WhatsApp. It is free of charge and, by the way, it works with all mobile operating systems starting with old iOS 6.

Step 3. Open your updated WhatsApp tool.

Step 4. Now open a conversation where you wish to use iPhone GIF file.

Photo & Video Library WhatsApp iOS 10

Step 5. Do you see the Plus? Click on ‘+’ and choose Photo & Video Library.

Step 6. You can easily search the web for cute GIFs by clicking on GIF option [lower left part of the screen].

Step 7. Select the animation you enjoy the most from the big choice of GIFs you’ll see. Just tap on the one you like.

Step 8. Now send the text message as you would normally do. It will contain the selected GIF image.

The iPhone 7 Apple device is not what a lot of users expected. The design reminds of previous iPhone 6s and 6. No major changes are introduced. Still there are many customers who are excited about the colors, storage capacity, battery and cameras. Besides, the iOS 10 features also make this gadget pretty interesting compared to smaller iPhone SE or previous 6s.

Turn Live Photo iPhone 7 into GIF Message

You can also include live photos on iPhone 7 and videos to your text message. It’s actually so simple to make your Live Photo a GIF image:

Step 1. You need to open WhatsApp tool on your smartphone running the latest firmware.

Step 2. Open a new conversation.

Step 3. Press on the Plus option.

Step 4. You’ll see a section with Photo & Video Library option. Choose it.

Step 5. You’ll get to your Live photos. Select the one you wish to turn into GIF file.

Step 6. You should 3D Touch and swipe up to be able to the ‘Select as GIF’ action.

Step 7. Send your message.

Make GIF from Video iPhone WhatsApp

It is even possible to make a short video a GIF file. Here is how you can perform this iOS 10 trick:

Step 1. Record a video (6 seconds long at the most) on your handset.

Step 2. Launch WhatsApp.

Step 3. Start a new conversation and click on the ‘+’ option.

Step 4. Select Photo & Video Library and choose the video file.

Step 5. Turn on GIF feature [use a toggle] and your short video will become an animated GIF image.

Step 6. You can now send your text message. Isn’t it incredible?

You have learned how to SMS GIFs, short videos and Live Photos as GIF files. Create pretty messages and surprise your friends with simple animations. Learn how to add emojis to your iPhone message.

In case you want to add your GIF to starred section for quicker access while searching you should go to your WhatsApp conversation, click-hold that GIF file and choose the star option.

How to Download YouTube Videos and Turn Off YouTube Autoplay on iPhone 7

iPhone YouTube users know that this service has strict rules and you can’t just download any video when you want it. There are some tips and tricks you can follow to turn off YouTube autoplay and download YouTube videos directly to iPhone or iPad. We want to share the main secrets with you and help you enjoy both watching and saving videos to watch later on.

You might remember those times when you could use a simple browser plugin for YouTube iPhone download but this doesn’t work nowadays. Such additions are blocked or patched. Still there are tools that make everything possible. Let’s see what becomes helpful when good old methods stop working. In case you are running iOS 10 operating system version and having some issues here is how to fix bubble effect for iPhone messages.

How to Download YouTube Videos on iPhone

How to Download YouTube Videos on iPad / iPhone

There is iPhone YouTube app you can use. Since it’s free to download it’s pretty popular among users. We’ll explain how to save YouTube videos to iPhone Camera roll for both iPhone 6 and newest iPhone 7. The program also supports others Apple handset models. You need to double check that your firmware version is supported before you get it.

The program Titan Downloader used to be on iTunes. It was a free application you could download and use. Now you have to find the link on your own to get it.

Step 1. Install your new iPhone YouTube Titan Downloader on the phone or iPad [there is a different My Video Downloader tool on iTunes these days and it’s also free of charge].

Step 2. There are some tricks you have to know about. The official feature that once allowed downloading videos from YouTube is now blocked. So when you find a video via this app and try to download it you will see a warning about ‘copyright issues’ – you have probably guessed that nothing will work this way. So let’s see what the bypass is.

Step 3. Launch Safari browser on your iDevice.

Step 4. Search Safari for your wished YouTube iPhone download video. Copy the video’s URL [link].

Step 5. Now launch Titan YouTube downloader for iPhone 7 with numerous features and paste that link to watch the video.

Step 6. Start watching it and as soon as video begins playing you should quickly click on ‘Done’ option [it is located at the top left part of the screen].

Step 7. Now once the video window is shrinked down you should click-hold your finger on this window and wait. The special menu should appear.

Download YouTube Videos to iPhone Camera Roll

Step 8. This menu has two options. One is called ‘Download’ and the other one is known as ‘Download As’ – use one of these features to download the file within the application.

Step 9. If you want to download YouTube videos directly to iPhone you should select ‘Videos’ section located at the bottom. Make sure you click-hold the video icon so that you can save the video to Camera Roll.

This is a nice YouTube downloader for iPhone 6, 6s, 7 and iPads. You can enjoy the hidden feature even though it is banned.
Now since you’ve learned how to download videos on iPhone from Safari using a trick, let’s see what you can do with autoplay option.

You can also find out how to transfer information, files and other data from Android to iPhone. This could be useful.

How to Turn Off YouTube Autoplay

How to Turn Off YouTube Autoplay

If you are tired of all the videos playing automatically on your Apple device you can disable this feature and play them only on demand.

Step 1. Open YouTube on iPhone or iPad.

Step 2. Go to ‘Up Next’ menu.

How to Disable YouTube Videos on iPhone 7

Step 3. Disable Autoplay option you’ll find at the upper part.

Step 4. That’s it. All the videos should stop playing on their own now. When you wish to enable this feature you have to repeat the same guide but turn on Autoplay instead of disabling it. P.S. If you haven’t got the latest phone model you can easily upgrade to iPhone 7 online.

We hope you enjoyed our short how to save YouTube videos to iPhone camera roll instruction and now know how to disable autoplay option.

How New MacBook Pro 2016 Can Charge Your iPhone 7

Apple released new MacBook Pro 2016 that can be easily used as your amazing iPhone charger. This new computer model can really charge iPhone 7, iPhone 7 Plus or older models [by the way you can fix issues with iOS 10 bubbles effect to enjoy text messages even more]. The ‘fruit’ giant presented several new gadgets this year in hopes to impress potential customer right before the Christmas shopping season.

What do you need in order to start iPhone charging with MacBook Pro? Firstly, you should have the iPhone. Secondly, you need to get the latest model of MBP 2016. Then you also should find USB-C connection as this is what helps connecting the two devices and completing your goal.

MacBook Pro 2016 Release Date

New MacBook Pro Release Date

Apple presented this computer on October 27th. It arrives with some curious features. For example, it can boast Touch ID option, Touch Bar instead of a number of keys, better screen and some other improvements. It’s also worth to say that this model comes with Thunderbolt 3 ports. These are USB-C caring ports.

Still for iPhone charging you require a new cable since the USB lightning cable doesn’t support USB-C connection. We’ll give you some tips on what you can get in order to enjoy new MacBook Pro release and the opportunities it opens to simplify the charging procedure for your iOS 10 smartphone.

USB-C to USB Adapter for MacBook Pro 2016 and iPhone 7

iPhone Charging Accessories for MacBook Pro 2016 Port

You can take a look at different accessories. There is more than one solution in the market so you can choose and it’s great when you have a choice, right?

There are special adapters from USB-C to regular USB. If you find one interesting enough to purchase you’ll be able to turn MBP into iPhone charger. Such adapters remind of a small dongle that makes the unique Thunderbolt 3 port a regular USB port. You know how Apple likes to create exclusive devices with exclusive ports!

How much can such an adapter cost? You can find it around $20 online if you prefer original Apple accessories. Third-party companies also create similar products and offer them way cheaper. You can search different stores (both online and your local shops) if you wish to get such an adapter. By the way, all iPhone Verizon users can limit their data usage to save money on monthly bills.

USB C to Lightning Cable Accessories

There is a different product you can look for. Modern market can aslo boast USB-C to Lightning cable. Such accessory can let you charge iPhone 7 via your MacBook Pro with Retina display as you can connect iPhone directly to your computer via this cable. It’s pretty simple and way simpler than getting an adapter however Apple prices such cables at around $25. It does sound too expensive for a cable.

Just as it happens with all original ‘fruit’ accessories you can always find third-party USB-C to Lightning cable and use it instead of Apple product. This way you can save some money.

How Do I Know If My iPhone Is Charging

Once you connect the handset to MBP 2016 device [find our how to get a full refund from iTunes] you will know at once that the charging process has begun. If your iPhone is locked there will be a big battery icon on the lock screen. If the phone is unlocked you should still understand it is being charged. Take a look at the status bar. Do you see where your battery icon is located? Right beside it you will find a lightning bolt. It tells you everything is ok and the charging happens.

Apple MacBook Pro 2016 Features

Apple MBP 2016 Features

The arrival of new MacBook Pro was just in time for the upcoming holiday shopping season. Apple could present it along with iPhone 7 and 7 Plus earlier this fall however it took some time before offering an updated Mac to fight with declining Mac sales.

If you have this gadget you should learn how to set up MacBook Pro 2016 version. It’s a simple and quick guide for everyone who is planning or already purchased the latest device from Apple.

Simpe Way to Set Up New MacBook Pro 2016 Model

New Apple customers who just purchased the most recent device might wonder how to set up MacBook Pro painlessly. This is not something you have to repeat once in a while thus ‘setup’ instructions are popular and must-have when you get a new smartphone (for example iPhone 7 running iOS 10 version), tablet or computer.

There is a simple instruction you can follow to avoid any possible MacBook Pro setup problems. We’ll share the guide below so that you can enjoy the amazing design and incredible new features instead of searching for the best MacBook setup assistant online.

Apple presented its latest device for 2016 with cool Touch Bar option. These are amazing changes that are already loved by many users from all over the world even though this is a brand new gadget. You shoud also learn how to get a refund from iTunes on your new Mac.

How to Set Up Apple MacBook Pro 2016

How to Set Up MacBook Pro Retina 2016 Model

Step 1. Open your new MacBook Pro 2016. This way your device will automatically turn on. Tip: when you wish to turn off MBP you should press on Touch ID button that is placed near the Touch Bar.

Step 2. Let’s continue setting up a new MacBook Pro by choosing the language. Now press Continue option.

Step 3. Select the keyboard layout you like and choose to Continue again.

MacBook pro 2016 Setup How to Instruction

Step 4. Choose your WiFi network and provide its password before you can proceed. Users who are using Ethernet connection should go wih Other network Options – Ethernet.

Step 5. MacBook setup assistant will suggest you want to set it up as a new computer. If this is what you wish to do you should choose Don’t transfer any information now and proceed. Still it is always possible to move your data from old computer to the new device [if you are a fan of Apple smartphones you should learn what the difference is between iPhone 7 and iPhone 7 Plus].

Step 6. You’ll see the box Enable Location Services on this Mac. You should check it.

Step 7. Now you’ll be asked to sing in using your Apple ID and password. It’s best to use the same ID for all your iDevices in order to sync data, files and services. Also, if you use this method your full name will appear as your Mac and Account name.

Step 8. You’ll see Terms and Conditions that you have to Agree to in order to continue.

Step 9. You need to register Touch ID to protect the device from being accessed by third-party people. If you have problems with remembering your passwords you are highly advised to check the option ‘Allow my Apple ID to reset this password’ just in case you ever forget it.

Step 10. It’s good to check the option for setting time zone based on your current location if you enable Location Services.

Step 11. Our simple MacBook Pro setup guide goes on and you need to check the option ‘Turn on FileVault disk encryption’ that is responsible for encrypting your computer’s hard drive information. It is important to secure your contents and this is one of the ways.

Step 12. There are several more things you need to complete. Just check the box for ‘Allow my iCloud account to unlock my disk’ and a couple of more things.

Step 13. Make sure you allow Store files from Documents and Desktop in iCloud as this MacBook Pro setup feature is very useful. It is a wonderful option for optimizing your storage on macOS Sierra platform. Still you have to think twice before you use it because it requires enough iCloud storage space to fit your Documents and Desktop folders. If you have so much space, choose it.

Step 14. You need to turn on Siri on your computer. Do this by checking the window for ‘Enable Siri’ feature.

Step 15. You have successfully set up your MBP. Now just wait a bit as the process should complete pretty soon.

Apple MacBook Pro 2016 Setup Guide

New MacBook Pro release date was October 27. This device is sold in two colors: Space Gray and amazing Silver. You can find it with a 13-inch and 15-inch screen along with Touch Bar option that replaces older function keys. The prices start at $1,499. This could be an interesting gift for the upcoming holidays. Even if you don’t own this computer yet you might want to keep the instructions on how to set up MBP 2016 in case you are planning to purchase this new Apple computer or iPhone 7 [don’t forget about amazing iPhone IMEI checker services that are must-use before you decide to SIM unlock your handset].

How to Fix iOS 10 Features Not Working: Get Bubble Effects Back

Do you enjoy iOS 10 features? Some users liked everything Apple offered this fall however those who updated to iOS 10.1 version notice some difference. Right after this iOS 10 download their iMessage stops sending cute messages with bubble effects. This takes place on both iPhone 7, 7 Plus, other iPhones and iPad devices.

Are you unhappy with iOS 10 update because of this problem? You can fix bubble effect and enjoy it again on your iDevice. There are some simple tips and tricks you can follow. No one guarantees that your issue will be solved right away but you risk nothing to try. Hopefully your iOS 10 problems with iMessage will be gone as soon as possible.

iOS 10 Bubble Effects in Messages iPhone App

It is nice when you can text your relatives and friends with messages that have the bubble effect, isn’t it? Of course, you can always go with the WhatsApp instead and a lot of ‘fruit’ fans prefer this program over the default iMessage. Still the latest operating system has improved iMessaging so much that you could find it even fantastic.

By the way, all Verizon iPhone owners can learn how to restrict their data usage and save some money on monthly bills. This is pretty simple and can be handy in times for the holidays season.

How to Fix iMessage Effects Not Working

Sometimes bubble effect doesn’t let you enjoy all the magnificent iOS 10 features as it stops working. It could be related to the Reduce Motion option. If you enable this particular spec it automatically decreases the parallax effect of different icons. In other words, it directly influences bubble effect and this is why you face issues.

Step 1. Open Settings on your iPhone 7 or other handset / tablet model to enjoy iOS 10 options including the updated iPhone Health app.

Step 2. Choose General menu to proceed.

Step 3. Select Accessibility option.

Reduce Motion iOS 10 Guide

Step 4. If iOS 10 iMessage effects not working for you you need to click on Reduce Motion.

Step 5. Now disable this feature by simply toggling it off.

Step 6. You need to also disable Auto-Play Message Effects.

Step 7. To let the changes take the effect you need to reboot the gadget. This can be done by pressing both Volume down and Sleep / Wake buttons at ones if you have iPhone 7 model or Home button + On / Off buttons on older versions.

Step 8. Now when the phone is back on you should enable Auto-Play Message Effects again.

Step 9. Now create your new text message and enjoy the awesome bubble effect as it should start working.

Don’t worry if iOS 10 problems with iMessage ‘bubbles’ continue. It means you should try a different method and we’ll talk about it below. Keep in mind that the latest version of ‘10’ firmware makes it possible to enjoy message extras while also using Reduce Motion feature. Mac users can also learn how to get a refund from iTunes store.

How to Fix iOS 10 Bubble Effects

What to Do If iMessage Screen Effects Not Working

There is a second trip that could fix iOS 10 bubble effects not working issue on the ‘fruit’ gadget. It’s simple and it deletes nothing on your phone. Still it can help you out.

Step 1. To enjoy all the iOS 10 message features you should reset your settings. This could ‘restart’ the options and make them perfect again.

Step 2. Launch Settings as this is the place where all the changes happen.

Step 3. Go to General menu.

Step 4. Find Reset section.

Step 5. Click on Reset All Settings feature.

Step 6. Sometimes you should enter your passcode before you can use Reset All Settings option. So confirm that you wish to reset the settings and enjoy the bubble effect.

Bubble Effects Fix iMessage iOS 10 Problems

Is it worth to download iOS 10 and update to this latest platform or not? iPhone owners should be glad to enjoy the impressive features such as new Emojis, Digital touch update, Markup feature and various superb extras that make it so much cooler to own the Apple device.

Texting with animations is cool but if something stops working you become frustrated. In case the two methods described above don’t help you to solve the issue you can either downgrade iOS 10.1 to iOS 10 or wait until Apple presents the new official iOS 10.2 firmware version. It’s up to you what to do but we all believe that everything will be all right and your cute bubbles will appear on screen when you send your text messages via iMessage program.

WhatsApp Emoji Tricks: Enjoy Texting on iPhone and Apple Watch

There are so many great emojis for WhatsApp and texting on both iPhone and your Apple Watch. Are you ready for some curious iOS 10 tips and tricks to make your holiday messages pretties and much funner? We’ll share some guides with you to help you take full advantage of iPhone emoji keyboard and improve your wearable texting experience.

The updated WhatsApp iPhone iOS 10 version allows you sending text messages with emojis, draw on your videos and photographs. It’s amazing especially when your emojis Apple Watch feature cool additional options for you to enjoy. Let’s see how to get emojis on iPhone 7, 7 Plus or any other model.

WhatsApp Emoji iPhone iOS 10 Guide

How to Add Emoji to WhatsApp on iPhone

We hope you’ll find this instruction handy and easy-to-follow. The simple WhatsApp emoji tricks are perfect for your SMS messages.

Step 1. Open WhatsApp on the iOS 10 iPhone 7 or other model that is updated to this firmware version.

Step 2. Choose who you wish to chat with.

Step 3. Click on Plus ‘+’ where you can select an image.

Step 4. You can use WhatsApp iPhone emoji via top menu where you are able to add smiley faces or other emojis. There are iPhone emoji meanings you can learn more about if you wish to. It’s always nice to know what the picture means.

iOS 10 Emojis List iPhone

Step 5. Once you click on the Smiley icon you will see the list of available emojis. Choose the one you like and drag it where you would it to be placed.

Step 6. Now you can add text via Text menu or send the message as it is. Just click on the Send option.

How to Draw on iPhone iOS 10 Emoji

Emojis for WhatsApp and Texting: Draw on Videos or Photographs

Now as you have learned how to easily add emoji to WhatsApp let’s start with more complicated steps [learn about factory SIM unlock service that can make your iPhone never-locked forever]. It is possible to share pretty images and videos if you draw on the. Here is how to do this:

Step 1. In order to scribble on the images or videos you want to share with your friends you should go to WhatsApp on the handset and choose who you wish to send the message to.

Step 2. There is no need to search for iPhone emojis copy and paste links as you need to click on the ‘+’ and choose one of the options from the bottom menu you’ll see. It can be ‘Share Contact’, ‘Take Photo or Video’, ‘Share Document’, ‘Photo/Video Library’ etc.

iOS 10 Emoji WhatsApp Guide iPhone

Step 3. For example, let’s go with Photo/Video Library where you should tap on the video file or your image before you can share it.

Step 4. From the top menu you can choose what you want to do with the photo: rotate it, add emoji, adjust the size etc.

Step 5. If you select emoji via Smiley icon and drag it to any place. You can also add Text, color it the way you like, and drag it to the desired place.

Step 6. You can click on the Pencil [upper right part of the screen] in order to draw something on the photo or video.

Step 7. Remember to click on ‘Send’ to send the text message to your friends.

You can easily enjoy Apple emojis copy and paste option and it is definitely cool to create funny images and video files. Use WhatsApp iPhone iOS 10 emoji tips and tricks and also explore all the possibilities of your wearable gadget.

Apple Watch Emoji How to Use

Emojis Apple Watch Instruction

If you are not a big fan of iPhone emoji keyboard you can also send emojis using your wearable device. While WhatsApp emoji tricks are perfect for smartphone owners, the Apple Watch users can use animated emoji images via Messages application.

Here is how you can make animated emojis live if you are running watchOS 3:

Step 1. Open Message program on the iWatch.

Apple Watch How to Add Emoji

Step 2. Go to conversation – Create Message or just Force Touch the screen so that you can start a new message.

Step 3. Click on smiley face and once you see emojis you should swipe to the left until you see characters and choose the emoji you like.

Step 4. Press Done – Send and your message will be sent.

It is also possible to use standard emoji image via Messages – Conversation – Emoji and located the icon using the Digital Crown. Besides, you can always limit your Verizon data usage on iPhone which is simple and pretty quick to achieve.

Verizon iPhone Users Can Limit or Restrict Their Data Usage

Apple users who are using Verizon as their carrier should know how to limit dat usage on iPhone Verizon. It’s also important to know how to restrict cellular data on iOS 10 which can only be handy and useful.

What is cellular data? Let’s put it in simple words. When your cellular connection is on your network provider allows receiving and sending text messages, making phone calls and viewing the 3G / LTE icon in your iOS 10 iPhone status bar. Once you turn off your cellular data this icon will disappear and you will only be able to get and send SMS messages via Wi-Fi connection. All the phone calls would also be only possible via web-apps and working Wi-Fi.

iPhone Verizon Cellular Data Info

How to Restrict Cellular Data iOS 10 Guide

This is pretty simple. It doesn’t matter if you have iPhone 7, iPhone 7 Plus or other ‘fruit’ gadget you can set up iPhone cellular data restrictions through Settings:

Step 1. So open Settings and choose General menu.

Step 2. Go to Restrictions and go to Cellular Data Use.

Step 3. Disable Don’t Allow Changes if this option is still on.

Step 4. Choose Settings again and select Cellular section.

Step 5. Disable Cellular Data and after a moment or two enable Cellular Data.

Step 6. Now it’s time to Reset Network Settings which can be completed through Settings – General section – Reset.

iPhone 7 Verizon SIM Factory Unlock

How to Set Data Limit on Verizon Family Base

Firstly, your account shouldn’t be prepaid in order to use this option. Secondly, you need a computer, internet connection and web browser. Thirdly, you should use your My Verizon ID [although the phone number could also work if it has access privilege].

Here is how to limit data usage Verizon using your PC or Mac:

Step 1. Once you sing in to your account you need to go to My Verizon and choose My Plan & Services.

Step 2. Select Manage FamilyBase and choose Controls. You need to tap on Usage Limits to continue.

Step 3. Tab on Data which you will find under Set limits and view usage.

Step 4. Once you locate your mobile number you should proceed by tapping on the right arrow.

Step 5. The minimum data usage limit for FamilyBase More Everything option is 500 MB. This is the reason why plans with less data become restricted. So choose Stop all data usage.

Step 6. Now you should enter the limit you wish to use.

Unfortunately not all Verizon FamilyBase accounts can limit their data usage. You can find more information on the official Verizon site.

iOS 10 iPhone Features

iOS 10 Features: How to Restrict iPhone Cellular Data with Restrictions

Now as you have learned how to limit data usage on iPhone Verizon [find out if your iPhone is locked or unlocked] it’s time to deal with newest iOS 10 firmware version.

Sometimes this guide can help you with iPhone cellular data restrictions not working issue. There are also situations when users wish no one to mess with their Cellular data on iOS 10 platform and luckily you can set up your own restrictions. Yes, the awesome iOS 10 feature called Restrictions allow you deciding what parts of the system and apps you don’t want anyone to access on your behalf.

iPhone Data Restrictions iOS 10

Data Restriction Instruction for iPhone 7, iPhone 6s

Step 1. Go to Settings on iPhone 7 that is running iOS 10 as this is the tool where you start your changes.

Step 2. Select General – Restrictions.

Step 3. Provide your Restrictions passcode and choose Mobile / Cellular Data under Allow Changes.

Step 4. There are two options: Allow and Don’t Allow Changes. You need to select the second one with the ‘don’t’ part.

Step 5. Now you can see three more features: Volume Limit, Accounts and Background App Refresh. It’s up to you if you wish to restrict them as well or not.

It’s great that you can reduce your iPhone data usage as well as restrict mobile data usage as well. It should improve your experience with Verizon or any other U.S. network you are locked to. Still remember that distant factory IMEI unlocking service can make you carrier free at an affordable price and pretty fast. This is something a lot of locked users eventually do in order to connect to any carrier at any time and switch between different networks with ease.

By the way if you wish to set your data allowance for Verizon, here is how to do this:

Step 1. Go to My Verizon app and select My Plan & Services.

Step 2. Go to Family Safeguards & Controls as this is where you can find the option for View Details & Edit.

Step 3. Locke your plan or cell phone number and choose your desired Data Allowance.

Step 4. Remember to save the changes.

How to Use iOS 10 Shortcuts: iPhone Magic Tricks

The list of iPhone secret codes tricks and iOS tips and tricks is constantly growing because Apple continues to release new smartphone models and firmware versions. The company updated mobile operating system earlier this fall so you can now enjoy various iOS 10 shortcuts once you install this firmware.

Right now we want to talk about accessibility shortcuts you can enjoy using. These iPhone magic tricks are amazing and they simplify your everyday smartphone usage. It becomes faster and easier to perform various actions when you can access them using iPhone accessibility setting and some little secrets.

iOS 10 Shortcuts

You can quickly master new iPhone secrets codes on iOS 10 within Accessibility section. It’s perfect for both iPad and your handset. Once you learn how to use iOS 10 shortcuts you will love launching the features you love the most by triple-clicking your Home button. Besides it will become so much easier to switch between iOS 10 features you’ll be surprised. Let’s get into details and explore the world of your beloved handset.

There are so many interesting and useful iPhone accessibility settings you need to explore. Still you know that the first thing you should do is turn on this amazing feature, right?

iOS 10 Accessibility Shortcuts How to Use

How to Enable Accessibility Shortcuts on iPhone Running iOS 10

Step 1. Anything you are trying to setup on your iPhone goes through Settings.

Step 2. Choose General menu and click on Accessibility option.

Step 3. Choose Accessibility Shortcut feature which you’ll find at the bottom of the screen.

Step 4. Select the features you wish to use. The list contains 7 various options you can enjoy and it is possible to choose several at once.

iPhone iOS 10 Triple Click Shortcut

How to Create iPhone Triple Tap Action

This is pretty easy to do. You need to only decide what action you wish to do during your iPhone triple tap performance:

Step 1. On your iPhone 7, iPhone 7 Plus or other model you should go to Settings program.

Step 2. Select General option.

Step 3. Access Accessibility section.

Step 4. You’ll find Accessibility Shortcut feature way-way down the menu. Click on it.

Step 5. Now select the action for your Home button triple clicking. You are done.

iOS 10 Color Filters

List of Accessibility Shortcut iPhone Features

Here are the options you can select from when you enable iPhone magic tricks for easy access.

  • Color Filters

This feature can help you customize your screen color layout. Just select the color you like and go with it.

  • VoiceOver

Would you like your display contents to be spoken? Your iPhone 7 is capable of this as well as other iOS 10 gadgets.

iOS 10 Shortcuts Zoom

  • Zoom

Sometimes it is cool to zoom in your screen content. Improve your visibility using this fun option on iOS 10 platform [learn how to backup iPhone manually].

  • Touch Accommodations

Choose how you want your display to respond to your taps and clicks.

  • Switch Control

This is another interesting motor accessibility option you can enjoy. Turn your handset display or external switch to your control.

  • Reduce White Point

You have most likely guessed that this particular feature allows adjusting the bright colors to your personal likes. Reduce the color intensity and improve your ‘fruit’ life.

  • Invert Colors

This is the simplest thing. This option can invert the colors across iOS 10 firmware.

Assistive Touch iOS 10 Feature

  • Assistive Touch

Simplify the control for some buttons and enjoy gestures. This is a great function for users with motor impairments.
Remember that you are able to select several features and they all will be assigned to your triple click action. However if you choose one option it becomes activated as soon as you click three times on your Home button. If you select more features you will see the menu with all the options to choose from. Use the same triple-click to disable the option.

We hope you enjoyed exploring the new iOS tips and tricks. Remember that they work only on the firmware version 10 and newer. The first official release was offered in September however Apple keeps improving its mobile operating system and presents newer updates to fix previous bugs and issues.