iOS 10 Emoji Replacement Feature: Convert Words to Emojis on iPhone 7

You can enjoy your iOS 10 emojis once you learn how to convert text into emoji while typing on iPhone 7 or iPad. The cool iOS 10 tips and tricks work on different iPhone models, not just the iPhone 7 and iPhone 7 Plus so you can take full advantage once you install the newest operating system on your iDevice and learn more about predictive emoji iOS 10 option.

There are different iOS 10 hidden features you can explore after you update your iDevice to this firmware version. Apple currently offers iOS 10.2 as the latest release of this mobile OS for its smartphones and tablet computers. iOS 10 Message features are also worth to explore so let’s learn how to replace text to emoji using this application.

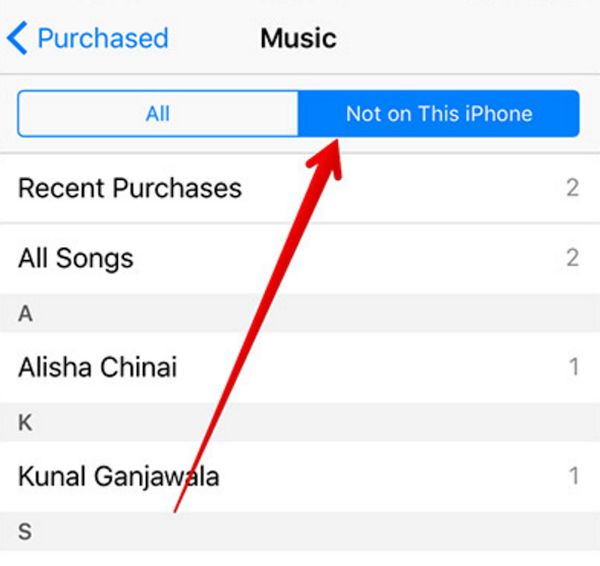
By the way, users who experience problems with music download (when purchased songs are not re-downloaded on iTunes) can fix the issue.

iOS 10 Emoji Replacement Guide

iOS 10 Emoji Update

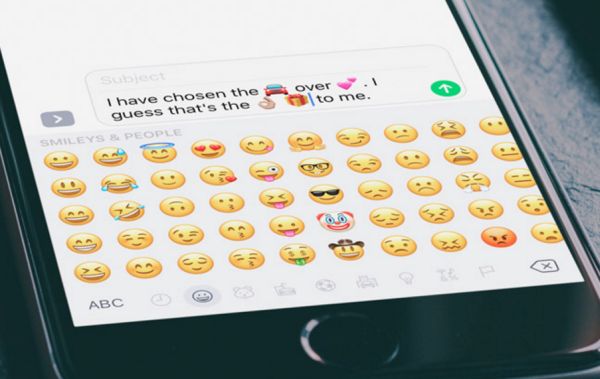
The list of available funny, hilarious and cute emojis is long. You can add animated smiley faces to your text messages on iOS 10 and make your SMS cuter and prettier. iPhone and iPad users can add emojis on-the-go by converting text into the images.

How is it possible? Let’s figure it out.

Word into Emoji iOS 10 Features

How to Convert Text Into Emoji on iPhone, iPad

Step 1. To turn words into emoji you should make sure you are running at least iOS 10.

Step 2. Open Messages program on the iPhone or iPad.

Step 3. Select the contact you are planning to text.

Step 4. Click on the text fields and start typing your message. Don’t worry as not all the words will emojify. Only a number of compatible emoji-words can be used for automatic action.

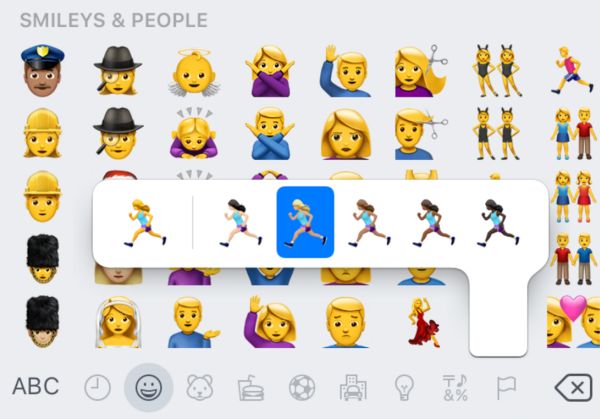
Step 5. You can see the iOS 10 emoji replacement list by clicking on the emoji button at the lower part of the screen and seeing the eligible words (they should be highlighted with orange for you). What words could these be? Simple words like love, car and similar can be turned into an image.

Turn Words into Emoji iOS 10 Tips and Tricks

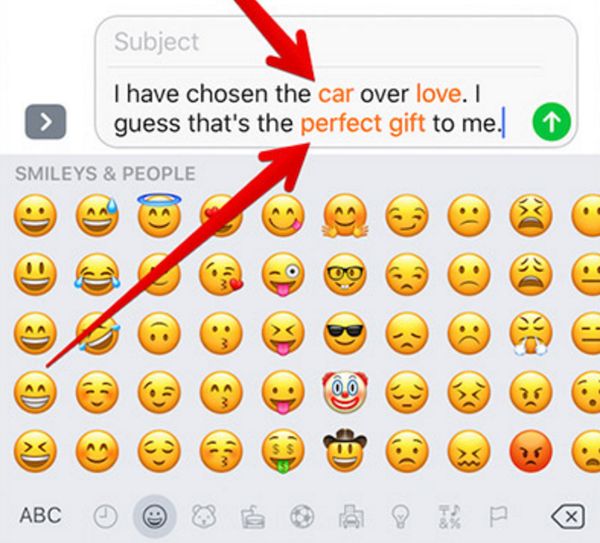
Step 6. To turn text to emoji on iOS 10 you should touch the highlighted word.

Step 7. Replace the words using emoji prediction iOS 10 feature and send your message.

We hope you liked the awesome emoji prediction iPhone tips. Your iMessage can be magical. Remember that you should enable Predictive option when you wish to turn words into emojis by prediction [learn how to transfer files on iPhone]:

Step 1. On your iPhone select Settings app.

Step 2. Choose General menu.

Step 3. Click on your Keyboard.

Step 4. Enable Predictive feature.

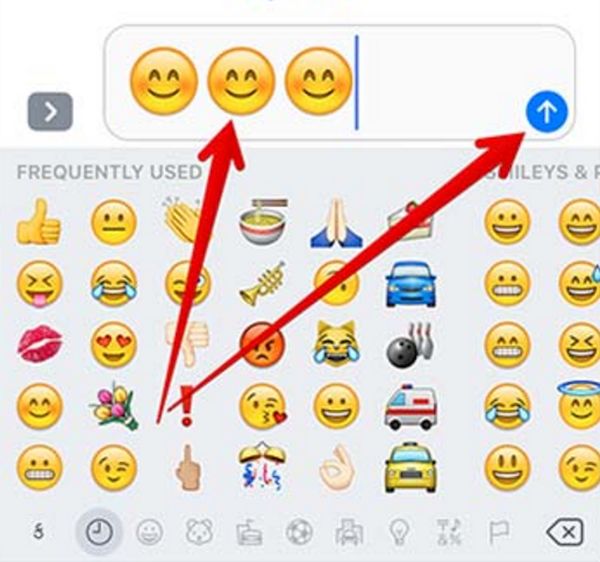
Luckily the iOS 10 Messages upate offers even more emoji tricks. For example, you can enjoy 3x emoji feature which is a great way to make the ordinary image 3x bigger. Would you like to learn more?

If you are tired of ordinary emojis you can use iOS 10 hidden features and make emojis much bigger.

Make Big Emojis iOS 10 Tricks iPhone 7

How to Send Big Emojis on iPhone: iOS 10 Secrets

Step 1. You should launch Messages program on the handset.

Step 2. Click on the contact you are planning to surprise with 3x bigger emoji.

Step 3. Bring your keyboard by tappin on the text field and choose Emoji Keyboard.

Step 4. You should select up to 3 emojis at a time.

Step 5. Click on ‘Send’ option and your message with bigger images will be sent.

Remember that iOS 10 Message features with 3x bigger emojis are only available on iPhones [learn how to set up iPhone 7 models] when you add no more than 3 emojis to your text message. If you add 4 or more emojis at once their size will become default (small again).

Substitute words with emojis, make smiley images bigger and send incredible messages to your family and friends. Everything is possible once you update from iOS 9 to iOS 10.

Purchased Song Isn’t Downloaded on iTunes. How to Fix Problems

Do you experience new iTunes download problems? There are users who report weird issues with this program. For example, a purchased song is not download on iPhone or your computer. Is there a fix to such bugs?

Most Apple issues can be fixed without new program updates [learn how to transfer files on iPhone]. There is no need to wait for the company to present next iTunes version since you can deal with downloading iTunes problems 2017 right on your Mac or Windows PC. You don’t even need to use your iPhone since the issue can be solved on computers.

You can surely try to download iTunes later version (if you have an old one) and see how it works. Still try the guide below before searching for other methods. By the way, AT&T iPhone users can check their data usage and save money.

iTunes Download Problems Songs Redownload iPhone 7

How to Fix Can’t Redownload Purchased Songs from iTunes

Step 1. Try to purchase something via iTunes from your computer (either Mac or Windows PC). Of course, you should buy only the song you were planning to get. If your purchased song not downloading on iPhone 7 or other model you should try from your computer [if you just got a new Apple phone learn how to set up iPhone 7 without issues]. If you have succeeded without this guide you are lucky. In not (you downloaded the tunes but don’t see your purchase, it’s better to continue.

Step 2. It could be that you caused your iTunes download problems by hiding your purchase. To unhide it, you should first open iTunes (desktop version).

Step 3. Visit iTunes Store.

Step 4. Click on Music Quick Links that appear on the right part of your display.

Step 5. Now press on Account and sign in with your Apple credentials.

Step 6. Once you see your account page you should find Manage option under iTunes in the Cloud title. Click on Manage to see your Hidden Purchases.

Hide Unhide iTunes Purchase

Step 7. Press on Unhide under the song title you bought and wish to see as downloaded.

Step 8. Press on My Music you’ll see at the top. Now there will be a Cloud icon near this song and once you press on it – the song will be downloaded.

Users who are not happy with their AT&T network can factory unlock iPhone 7 and connect to all U.S. and foreign carriers.

Method 2 to Download Purchased Songs iTunes

Sometimes you might be using your friend’s or parents’ computer to re-download your songs. This means that the device could remember a different Apple ID and this could be the reason why you are facing iTunes problems 2017.

When you or your friends enable some options (for example, Family Sharing feature or Automatic downloads) their computer or iPhone is automatically associated with their Apple ID. When you wish to use your ID you’ll have to do the following:

Step 1. Launch iTunes and sing in using the original account.

Step 2. Choose Account Menu and go to View My Account.

Step 3. You should enter the password once again before pressing on View Account.

Step 4. Scroll to get to Manage option.

Step 5. Now you can remove the associated device.

The problem should be fixed. Have you explored all great iOS 10 features or not?

iTunes Download Issues Redownload Purchased Content

Method 3 to Fix Purchased Song not Downloaded iTunes Problem

There are several reasons why you might get download iTunes issues and are not able to redownload your purchase:

  • The song you have bought earlier is not longer available on iTunes and thus you cannot redownload it
  • Some content is available for download for particular countries only and if you change the country for your Apple ID you won’t be able to redownload it
  • It is impossible to redownload the song or app you have got a refund for

Sometimes you can fix the bug by simply signing out and signing back in. You can try this trick with your desktop or iPhone iTunes app to remove any possible bugs.

By the way, you can restart your computer or phone to fix the iOS problem.

If nothing helps and you still have issues with downloading content from iTunes you can contact Apple or simply report the problem to iTunes (do this only if you are sure that you purchased an item but cannot find it on your devices).

How to Gift iMessage Stickers on iOS 10 iPhone 7

Is it your friend’s birthday or any other holiday you want to celebrate in an unusual manner? You can take advantage of iMessage stickers that are perfect for iOS 10 iPhone and iPad. Have you heard that you can send sticker pack telegram via your ‘fruit’ device? It’s simple, fast and it can be a wonderful gift idea for any special occasion you can think of.

Follow the instruction below and you’ll find out how to send sticker pack for iOS 10 iMessage. Firstly, make sure you have installed iMessage app on your gadget. If your version is an old one you should upgrade it to the most recent release. Secondly, learn more about iMessage stickers and how they can be useful to you. By the way, you can easily transfer files from Evernote to iPhone notes.

iMessage Stickers iOS 10 iPhone

About Stickers for iMessage

There are a lot of great iOS 10 iMessage effects you can enjoy. Using iMessage apps and iOS 10 stickers you can create joyful moments for your friends and family member. Apple presented new iOS 10 in early fall. The company spent the whole summer testing it and trying to fix all known issues and bugs. There are some iOS 10 problems that need to be resolved yet still there are also many interesting changes you can try.

Improve your iMessage iOS 10 app and start the entertainment. This program has the coolest things to offer and sticker pack is one incredible feature you should give a try. Sometimes you can’t find the right words to express yourself. However a cute or funny sticker can show your emotions even better than simple words. No additional efforts are required when you have a step-by-step guide to follow.

iPhone iMessage sticker pack iOS 10

iMessage Stickers Tutorial

Step 1. Open iMessage app on your iPhone or iPad [learn more about single sign-on technology].

Step 2. Select the contact (any contact is good for now since you are not selecting the recipient of the iOS 10 stickers gift yet).

Step 3. Look at the text field. You should see the App icon. Do you see it? Click on it to proceed.

Step 4. Now look down at the left lower corner. There is an App drawer. You should click on it.

Step 5. Press on Store option and choose the sticker pakc you like the most.

Step 6. Click on the Share option that can be found at the upper right part of summary.

Step 7. You are so closer to sharing iOS 10 iMessage effects with other iPhone 7 users. Click on Gift option in the share field.

Step 8. Provide the email address of the gift recipient now [make sure this is the email related to Apple ID].

Step 9. Once the email is entered you can add a message to personalize your virtual gift.

Step 10. Choose the date when you want the gift to be sent.

Step 11. Click on Next at the upper top part of the screen.

How to Gift iMessage Stickers iOS 10 iPhone

Step 12. Select the theme for the gift card you are creating. Click on Next option.

Step 13. Double check all the information and click on Buy option (can be found at the upper right part of the screen).

Step 14. Press on Buy once again and provide your Apple ID passcode.

Step 15. To complete this iMessage stickers guide you should press on OK.

Step 16. Click on Done to complete your purchase.

Send sticker pack telegram as a gift and those who will receive it can use those stickers for free (since you are the one who is paying for the service). Do you think it can be a fabulous holiday gift?

A lot of iOS 10 iPhone 7 / iPhone 7 Plus users should be glad to receive hilarious messages with nice stickers. There are always so many great packs to select from that you’ll love creating exclusive text messages through iMessage. By the way, you can easily find new packs to share in the App Store.

How to Transfer Files on iPhone: iOS Notes App Tutorial for Evernote Users

Would you like to transfer files to iPhone without iTunes? There are a lot of different iPhone transfer software you can use. Everything depends on the type of files you wish to move between your phones or between iPhone and Mac. For example, if you are using Evernote that is believed to be a wonderful note application – there is a simple way how to export Evernote to Apple Notes on both your handset and ‘fruit’ computer.

We know how you can use your iPhone Notes app to move all files from Evernote to your iOS 10 program [learn more about new single sign-on iOS 10 feature]. This instruction will also work for your Mac computer. Follow the iOS Notes app tutorial below and you’ll quickly explore all interesting Apple Notes tips for users with products released by the Cupertino-based company.

How to Transfer Files on iPhone 7 iPhone 7 Plus

Best iPhone Transfer Software Details

Do you need to use any third-party program to transfer files to iPhone without iTunes? With Evernote, there is no need to install any additional tools when you wish to move your notes. Everything can be done within the program itself. Are you excited to give it a try? You’ll find the step-by-step guide for using your notes iOS 10 below.

Unfortunately, there is no way how you can export all files at once. The process takes a lot of time and you’ll have to be patient. Still you can manage everything eventually. By the way, AT&T iPhone users should learn how to check their mobile data usage.

How to Use Best iPhone Transfer Software

How to Export Evernote to Apple Notes on iPhone

Step 1. Being to export Apple notes by opening Evernote application on your iPhone 7, iPhone 7 Plus or other handset model.

Step 2. It’s best to choose one Note you want to export. If you want to export multiple files you’ll have to repeat this guide several times.

Evernote iOS 10 iPhone App

Step 3. Click on More option that looks like 3 dots. You’ll see it at the lower right part of the screen.

Step 4. Click on ‘Share’ option that is available in the Evernote menu.

Step 5. To transfer files on iPhone you’ll have to choose ‘Export Note’ option. This feature should open a new Mail window that has the Note attached as .enex file. Just type in your email address and click on ‘Send’ to email the file.

Transfer Evernote to iOS 10 Notes App

Step 6. Now you can close the app.

Step 7. Don’t put your iPhone away yet. Launch Mail application on it.

Step 8. Select the email you have sent (the one that contains the .enex file).

Step 9. Long-click on this file and you’ll access the extensions window.

Step 10. Click on ‘Add to Notes’ option. This way you can export the file to your iOS 10 iPhone Notes app. There will be a new pop-up window that shows ‘Import Notes’ option. Press on it to continue.

Step 11. You can exit Mail program.

Step 12. Launch iPhone Notes and click on Imported Notes folder.

Step 13. Find your file (in case there is more than 1) and enjoy your note.

How to Transfer Files Mac Evernote to Notes App

How to Move Evernote Files to Apple Notes App on Mac

Step 1. Make sure your computer uses OS X 10.11.4 version or newer operating system.

Step 2. Open Evernote on your Apple machine.

Step 3. You should sign in to Evernote account.

Step 4. Look at the Menu and press on ‘Edit’ option. You’ll be able to move all Evernote files to Notes at once which is impossible on iPhone.

Step 5. Click on Select All option.

Step 6. Select ‘File’ in your Menu and press on ‘Export Notes’. Remember to Name your file.

How to Export Notes Evernote

Step 7. Choose where you wish to have the file saved and press on ‘Save’ option. All your notes will be exported as .enex files just as it happens on iOS 10 devices.

Step 8. Open Notes program on Mac and press on File – Select – Import to Notes.

Step 9. Find the .enex file and press on Import.

Step 10. Confirm your decision by clicking on Import Notes and all your files will appear in iCloud folder ‘Imported Notes’ – isn’t it cool?

You see that it is possible to easily move files from Evernote to your iOS 10 iPhone 7 or Mac Notes app.

Cool iOS 10 Features to Preserve iPhone Camera Settings

There is a list of iPhone 7 hidden features that become available after particular firmware versions update. For example, once updated to iOS 10.2 you’ll be able to play around with your iPhone camera settings and preserve changes. This can be done on different smartphone models and Apple iPad devices.

There is an awesome addition to iOS 10 settings (have you heard about single sign-on iPhone option?) that is called ‘Preserve Camera Settings’ and you can use it to not allow applications to reset the changes you have applied. This is a great thing to do if you have a lot of iPhone camera apps that could possibly reset your default settings. You can now control even more features on your Apple devices.

iOS 10.2 Features Settings for iPhone Camera

What’s New in iOS 10 Settings in Version 10.2

The new operating system update brings not only new iPhone camera features but also ability to use single sign-on option, make emergency calls via Emergency SOS and enjoy the great TV program. Still there are some amazing hidden features you must know about and ‘Preserve Settings’ is one of them.

The incredible iPhone 7 Plus camera tips we’ll talk about below can work on iPhone 6, 6s, 7 and your iPad because the changes are brought by iOS 10.2 firmware and once you install it on your ‘fruit’ gadget you’ll be able to apply the changes.

You can also order factory SIM unlock for your iPhone 7 or 7 Plus. This is the simplest way to become SIM free from AT&T or other carrier.

iPhone Camera Settings

iPhone 7 Plus Camera Tricks

How can you take full advantage of the new iPhone 7 camera settings? What happens when you turn on the latest iPhone 6s Plus camera settings to ‘Preserve’ mode? In other words, users who like to work with Square mode in their iOS 10 Camera on iPhone will see this particular mode when they launch Camera program (if the mode was preserved). No default camera settings iPhone 6, iPhone 6s, iPhone 7 won’t return unless user chooses to change something manually.

Without this mode, your settings will go back to ‘default’ the next time you launch Camera app.
Now it’s time to explain how to use iPhone camera and enjoy the interesting new filter. While iPhone 7 Plus can boast the most powerful camera ever (this is the quick answer to the question ‘which iPhone has the best camera’ ever since the original Apple smartphone release) other handset models can also offer nice photo experience.

iPhone Camera Preserve Settings iOS 10.2 Feature

iPhone 7 Camera Tips for Using Transfer Filter

Step 1. Install iOS 10.2 as this is the only firmware version that currently supports amazing ‘Preserver’ option on iPhone.

Step 2. Once you are updated to iOS 10 you can click on Settings.

Step 3. You need to scroll down a little bit. Find Photos & Camera and click on this section.

Step 4. You need to look under Camera menu.

Step 5. Do you see Preserve Settings, the new iOS 10.2 feature? Click on it.

Step 6. There will be 3 options to choose from. You’ll see Camera Mode, Live Photo and Photo Filter.

Here are some details about these three features. You can click on Camera Mode if you want to save your last mode (Square, Video and not Photo option set up by default). You might wish to click on Live Photo feature if you need to preserve your settings created specifically for Live Photo and not use the default settings. It is also possible to choose Photo Filter if you need to save filter that was used for the last time (Fade, Process or Transfer).

Let’s practice now. Launch Photos application on iOS 10 and set the filters you wish to use. There is no need to remember your settings and set everything up each time you launch one of the iPhone camera apps for your platform. Test this feature and you’ll like how the filter works and preserves your preferences.

What do you think about the upcoming changes and improvements you can enjoy?

How to Use Single Sign On Technology on iPhone and iPad

The long iOS 10 features list is growing fast. There is a new edition in iOS 10.2 firmware version and it uses single sign on technology for both iPhone and iPad. Apple offers its customers single sign on solutions and the first example arrives with operating system update. By the way, you can fix iPhone 7 storage full issue in case you have this problem.

What is this option about? What are the benefits of single sign on? We are happy to answer these questions and explain how you can enable the long-awaited feature on your iDevice. Nothing is complicated and you’ll love how you can access your applications so much easier.

Would you like to get more freedom on your ‘fruit’ device? By the way, you can turn on the new option on both iOS 10.2 gadgets [iPhone 6s battery replacement can be free to you] and your Apple TV running tvOS 10.1 version. The simple access to your TV content or iOS programs is incredible can be achieved after you enter your credentials only one time (all other accesses will happen automatically on any supported apps).

Single Sign on Implementation Providers

Single Sign on Implementation Providers in U.S.

Only several providers support the new feature in the USA. They are Hotwire, Sling TV, Dish Network, DirecTV, Hawaiian Telcom, GTA, GVTC, MetroCast and CenturyLink Prism. This list will most likely grow in the future so you’ll get more options pretty soon. See the single sign on example below.

Single Sign On iPhone 7 Enable Guide

How to Enable iOS 10.2 Single Sign On Technology on iPhone / iPad

Step 1. Remember that you can turn on the latest option only after you install iOS 10.2. [Learn how to check AT&T iPhone data usage].

Step 2. Take your iPhone or iPad. Go to Settings to start using fun iOS 10 features.

Step 3. Click on TV provider section.

Single Sign On Settings TV Provider iOS 10.2

Step 4. Choose your TV provider (after you made sure it is supported).

Step 5. You’ll have to enter your credentials.

Step 6. Now you should find the applications that are compatible with your subscription on iDevice. Open Settings again – TV Provider section – Find More Apps.

Step 7. You’ll see all the compatible programs on the App Store you’ll be taken to.

There will be NBC, USA NOW, E! Now, Telemundo, Watch Travel Channel and other apps. Some of them support only Apple TV and others are created for iOS platform. There are also titles that work on both platforms (for example, Hallmark Channel Everywhere or Watch DIY).

All iPhone 7 users can factory unlock AT&T iPhone 7 / 7 Plus and use any SIM card.

The great single sign on solutions is not full without you being able to disable this option:

Step 1. Launch Settings on iDevice if you loved the benefits of single Sign on but wish to now disable this option.

Step 2. Select TV Provider.

Step 3. Choose your account.

Step 4. Press on Sign Out option.

Single Sign On Apple TV Feature

How to Implement Single Sign On for Apple TV

Step 1. Install tvOS 10.1 and double check the name of your provider. Only supported cable providers work with the feature. Also keep in mind that only U.S. users can enjoy both advantages and possible disadvantages of single sign on.

Step 2. Launch Settings on your ATV.

Step 3. Go to Accounts.

Step 4. Choose TV Provider section.

Step 5. Choose your provider.

Step 6. Press on Sign In option and enter username / password.

Step 7. Just as it happens with the iPhone (have you heard about secret iPhone 6s codes you can unlock?) or iPad you should launch Settings on Apple TV and choose Accounts – TV Provider once again.

Step 8. Select Find More Apps option to visit App Store and download the programs that are compatible with the feature.

Step 9. You won’t have to sign in by providing your credentials each time you log into one of such apps. This will happen automatically when you enable single sign-on option.

Single Sign On Sign Out Feature

How to Disable Single Sign-On for ATV Running tvOS 10.1

Step 1. Launch Settings on your device.

Step 2. Choose Accounts menu.

Step 3. Select TV Provider section.

Step 4. Press on Sign Out option.

Keep in mind that once you turn off the option you’ll be asked to individually sign in to every application that supports your subscription with one of the nine U.S. providers.

What do you think about these tips and tricks? Do you like the advantage of saving time while logging into your favorite apps? The disadvantage is that anyone who has access to your iPhone, iPad or Apple TV can also sign into your apps without your help.

iPhone 7 Storage Full But Not… How to Free Up iPhone Cache

Is your iPhone storage full but not? It’s important to get iPhone cache cleaner and clean your memory once in a while. This way you can remove junk files and free up so much space you’ll be surprised (it is easy to reduce mobile data usage on Apple phone).

Is it possible to deal with iPhone storage full issue without jailbreak? What tool can you use and where to download it? All these questions are to be answered in this post. Hopefully you’ll find the process of how to free up storage on iPhone and iPad running iOS 10 firmware version pretty easy and quick.

iPhone iCleaner Pro no Jailbreak

Great iPhone Cache Cleaner App

iPhone 7 and iPhone 6 storage full problem can be solved with iCleaner no jailbreak program. It is available for your iOS device. Users who were using iOS 9 and older platform versions remember that there was no iCleaner app for them unless they were jailbroken.

At the same time you are not able to perform jailbreak on iOS 10 iPhone 7 because there is no working solution. Luckily, you can use iPhone cache cleaner even without jailbreak once you update to the latest firmware (you can download iOS 10 ipsw for your gadget).

You cannot install the iCleaner App Store program because this programis not present in iTunes. There is a way how to use iCleaner source and obtain the application for your device.

How to Clean Cache on iPhone

How to Free Up Storage on iPhone or iPad: Install iCleaner Pro

Step 1. You should search for iCleaner Pro IPA file. It is available online. Download it for iOS 10 iPhone or iPad.

Step 2. Install the tool to deal with iPhone storage full issue.

iCleaner Pro for iPhone

Step 3. You will have to rely on Xcode as this is the only way to install iCleaner Pro. Where can you find Xcode 8.2 for Mac computer? Visit Apple Dev program and install this addition.

Step 4. Launch Menu on your computer and go to Preferences where you can select the Xcode.

Step 5. Read Terms and Conditions and agree to this information. You’ll be asked to type your admin password (the one you are using for Mac) and select Accounts – Preferences. Press on ‘+’ and get the Add Apple ID so that you can add a new account.

Step 6. You should use your Apple ID to log in.

Step 7. Open Terminal on Mac and type in the command:

sudo gem install cocoapods; git clone http://bitbucket.org/rileytestut/icleaner pro.git; cd icleaner pro; pod install

What does it do? It allows you downloadand launching Swift / Objective-C source code of the program.

Step 8. Now install iCleaner Pro on the iPad or iPhone.

Step 9. Launch the iOS 10 application.

Step 10. Open Settings – General menu and select Profile & Device Management. You’ll have to choose dev name to proceed afterwards.

Step 11. Click on Trust so that your system can accept the certificate. You are ready to clean your system. Proceed with ‘How to get more storage on iPhone 6s, iPhone 7, iPad’ and learn how to remove all the junk from your device.

Learn how to replace iPhone 6s battery for free.

iCleaner Pro App for iOS 10

How to Clean iPad Memory, iPhone Cache

Step 1. Now let’s deal with ‘iPhone storage almost full’ problem. Open iCleaner Pro tool on your mobile device.

Step 2. There will be ‘Allow temporary files cleanup option’ you should allow. It will appear on the main screen.

Step 3. Believe us, this How to free up space on iPhone 6s instruction is simple.

Step 4. Click on Confirm when you receive a notice.

Step 5. Let’s begin. Press on Start cleaning option. The process of cache clearance should start in Fast mode. Remember to press on Continue.

Step 6. Don’t do anything while the clean up procedure goes on. You will see the progress bar that shows how it is going.

Step 7. How do you know if it’s over? You will see the Wiping Completed message. Confirm it. That means you have successfully deleted unimportant files and freed up some space on your handset or tablet computer.

Have you fixed storage almost full iphone 6 or iPhone 7 issue? Find out the information about your space used via iPhone – Settings – General menu – About / Storage & iCloud Usage. Hooray!

Find Out If You’re Eligible for iPhone 6s Battery Replacement from Apple

Some Apple users come across iPhone battery replacement issues eventually. How do you know it’s time to repair your decide? Are you eligible for the free iPhone 6s battery replacement service offered by the Cupertino-based giant?

The iPhone 6s was released in 2015. The latest iPhone 7 is an upgrade Apple sells this year. Not all users are eager to purchase the iPhone 7 or iPhone 7 Plus. Some are happy with their previous model however the battery problems could be the one big obstacle you have to deal with. So what is your decision? How much does it cost to repair the phone?

There are several ways you can try. There is the free Apple battery replacement program you could be eligible for. There are also services that can fix the issue but it would cost you money.

iPhone 6s Battery Replacement Free

iPhone 6 Battery Replacement Cost

The prices could be different depending on your country. U.S. customers can officially repair their iPhone 6s at $129 (if they wish to replace the screen). The battery replacement service would cost $79. By the way, the price doesn’t change if you wish to repair your screen or change the battery for older iPhone 6, 5s or iPhone SE.

iPhone 6s Battery Size

Let’s recollect information about iPhone 6s battery mAh. This handset has the Li-Ion 1715 mAh battery that is non-removable. You cannot replace it if you are not professional enough. There are big chances you’ll break the phone so it’s better to solve iPhone 6s battery problems with Apple’s help or through third-party repair services. You cannot fix iPhone 7 issues this way.

iPhone 6s Battery

iPhone 6s / iPhone 6s Plus Battery Life

It lasts for about 8 hours if fully charged and actively used. Even the bigger 2915mAh battery built-in iPhone 6s Plus doesn’t last longer. In fact, a lot of users state that their phones’ life drains even faster especially after iOS 10 update.

You can run iPhone 6s battery life test on your own. If you are not happy with your gadget’s one-time-charge life you can try to replace the battery free of cost. Not anyone can get this service for free, but there is a way and it could be a perfect solution if your smartphone starts to reboot without any reason and it happens repeatedly.

If you have the newest device you can factory unlock iPhone 7 from AT&T and other networks.

How to Replace iPhone 6s Battery for Free

iPhone 6s Battery Replacement: How to Get It for Free

Apple reported that a small number of phones (limited serial number) has had manufacturer problems. Only the devices that were manufactured in September-October 2015 and phones that were released later on have no similar bug.

How to find out if you can get the replacement at no cost:

Step 1. Find your iPhone serial number. Launch Settings app if you don’t want to look it up on the back of the handset, choose General menu and visit About section.

How to Find iPhone Serial Number

Step 2. Be attentive as you have to closely study the 4-5th characters in the serial number.

Step 3. Do you see any of the following characters in it? We are talking about Q3, QJ, Q4, QH, Q5, QG, Q6, QF, Q7, QD, Q8, QC or Q9.

Step 4. You can take the phone with the serial number with numbers from Step 3 to Apple Authorized Service Provider (or your local Apple store) and get the free battery replacement for problematic device.

It’s great that even if you are out of warranty you can still get the service and pay nothing for it. Some users like to fix everything themselves. If you are like this you should definitely backup your iDevice before applying any changes. Do this through iTunes desktop program or iCloud.

Disable Find My iPhone

You should also disable Find My iPhone:

Step 1. Launch Settings on the iDevice.

Step 2. Select iCloud section.

Step 3. Turn off Find My iPhone feature.

It’s also necessary to erase your information before taking the gadget to the service center:

Step 1. Open Settings on your smartphone.

Step 2. Select General menu.

Step 3. Press on Reset.

Step 4. Click on Erase all Content and Settings.

P.S. If your gadget unexpectedly shuts down after you tried to reboot, reset it and install the most recent version of iOS firmware – it could be time to send it to Apple service center. Learn more about iPhone 6s tips and tricks.

Learn How to Get iPhone 7 Out of Headphone Mode

The ‘fruit’ devices always have various issues and bugs you have to solve or wait for the Cupertino-based giant to fix on your behalf. Some Apple users might even remember the iPhone 6 stuck in headphone mode water problem. It seems to also happen to new iPhone 7 models. What should you do when you can’t deal with iPhone headphone mode?

There could be more than one method for iPhone stuck in headphone fix. We’ll share several ways you can try to get our of iPhone headphone mode and use your handset the regular way again. Remember that you can always try a different method if one doesn’t work for you.

Can it be the problem with the latest iOS 10 firmwaver version? If the issue is with the operating system, it might be eventually fixed by Apple. However it could be a different problem that causes the ‘stuck’ mode. It’s curious when you see the bug when your headphones are not even plugged in. In other words, the issue might be with the headphones, your iPhone hardware or the bug with the software version you are using.

iPhone 7 Stuck in Headphone Mode

How to Solve iPhone 7 Stuck in Heaphone Mode

Since there could be multiple reasons for the problems there is more than one solution. Don’t get upset in case nothing helps you out. Even with the iPhone 7 handset running iOS 10 you can experience issues. So let’s try something out and hopefully figure out how to get iPhone out of headphone mode.

iPhone Stuck in Headphones Mode Fix: Method 1

Since the problem can be with your accessories and not iPhone or iOS 10 (iOS 9 or earlier version if you happen to still use iOS 8) you need to try plug in your headphone and then plug it out. Why could this solve the problem?

Sometimes when you remove headphones too quickly your mobile operating systemmight not detect this action and thus iPhone 7 or iPhone 6 thinks headphones are plugged in while they are not (learn what to do if your iPhone 6 starts to restart on it own). Be gentle when you plug out the accessories and the system will have enough time to ‘understand’ your operation.

Do you still face the bug?

iPhone Headphone Mode Fix

iPhone Stuck in Headphone Mode Fix: Method 2

You have probably read so much about iOS problems and bugs. Different versions of Apple firmware suffer from different issues. Even iOS 10 is not perfect. Thus when the problem is not with your headphones or ports you could try to restart your handset.

Simple iPhone restart can solve many problems with ease. The software restarts and ‘clears’ issues so you get rid of the bug. Restarting is safe as you lose no information or your data.

iPhone 7 Restore from Backup

iPhone 6 Stuck in Headphone Mode Solution: Method 3

If you back up your new iPhone 7 or other model once in a while you can try to restore from previous backup versions. It’s great to back up so that you can restore and get all your information back (including apps, games, personal data etc.).

Keep an eye on iOS updates. You can download and install the most recent firmware because every new release fixes some previous bugs.

iPhone 7 Heaphones Accessory

iPhone Headphone Mode Fix: Method 4

You can borrow your friend’s headphones and try to use them instead of yours. Maybe the problem is with the accessories and you can fix everything by plug in a different pair of headphones.

iPhone port might not detect your old headphones because of the metal used in them. If they are not original, if you are using a cheaper version – this could cause the problems.

iPhone Port Problem: Method 5

Is everything right with your 3.5 mm port? Gently try to clean it with a toothpick. Maybe there is some dust inside.

At last but not least. If the problem still exists and you tried everything to solve it, you have to try another method. Take your iPhone to your closest Apple Store and hopefully your warranty can cover the repair or iPhone replacement.

This year the ‘fruit’ giant presented the iPhone 7 with more storage and some interesting features. Still most customers are looking forward the next generation because iPhone 8 could offer so much more than all previous devices.

AT&T iPhone 7 Data Usage Check for Current Period

Every new Apple handset user wonders how to check data usage on iPhone 7 or other model. We decided to mention the iPhone 7 and iPhone 7 Plus because these two models are the latest in the market. The company officially released both phones in the fall 2016 and a lot of customers expect to find one under their Christmas tree.

Why should you control data usage iPhone 7? Well, there were good old days when users enjoyed the true unlimited data. Those days are gone and although many of use still miss them you should keep a track of everything you perform with your smartphone. This includes both application and AT&T internet data usage. Learn how to save money or simply control your data on-the-go.

Let’s learn how to check data usage on iPhone 6, 7 and other models [remember to set up iPhone 7 as soon as you get it]. It’s truly doesn’t matter what Apple phone model you have. Besides, you might not even be locked to AT&T. This guide is devoted to AT&T iPhone data usage check as well as any other mobile operator in the USA or from across the world. The whole system is pretty similar anywhere you live or travel to.

Check AT&T iPhone Data Usage

Cellular Data Usage Current Period

If you need information about ‘data usage iPhone 7’ you can get it for free, especially if you are using AT&T as your mobile carrier. You don’t have to worry about your text and talk data since this is an unlimited offer by most U.S. networks. You are charged for mobile usage so this is what you should control.

Use one of the methods described below to get the information about your current billing cycle to avoid overcharges. You can check your data usage directly from your mobile device so this is fast, easy and free.

How to Check Data Usage on iPhone

Let’s start your AT&T internet data usage checking with the simplest method first. New iPhone 7 and older iPhone 6 users should take advantage of using star codes. What is this? Star code is a combination of symbols and numbers. You dial them and your smartphone quickly provides the information you seek to get.

For AT&T, you should use the special star code for iPhone data usage check. So here is what you need to do:

Step 1. Take your iPhone and make sure your carrier is AT&T. You will see AT&T icon at the left top menu of your screen.

Step 2. Launch Phone program on your handset.

Step 3. Click on your Keypad to start typing.

Dial *3282# to Check Cellular Data Usage AT&T iPhone 7

Step 4. Type in *3282# (if you need information in English) and dial it via a green Dial icon. Users who prefer to receive information in Spanish should dial a different combination of *3286# – this is also simple.

P.S. If you need to know how to translate the numbers above on your keypad: the words are DATA and DATO correspondingly.

Step 5. There will be an on-screen message with your personal data usage information.

It is also easy to learn your AT&T minutes via a similar method. The combinations are *646# for English version and *876# for users who prefer messages in Spanish.

myAT&T App for iOS 10 iPhone 7

iPhone Data Usage App for AT&T Network

If you are not a fan of star codes but still need to control your monthly data usage with AT&T you can download and use the free myAT&T application. It is available at the App Store and it’s a no-cost program that shows your billing cycle’s usage for ‘current data’ as well as information about past cycles. You can even get details about shared usage if you have subscribed to family Mobile Share data plan.
Anyways, you need to complete some steps before you get the information:

Step 1. Download and install the free myAT&T app.

Step 2. Launch the application on your iPhone 7 or other model.

Step 3. Log in using your AT&T account login / password.

Step 4. Go to Overview – Data menu.

How to Check AT&T Data Usage iPhone 7

Step 5. Get the details and you’ll see your data usage. Family members can see the information broken down via a pie chart. It’s pretty simple and detailed.

By the way, AT&T users always receive message alerts (via email or SMS) when they are about to reach their data limit per month. You can also call AT&T at 800-331-0500 if you need assistance or help.

You can always factory unlock iPhone 7 from AT&T or other networks and save even more on your data plans.