Can You Get Refunds on iTunes on Your iPhone or Mac?

Can you get refunds on iTunes? Many iPhone users ask this question when it comes to various problems with the store. You might have downloaded the wrong application or made an in-purchase by mistake. Well, there is iTunes refund request option and you can take advantage of it. This is not difficult to do so take your chance and ask for your money back.

It doesn’t matter if you only use your iPhone most of the time or prefer Mac or Windows PC for getting your iOS 10 apps or iOS 9 programs [enjoy some amazing and useful iOS 10 tips and tricks]. iTunes refund policy allows getting refund for App Store and iTunes purchases on both you smartphone and computer.

how-to-get-itunes-refund-on-iphone

How to Get a Refund from Apple App Store

It’s not a problem if you buy something you don’t need. It’s also not a big deal if the application you purchased turned out to be something you never expected. Right, when you have the wrong thing or don’t receive the item you were hoping to see you can request an Apple app refund. By the way, do you know how to send handwritten messages on iPhone 7 with ease?

Have anything like this happened to you? Were you too shy to ask for a refund? Don’t be shy. Follow our detailed guide and ask the famous Cupertino-based company to return your money. Here is what you should do if you are looking for web-solution:

Step 1. Firstly you need to follow ‘report a problem iTunes’ link so that the ‘fruit’ giant knows that something is wrong and you are not satisfied. Visit Apple issue reports website.

Step 2. Secondly you need to use your Apple ID / password to log in [make sure that this is the account that was used to purchase the wrong item]. Otherwise you cannot report the problems with programs you wish to get refund for.

Step 3. Now as you have successfully logged in you need to select the app purchase you are not happy with. Find it on the list.

Step 4. Select the app and click on Report [this option is located in to the right of the application title].

Step 5. Choose your reason for refund, add the description and submit your request online using your computer or iPhone.

How to Get Your Money Back from the App Store via Email

This method is a bit longer than the web-based solution still you are able to get your App Store refund using your email address:

Step 1. Take your newest 4.7-inch or 5.5-inch iPhone 7 or other smartphone model and make sure you have internet connection.

Step 2. Launch Mail application and find the app purchase receipt.

itunes-report-problem-receipt

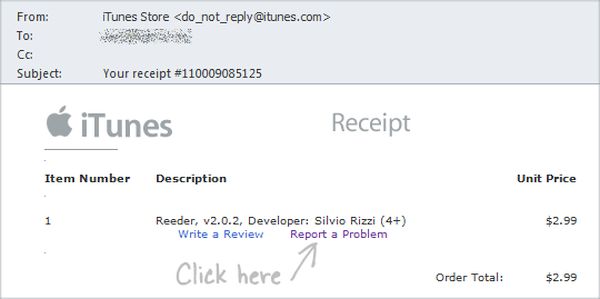
Step 3. Click on that receipt.

Step 4. You’ll be forwarded to the ‘fruit’ company’s problem report page.

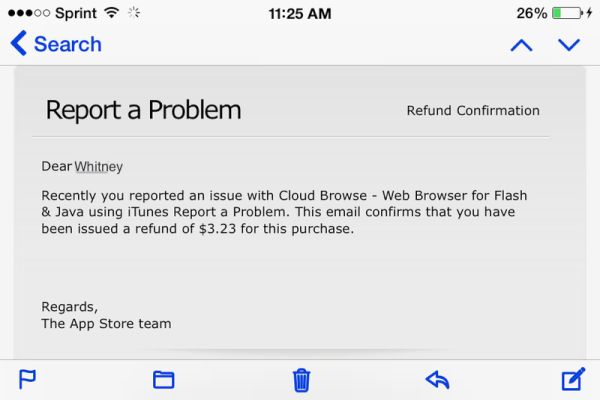
Step 5. Select the reason why you want to be refunded and fill in other details.

Step 6. Complete your Apple refund request by sending the email.

How to Get Money Back on iTunes on PC or Mac

Sometimes it is easier to fix refund App Store problem using your computer. This can be done on both Macs and PCs but only if you have iTunes installed on it. You are also advised to manually backup your iPhone just in case.

Step 1. Launch iTunes program.

Step 2. Just as it happens on your smartphone you should sign into your iTunes account with Apple ID and password once you select Account section. This menu is located on the right side.

Step 3. You’ll see your Purchase History menu.

Step 4. Select the See All option.

Step 5. Find the right purchase and tap on the arrow right next to it.

Step 6. Now press on Report a Problem option so that you can request your refund by letting Apple know about your reasons [please note that you will be taken to the ‘fruit’ site].

Step 7. Leave your request and wait for Apple in app purchase refund or app refund.

successful-itunes-app-refund

Once you complete your refund request you should wait for the company to read your explanation. It takes some time however you’ll be happy if the desire to get your money back has a good reason like an incorrect or unwanted purchase. Apple officially allows refunds for wrong purchases so this is the main reason you have to choose.

This year the Cupertino-based giant presented iPhone 7 and 7 Plus that look exactly as previous iPhone 6s / 6s Plus but boasts some nice changes. For example, you can get 256GB model in 2016 or wait a year for the bigger upgrade expected along with iPhone 8 launch. No matter what model you decide to get you can always SIM unlock iPhone from any U.S. network and worldwide carrier using safe, fast and affordable service.

How to Customize iPhone 7 or iPhone 7 Plus without Jailbreaking It

The simple iPhone 7 user guide explains how you can customize your smartphone without major efforts. It is currently impossible to jailbreak this model which arrives with iOS 10 pre-installed on it. Let’s see how you can bring customizations to your handset and get acquainted with curious iPhone tweaks that are available to all users.

There are a lot of great iPhone 7 features [for example, you can enjoy wireless charging on iOS 10] and you have plenty of time of exploring all the options and adding the interesting touches to make your ‘fruit’ experience simply perfect. Everyone want’s to be a pro and this is something you can do right here right now.

How to Customize iPhone 7 Guide

How to Customize iPhone Without Jailbreak

There are so many things you can do with your smartphone. Here are some of the best changes you are welcome to add or adjust on your 4.7-inch iPhone 7 or 5.5-inch iPhone 7 Plus. These both phones look like previous generation models yet they have some long-awaited features including improved cameras, better batteries and more storage capacity.

iPhone 7 Wallpaper

  • iPhone 7 Wallpapers

You can easily set new wallpapers on your handset [find out whether you have CDMA or GSM iPhone model]. The guide is simple:

Step 1. Launch Settings on the iDevice and select Wallpaper – Choose a New Wallpaper option.

Step 2. Choose the image or wallpaper you wish to use and press on Set option you’ll find at the lower part of the screen. It says Set Lock screen / Home screen however you can choose both options.

iPhone 7 Display Zoom

  • Cool iPhone 7 Features with Display Zoom

iOS 10 users can enjoy the awesome display zoom feature to get to all the details on their newest Apple handset. Still experiencing no SIM card issue on iPhone? Here is how to use this option:

Step 1. Go to Settings app.

Step 2. Choose Display & Brightness section where you will find Display Zoom option.

Step 3. Click on Zoomed option and press on Set – Use Zoomed and wait for the smartphone to restart.

The same instruction will help you to revert changes. Just select ‘Use Standard’ in the last step and your phone will use a bit less battery life afterwards.

How to Reboot iPhone 7

  • Quick Reboot iPhone 7 User Guide

The latest generation phones use a different reboot option:

Step 1. You should click and hold the On / Off option that is placed on the right side of your device.

Step 2. Now you need to click and hold the Volume down option found on the left side of the smartphone while you are still holding down the On / Off button.

Step 3. While you are pressing two buttons at the same time your display will turn off and get back on. You’ll see Apple logo and this means you have successfully rebooted.

Choose iPhone 7 Home Button Click

  • Cool iPhone Tweaks No Jailbreak for Home Button

You can adjust the click intensity for the integrated Home button on iPhone 7 Plus and iPhone 7 and change its click speed without any issues:

Step 1. Go to Settings and select General – Home Button.

Step 2. Choose your click intensity from Light, Medium and Heavy [options 1, 2 and 3 accordingly] and test your button.

Step 3. Choose Done when you like the speed.

Step 4. You can adjust the click speed by going to Settings – General – Accessibility where you can select Home Button.

Step 5. You will see three speeds right below Click Speed. Select one of the following: Default, Slow or Slowest and adjust the speed to your personal needs.

How to Customize iPhone 7 Siri Without Jailbreak

iPhone Customization for Siri

You can do so many different things with Siri on iPhone 7. Change its language, adjust the settings and make your personal assistant must-use in your everyday life.

How to Change iOS 10 Siri Language

Step 1. Go to Settings and choose Siri.

Step 2. You need to select Language and choose the one you wish to use. It can be English, Hindi or any other option. It’s up to you how you want your personal assistant to talk to you.

How to Select Siri Voice on iOS 10

You know that Siri can be female or male and you are the one who choose the accent.

Step 1. Launch Settings and select Siri option.

Step 2. Select Siri Voice and choose the accent from Australian, American or British English.

Step 3. Point to gender: male or female and you are done.

Changing Contacts in Siri

Step 1. Your iOS 10 assistant can call your friends or anyone else once you change contact information by launching Settings and choosing Siri. Also learn how to block spam calls on your iPhone 7.

Step 2. Go to My Info and you will see your contact list.

Step 3. Select data that Siri will use.

There are other methods to add ‘custom’ changes to Siri and other parts of iOS 10 firmware version to make it interesting and useful in all the ways you can think of. We are sure you can customize iPhone 7 to your personal likes and enjoy using this Apple phone for at least 2016-2017 since the next year the company is expected to unveil a major iPhone 8 upgrade and a lot of customers might be happy to get the newest model as soon as it is officially released.

iOS 10 Useful Tips: How to Use Health App on iPhone 7

The newest iOS 10 specs make some users curious especially if they didn’t have a chance to update yet. Apple released this firmware version and even updated it a couple of times in September. Who can win from installing this operating system? Let’s pay closer attention to iPhone health app that is improved in iOS 10 and brings some great features to love.

We won’t focus on what’s new in iOS 10 because this is the topic for a different post. We want to talk about iOS 10 health application and the changes it has introduced to ordinary users with iPhone 7 or older smartphone models. We should note that some iPhone 5 users report some issues after installing the latest firmware because it slows down their gadget. iPhone 7 and 7 Plus owners have other problems but most of them can be fixed with ease.

iOS 10 Health App What's New Improvements

iOS 10 Tips and Tricks for iPhone Health App

The following secrets are for users who wish to master iOS 10 like a pro. The updated program can help you stay fit and healthy. It can track your activities and share accurate details on your heart rate, blood pressure etc. You just need to learn how to use the tool in you everyday life.

Apple made its popular iOS 10 health application a real must-have. It has advanced features and new sections added compared to the previous iOS 9 version. This app is a stock one. You get it by default and it is free to use. So why not taking this advantage and reach your health goals using the smartphone and no-cost program?

The enhanced Health app offers new Today menu, better Health Data section and other improvements you will really enjoy. Here is how you can use this program and get the most out of it:

Step 1. Let’s explore what’s new in iOS 10 Healthy program by launching it on your long-rumored iPhone 7 or older model.

iOS 10 Health App Today Section

Step 2. Choose Today section and find your day’s health data by scrolling down or up. You can also find data of yesterday and other days by swiping to the right. Another way is to click on the particular date you’ll see at the display’s top.

Step 3. You can choose Subject to get details about your health or get data for time periods such as week, month, year.

The Health iOS 10 specs also allow you turn on Health data for any third-party or Apple app that supports such a function. By the way always remember to backup your iPhone before you do anything. Here is what you need to do:

Step 1. Launch Health on your iDevice.

Step 2. Go to Select a category and choose your subject [what information you wish to receive].

Step 3. You need to choose Data Sources & Access section to continue.

Step 4. You will find ‘Edit’ option located at the upper right corner of the screen. Click on it and you’ll be able to proceed.

Step 5. You will see the list of applications which can show your health data if you choose so. Just check mark the field right next to the app name and you will enable your Health Data option for this particular app. Select as many applications as you need.

Medical ID on iPhone Emergency Health App Guide

The cool iOS 10 features [you can upgrade to new iPhone 7 online] make it possible to access Medical ID when you need it pretty fast. This is a nice addition but you should learn how to enable this option:

Step 1. For cases of emergency it’s always nice when you can access Medical ID with a click. Open Health application to start.

Step 2. Select Medical ID section which you will find at the lower right part of the screen.

Step 3. Click on the Edit option you’ll see at the upper right part.

Step 4. Enable the option called Show When Locked. You just need to switch on this feature.

Step 5. Now you can lock your device and test how the quick access to your Medical ID works.

Step 6. Just press or touch your Home button and you will see your passcode window.

How to View Medical ID on iPhone iOS 10

Step 7. Select Emergency section at the lower left part of the screen and press on Medical ID you’ll see at the top.

Step 8. Your Medical ID will be shown.

Step 9. Remember to press on Done to close this information.

There are a lot of applications that support Health Data on iOS 10. You can see all of them by going to Health app – category – Recommended Apps where you will find different programs you can download for free or buy. You can install this operating system to get all its features on iPhone 6s and SE lineup. Find out whether your iPhone 6s or iPhone SE is locked or unlocked if you got it from T-Mobile carrier.

We hope our short guide to the improvements brought to Health data on the newest firmware for iPhone users is something you can find useful.

How to Use iPhone 7 Wireless Charging Option

The release of the new Apple smartphones caused many rumores about new iPhone wireless charging possibility. This option is already offered by some of well-known competitors so seeing such an addition to the popular ‘fruit’ handset lineup was something to be expected. What can we say about the reality? Has Apple introduced the long-awaited option?

The idea of seeing iPhone 7 wireless charging faded as soon as the Cupertino-based company presented the two new smartphones to customers. You are still able to charge your newest handset wirelessly.

We’ll share a simple guide to walk you through the wireless charging procedure. Hopefully Apple will present this opportunity to all users in 2017 along with the new smartphone upgrade which is believed to be a major one [there are so many Android smartphones out there with the simple wireless charging technology that it becomes painful for some ‘fruit’ fans that they are not able to enjoy the option by default]. We have heard so many rumors about iPhone 6 wireless charging, iPhone 7 improvements and nothing has happened at the official level. Still there are always methods you can try and reach your goal, aren’t there?

iPhone 7 Wireless Charging

New iPhone Wireless Charging: How to Guide

Some work has to be surely done on your end. Forget about iPhone 6 wireless charging and let’s focus our attention on the newest iPhone 7 with A10 processor, improved cameras and other curious features and options. Some customers believe that the iPhone 7 and 7 Plus are not worth upgrading to because their design is the same as iPhone 6 and 6s lineup. Others are happy to get this latest generation model because of its dust and water resistance and interesting updates Apple offers.

Firstly, you can find the wireless charging card receiver. You can search your local stores or online shops for the cheapest or most affordable accessory. For example, you can look at Leapcover or find a similar Qi receiver [this one is priced at around $10]. Your wireless iPhone charger should work similar to the process described below. Secondly, we offer a fast glimpse at what you can expect and how the whole iPhone 7 wireless charging idea works.

iPhone Wireless Charger

Step 1. It is necessary to plug in your lightning cable to the receiver you found. This way you’ll be able to place the cable over your phone’s back.

Step 2. It is needed to also find a thin case on the handset before you can put the gadget on the charging pad.

Step 3. Start charging wirelessly.

As you can see your iPhone 7 charging options still require using the lightning cable. This is what users hope to get rid of completely. At the same time getting additional accessories does require cables because this is the only way to connect the handset to charge it.

This is a different method of enjoying both iPhone 7 features and wireless charging. If you are not a fan of a charging station with just any case you can search for a special charging case that is designed specifically for your iDevice. Right, you still need to find additional accessory developed for the latest Apple smartphone model and use it to charge your device. You’ll have to place the device into the case and then on the charging pad.

iPhone 7 Wireless Charging Reports

iPhone 7 Wireless Charging Dreams

It would be great if Apple adds the wireless charging feature to the phones one day. Customers are always happy when their experience requires no efforts. With the current iPhone models it is impossible to find a simple and quick way to charge the smartphone without a cable while other well-known companies release handsets with this technology already built in.

Apple takes steps to improve its devices. This year it took a step towards waterproof and dust resistance along with built-in Home button with touch sensitivity, better batteries, more storage capacity [the old 8GB and 16GB models are in the past and users can enjoy 32GB, 132GB and 256GB models] and improved cameras.

The next year phone is already awaited by millions of ‘fruit’ fans. 2017 is when Apple celebrates the iPhone’s 10th anniversary. This is the main reason why experts and customers are talking about design upgrade and major changes that could be added to the next iPhone 8. Could it finally get the wireless charging option or not? What do you think?