It’s great to have files from your phone saved on your computer [it is also possible to download videos from YouTube to your phone]. This way you will not lose them in case anything happens after firmware update, restore or other processes. Are you ready to sync iPhone to PC when Windows 10 not recognizing iPhone? It can happen unless you follow the step-by-step guide on how to sync the handset to personal computer with the most recent operating system version.
Keeping files up-to-date is possible and you can do this after you download iTunes for Windows 10 64 bit. Not every Apple fans has a Mac computer. There are people with iPhone and PC. This means you should use your personal computer and iTunes for Windows 10 (make sure the program supports this platform otherwise you won’t be able to use it). Learn how to reduce iPhone mobile data usage without issues.

iTunes Download for Windows 10
This is the easiest thing to do. You should search for iTunes download 64 bit for your operating system, get the link, download the program and install it. Maybe you already have this desktop tool. In this case you should upgrade it to the most recent release on your computer.
It’s not necessary to keep all your music files, films and TV shows on your smartphone. It’s much better to sync the iPhone to PC and and keep your content on the computer.
How to Sync iPhone to Windows 10 via WiFi Network
Step 1. It becomes possible to transfer content between iPhone and Windows PC once they are synced. Take your Lightning to USB cable and connet the handset to your computer.
Step 2. You need no Windows 10 iPhone driver since you only need the right iTunes version.
Step 3. Launch iTunes. The program will take a moment to recognize your iDevice.
Step 4. Press on the iPhone button that is available in the upper left menu.
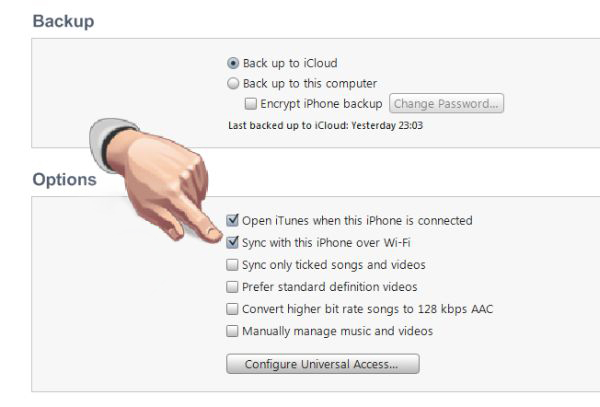
Step 5. Scroll down. You should get to the bottom so that you can turn on WiFi option.
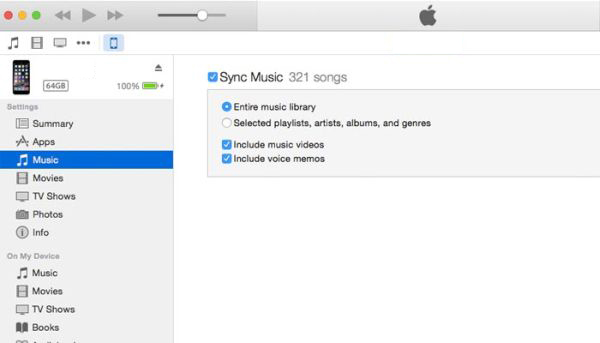
Step 6. You should check boxes next to several menu options. Firstly, this includes Sync with this iPhone over WiFi connection. Secondly, you should press on Music that can be found on the left and enable the box next to Sync Music. Repeat the same step for other content such as Photos, TV Shows and Movies.
Step 7. Press on Apply feature.
Step 8. Now click on Sync to enable it.
Congratulations! You have successfully synced your handset (maybe iOS 10 iPhone 7 or one of many previous models) with Windows 10 machine. Now when you connect to WiFi your gadgets will be automatically synced if they are connected to the same network.
Guide for iPhone Syncing to PC via Cable
Sometimes you have no internet connection. Is there a way how you can sync your phone to Windows 10 without WiFi? You can use your Lightning cable or 30-pin USB cable depending on the model of your handset. Here is what you should do:
Step 1. Your iTunes program should be updated to the most recent release. Update it if necessary before you launch it.
Step 2. Take the cable to connect your iDevice [here is how to factory SIM unlock your iPhone 6s] to your Windows PC.
Step 3. Select your phone from the upper left menu.
Step 4. There will be Music option on the left menu. Click on it.
Step 5. You can now enable Sync Music feature. This way your music can be synced with your computer.
Step 6. Enable Sync options for Photos, TV Shows and Movies.
Step 7. You’ll have to confirm your decision by pressing on Apply.
Step 8. Now complete the procedure via Sync button.
That’s it. Use one of the methods described above to sync your files between the phone and PC. By the way, if you want to do the same thing on your Mac you can [here are some great MacBook pro touch customization tips]. Just use the iTunes version for your Apple machine and you’ll be happy with the results.
It is wonderful when you can transfer your files between devices but also remember to back up your iPhone via iTunes or iCloud once in a while. This way you can protect not only your music, movies and other files but also contacts and personal information.