Modern world seems to offer Internet connection everywhere. iPhone users can connect to WiFi nearly everywhere [do you know that Sprint iPhone 2-year contract is back?] still sometimes there is no available network and this is when Google Maps offline iPhone comes handy.
We’ll explain how you can save offline Google Maps iPhone and use maps anywhere you are. Apple has its own Maps application for smartphones [the company’s March Event announced new 2016 models] still a lot of users prefer using Google Maps and offline maps are one of the reasons why ‘fruit’ device owners choose this tool over stock iOS program.
How to Save Offline Google Map on iPhone
Step 1. Make sure you install Google Maps on your handset. This is a free tool and you can find it on the App Store. Many users have it already installed on the iPhone.
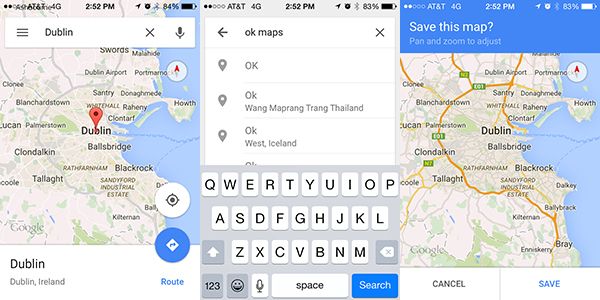
Step 2. Launch Google Maps and find the location / area you wish to save for using offline.
Step 3. Have you found the maps you want to save? Click on menu icon [it looks like 3 horizontal lines] and select Offline Areas [this instruction should work on the new iPhone SE as well].
Step 4. Here click on the Plus [+] icon and select the exact location by zooming and pinching around.
Step 5. Keep in mind that bigger maps download slower. Now click on Download and add the title to your map.
Step 6. Press on Save and wait till the map is downloaded to the iPhone. The map will be saved for 30 days. Once the month is over it will be automatically deleted by Google from the iPhone. It happens in order to save your space.
Step 7. You can re-download offline maps from Google Maps as often as you need.
Hopefully this guide on how to use Google Maps offline on iPhone is helpful to you.